A Practical Guide for Chinese Users: Powering Codex with DeepSeek

A step-by-step guide to running Codex with DeepSeek for users who lack a ChatGPT account.
This guide walks Chinese users through configuring DeepSeek as the underlying model for OpenAI's Codex using a third-party tool called Codex++ Manager. By intercepting Codex's API requests and redirecting them to DeepSeek's endpoint, users can bypass ChatGPT account and network restrictions while enjoying a near-identical feature experience at a fraction of the cost.
Article
OpenAI's Codex is increasingly regarded by developers as an essential AI coding tool. As an AI system deeply fine-tuned on code generation using the GPT model series, Codex has been trained on billions of lines of open-source code across dozens of programming languages — including Python, JavaScript, Go, and Rust — and can transform natural-language descriptions directly into runnable code. It first appeared as the core engine behind GitHub Copilot, and has since evolved into an autonomous "Coding Agent" capable of breaking down tasks, executing terminal commands, and iteratively fixing errors.
For users in China, however, there's a significant barrier: the official product requires a ChatGPT Plus account to log in, making both the network environment and subscription fees a hurdle. This article outlines a practical, unofficial-but-effective solution — using a third-party management tool to replace Codex's underlying model with the domestic large language model DeepSeek, so users without a ChatGPT account can still get started.
Two Approaches: Official Login vs. Domestic Alternative
Before diving in, it's important to understand that there are two completely different paths.
If you already have a ChatGPT Plus account and a suitable network environment, the simplest approach is to download the official Codex and log in with your ChatGPT account — no extra configuration needed. This is the most straightforward option and is recommended for overseas users or those who already have a subscription.
For most users in China, however, the triple barriers of account access, subscriptions, and network restrictions often exist simultaneously. The alternative is to install the native Codex, then use a third-party tool called Codex++ Manager to modify its login method and configure DeepSeek (or other domestic models like Doubao) as the underlying model.
It's worth noting that this type of third-party tool does not modify Codex's core functionality — it only changes the login and model integration method. As a result, the feature experience is essentially the same as the official version.
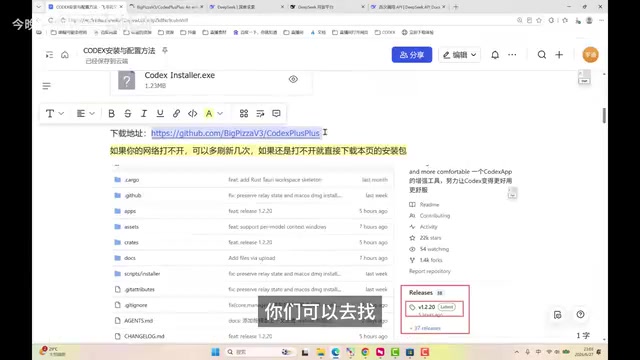
Step 1: Install Codex and the Management Tool
The entire process requires downloading two pieces of software.
The first is the native Codex installer. Windows users can open the system Store, search for "Codex," and click to download and install it for free. Mac users follow the same steps in the App Store. This is a standard online installation, no different from installing any other app.
Important: Once installation is complete, do NOT open Codex directly. Opening it directly will prompt you to log in with ChatGPT — which is exactly what we want to bypass.
The second software is Codex++ Manager. After installation, three related programs will appear on your system: Codex, Codex++, and Codex++ Manager. Make sure you choose the right one — open Codex++ Manager. The other two are not needed at this stage.
Codex++ Manager acts as an "API proxy layer." It intercepts network requests made by Codex locally and redirects traffic that would normally go to OpenAI's servers to a user-defined API endpoint. This approach is common in the tech community — tools like Ollama and LM Studio use similar methods to make local or third-party models "impersonate" an OpenAI-compatible interface for use with other software. A note on security: obtain the tool from official channels or open-source repositories to ensure trustworthiness, and rotate your API keys regularly to prevent leaks.
Once the management tool is open, you'll see a feature-rich interface — but we only need one section: provider configuration.
Step 2: Configure DeepSeek as the Underlying Model
In the left sidebar of the management tool, click Model Provider or Provider Configuration. By default, there's usually only one entry. Click Add Provider and fill in the following fields:
Basic Information
- Name: Customize this for your own reference — for example, "My DeepSeek."
- Access Mode: Select Pure API. This is the core logic of the entire configuration. An API (Application Programming Interface) is the standard protocol for communication between software systems. Choosing "Pure API" means Codex no longer requests computing power from OpenAI through an account system — instead, it fetches model inference results from DeepSeek's API endpoint. Once you understand this logic, you can apply the same method to any model that supports OpenAI-compatible protocols, such as Qwen or Doubao.
- Base URL: Enter
api.deepseek.com. The Base URL is the base address for API requests — think of it as the "street address" of the server. Copy and paste this directly to avoid typos.
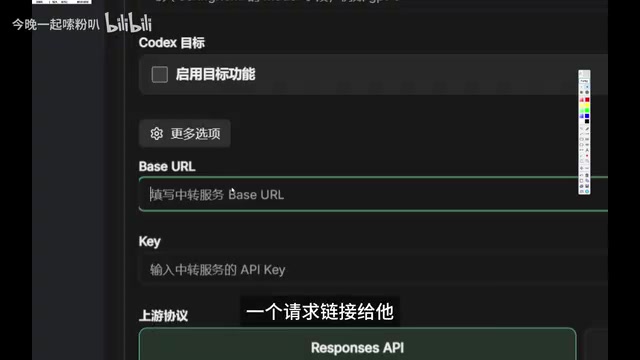
Obtaining and Entering Your DeepSeek API Key
An API Key is an identity token — it's the unique identifier for your DeepSeek account. It proves that you are the one calling DeepSeek's service, and token usage is billed to your account accordingly.
There's a compelling reason to choose DeepSeek as the underlying model beyond easy integration: cost-effectiveness. DeepSeek, developed by a team under High-Flyer Capital Management, uses a Mixture of Experts (MoE) architecture in its V3 version. Only a subset of parameters are activated during inference, dramatically reducing compute costs — with API pricing approximately one-tenth that of comparable GPT-4o models. At the same time, DeepSeek performs impressively on major coding benchmarks like HumanEval and SWE-bench, making it one of the best value-for-money options among publicly available domestic APIs.
To get your API Key: go to the DeepSeek official website, navigate to the API Open Platform, and click Create on the API Keys page. Important: A newly created key is only displayed in full once. Copy it immediately and save it to a local file or notepad. Once you close the page, you cannot view it again — you'll have to create a new one.
Paste the copied API Key into the corresponding field in the management tool, leave the protocol option at its default on the right, and click Fetch from Upstream. If the configuration is correct, the system will automatically retrieve the list of models currently available from DeepSeek.
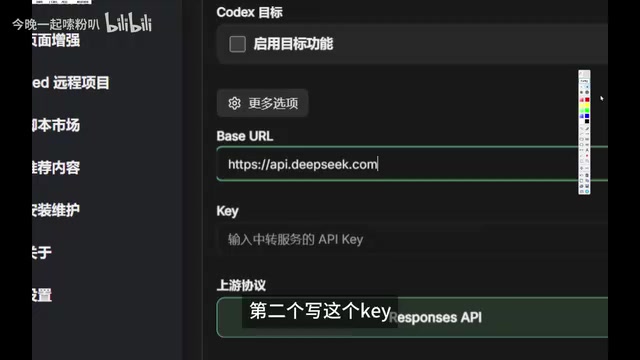
Successfully retrieving the model list confirms that both the Base URL and API Key are correctly configured. Scroll up to find the Save button and save. After saving, your newly added provider will appear in the provider list. Hover over it and click Use on the right — once the status shows In Use, the switch is complete.
Step 3: Top Up Your Account and Launch Codex
Completing the configuration doesn't mean you're ready to run immediately — you'll also need to make sure your DeepSeek account has a balance, otherwise the model won't actually work.
Simply top up on DeepSeek's recharge page. Based on real-world usage, DeepSeek's API pricing is extremely affordable — even running multiple tasks at high frequency all day, a month's cost is only around 100 RMB. For most learners, a 10 RMB top-up is more than enough to complete the majority of introductory exercises.
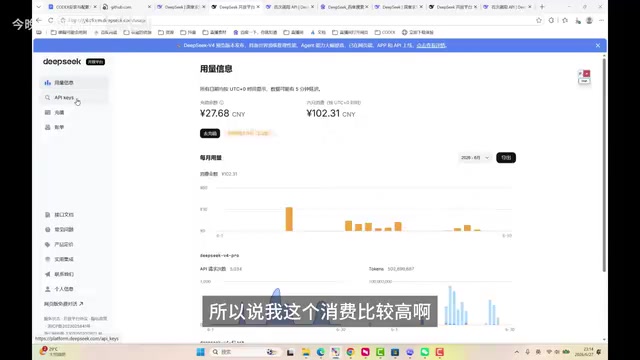
Launching Codex Correctly via the Management Tool
Once topped up, return to the top-right corner of the management tool and click Restart Codex++. Again: always launch through the management tool, not by opening Codex directly. Only this way will the model replacement configuration take effect.
After launching, a login prompt will appear:
- The first option is Sign in with ChatGPT — do not select this;
- The second option is Sign in with another method — select this one.
After clicking, you'll be prompted to enter an OpenAI API Key. Paste your DeepSeek API Key here and click Continue. The first login may take a moment.
Once inside the main interface, check the model selection menu in the bottom-right corner and confirm that you can select the DeepSeek model you configured (e.g., DeepSeek V3 Pro). The Pro version is generally recommended for best overall performance. At this point, the entire setup is complete.
Trends Worth Watching
At its core, this solution is a "bridging" approach — using the shell of an OpenAI tool while running a domestic model as the engine underneath. It effectively addresses the real pain points facing users in China today, but it also carries a potential risk tied to third-party tool stability: if an upstream Codex version update changes the interface, the tool may experience temporary compatibility issues. This is a trade-off inherent to any third-party bridging solution.
From a broader perspective, this approach also reflects the industry evolution of AI coding tools. From GitHub Copilot to Cursor, Windsurf, and Codex, coding tools went through a generational leap between 2023 and 2025 — from "code completion" to "autonomous coding agents." Meanwhile, the emergence of a multi-model ecosystem is pushing the tool layer toward "model-agnosticism" — tools focus on providing workflows and interfaces, while users freely choose the underlying model. The Codex team has already signaled plans to natively support third-party model integration, a natural step in line with this trend. Once that feature launches officially, users will be able to configure DeepSeek, Doubao, and other domestic models directly — no tools like Codex++ required — lowering the barrier for users in China even further.
For non-developers, the greatest value of this workflow is what it demonstrates: the barrier to using AI coding tools is dropping rapidly. Once you understand the core logic of "API integration," the method applies no matter which model or tool you switch to next. Learn it once, and it scales to everything.
Key Takeaways
Related articles

Network Doctor: An Open-Source Terminal Tool for Network Fault Diagnosis
Network Doctor is an open-source terminal network diagnostic tool that integrates ping, dig, curl, and traceroute, automatically detecting connectivity in stages and outputting fault conclusions in natural language.

LangChain Guardrails Explained: Building Safe and Controllable AI Agents
A detailed guide to LangChain Guardrails covering layered ecosystem architecture, middleware implementation, deterministic and model-driven protection for building production-grade secure AI Agents.

Deep Dive into Microsoft's AI Security Tools: Does Performance Really Surpass the Competition?
Microsoft launches enterprise AI security tools claiming superior performance. This deep analysis examines core capabilities, ecosystem advantages, and risks to guide enterprise security decisions.