ChatGPT Registration Guide: Complete Walkthrough for Codex Account Creation and Phone Verification

A complete step-by-step guide to ChatGPT registration and Codex phone number verification.
This guide helps developers navigate the common pitfalls of setting up OpenAI Codex by explaining the correct registration order: first create a ChatGPT account (domestic email supported), then log into Codex, and finally complete phone verification using a foreign number from a third-party platform. It also explains why registering directly in Codex causes errors and provides solutions for common issues like 403 errors.
Article Content
OpenAI's Codex coding assistant has been taking the developer world by storm — yet many developers get stuck at the most basic step: creating an account. You've read through countless tutorials, but still can't get your account set up. This guide walks you through the entire process from scratch, covering ChatGPT account registration, Codex login, and phone number verification, along with solutions to the most common errors.
What Is OpenAI Codex?
OpenAI Codex is an AI coding assistant built by OpenAI, fine-tuned from the GPT family of large language models specifically for code generation tasks. It understands natural language descriptions and converts them into runnable code, supporting dozens of mainstream programming languages including Python, JavaScript, TypeScript, Go, and Ruby. Codex is the underlying engine powering GitHub Copilot, and the core driver behind OpenAI's standalone client and VS Code extension. Unlike general-purpose conversational models, Codex was trained on a massive corpus of open-source code from GitHub, giving it far superior performance on tasks like code completion, function generation, and bug fixing. This exceptional programming capability is why Codex has quickly become one of the hottest topics in the developer community.
Why You Can't Register Directly in the Codex Client
One of the most common mistakes is opening the Codex client and trying to register or log in directly. This approach will almost certainly trigger a "verification mismatch" error.
The root cause lies in OpenAI's OAuth 2.0 authentication architecture. The Codex client does not maintain its own user account system — it relies entirely on OpenAI's unified identity platform (auth.openai.com) for SSO (Single Sign-On). When a user initiates the registration flow directly from the Codex client, the client attempts to create a session on the authentication server. However, since the account hasn't completed initialization on the main platform (including email verification and terms of service acceptance), the conditions for issuing an authentication token are not met. This causes a mismatch between the session state and what's expected, triggering the verification mismatch error.
The correct approach is: complete account registration on the ChatGPT website first, then use that account to log into Codex. Registering on the ChatGPT website in advance ensures your account completes the full initialization process in OpenAI's identity center, laying the groundwork for subsequent OAuth authorization requests from Codex. The order matters — reversing it will cause problems. The overall process has three steps:
- Register an account on the ChatGPT website
- Log into Codex using your registered account
- Complete phone number verification
Step 1: Register a ChatGPT Account
Start by opening the ChatGPT website (chat.openai.com) and clicking the "Sign up for free" button.
When it comes to entering your email address, the good news is that domestic Chinese email addresses are fully supported — QQ Mail and 163 Mail both work fine. You don't need a foreign email account.

Here's what to do:
- Enter your email address (e.g., a 163 Mail address) and click "Next"
- The system will prompt you to check your inbox for a verification code
- Go to your inbox, find the verification email from ChatGPT, and copy the code
- Paste the verification code into the registration page and click "Continue"
- Fill in your name (any name works) and age (must be 18 or older)
- Click "Finish account creation"
Once you've completed these steps, your ChatGPT account is successfully registered. Click "Skip" on the onboarding page, and you'll see the GPT interface logged in with your 163 Mail account.
Step 2: Log Into Codex Using Your ChatGPT Account
With your ChatGPT account ready, you can now log into Codex.

Whether you're using the standalone Codex client or the GPT extension in VS Code, the process is the same:
- Open the Codex app or VS Code extension
- Click "Continue with ChatGPT"
- The system will automatically recognize the ChatGPT account you just registered
- Click "Continue" to proceed to phone number verification
Because we completed registration on the official website in advance, the account is already initialized in OpenAI's identity center — so you won't encounter the "verification mismatch" error at this step.
Step 3: Complete Phone Number Verification
Phone number verification is the most involved part of the registration process. You'll need to obtain a foreign phone number capable of receiving SMS messages through a third-party platform.
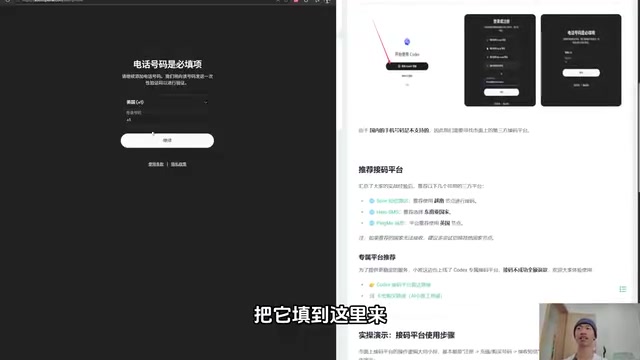
Why is a foreign phone number required? Phone number verification is a key part of OpenAI's anti-abuse strategy. Because AI services are at risk of being exploited through bulk account creation to abuse APIs or drain free-tier credits, OpenAI uses phone numbers as one signal of a "real user." OpenAI currently does not support phone numbers from mainland China (+86), Hong Kong (+852), or several other regions for verification. You'll need to use a third-party virtual number platform (such as SMS-Activate or 5sim) to obtain a foreign virtual number that can receive SMS messages. These platforms offer pay-per-use temporary number rental services — pay a small fee to get a real foreign number that can receive a one-time verification code, then release the number once verification is complete.
Verification Steps
- Obtain a foreign phone number from a third-party number platform (US numbers are recommended)
- Copy the number and enter it on the Codex verification page
- Important: If you selected a non-US number, make sure to choose the corresponding country/region in the dropdown menu
- Click "Continue" — the system will send a verification SMS to that number
- Go back to the number platform to retrieve the verification code
- Paste the code into the Codex page and click "Continue"
Once verification passes, Codex is ready to use.

As shown above, after a successful login you can immediately ask Codex questions and receive normal responses — confirming that the entire registration and verification process has been completed successfully.
Common Errors and Solutions
In practice, many users run into various errors along the way. Here's a prioritized troubleshooting guide:
1. Try Logging In Again First
Don't panic when you see an error. Start by trying to log in again 2–3 times — many issues are temporary and resolve on their own after a few attempts.
2. Clear Third-Party API Configurations
If you've previously configured a third-party API (such as a custom API proxy), it's recommended to delete the related configuration files and reinstall the Codex client before attempting to log in again.
The reason this causes conflicts: third-party API proxy configurations are typically stored locally as JSON or YAML files, and they modify the client's default API endpoint. When a user tries to log in through the official OAuth flow, if the client still reads the leftover proxy configuration, it will route authentication requests to the wrong address — causing the authentication flow to fail or return an unexpected response. Completely deleting the configuration files and reinstalling the client ensures all network requests are directed back to OpenAI's official servers, eliminating the configuration conflict.
3. 403 Error: Country/Region Not Supported
If you keep encountering a 403 error indicating that your country or region is not supported, this typically means your current network environment has been flagged. Try switching to a different network node and attempting the login again.
Related articles
 Tutorials
ChatGPT Plus Subscription Guide: Are GPT-5.5, image-2, and Codex Worth the Upgrade?
A detailed look at ChatGPT Plus features — GPT-5.5, image-2, and Codex — with a Plus vs Pro comparison and a complete step-by-step subscription guide for users outside the US.
 Tutorials
Harness AI Engineering in Practice: Using Claude Code to Master Enterprise-Level E-Commerce Development
Deep dive into Harness AI Engineering: master enterprise e-commerce development with Claude Code using the Rules, Skills, Wiki, and Changes framework.
 Tutorials
Cursor + Codex Dual-IDE Collaboration: A Practical Methodology for Open-Source Project Customization
A complete methodology for open-source project customization based on real-world experience, detailing the Cursor+Codex dual-IDE workflow, seven-stage process, MVP validation, and AI source code reading techniques.