The Complete AI Character LoRA Training Workflow: Hands-On Multi-Character Consistency Generation with Local Deployment

A complete local workflow for training AI character LoRAs and generating consistent multi-character interactions for free.
This article systematically covers the complete workflow for locally deploying AI character generation—from the five golden rules of LoRA training and automated ComfyUI dataset construction to hands-on comparisons of the Crea2, Ideogram4, and Wan models. It shows how to achieve consistent multi-character same-frame interaction, all running free on personal hardware.
Introduction: A New Era of AI Character Consistency
For a long time, keeping AI-generated characters consistent across different scenes has been a core challenge for content creators. In the early days of training multi-character LoRAs with Flux, images frequently ended up with the catastrophic result of "characters blending into each other," or you were forced to rely on Regional Prompting techniques that demanded extremely high hardware performance.
Regional Prompting is a technical approach within the Stable Diffusion ecosystem that divides the canvas into multiple independent regions and assigns separate prompts to each. Its principle is to apply differentiated text guidance to different spatial regions during the denoising process, thereby achieving independent control over the content at different positions in the image. The underlying implementation of this technique relies on the diffusion model's Cross-Attention mechanism—by selectively matching text embeddings with image features at specific spatial locations at each denoising step, different regions respond to different text conditions. However, this technique has several notable limitations: first, bleed-through easily occurs at region boundaries, meaning the visual elements of different regions contaminate one another; second, it requires precise coordinate settings for each region, making debugging costly; and more importantly, when multiple character LoRAs are loaded simultaneously, feature-space interference between different LoRAs often leads to facial fusion or feature misalignment between characters—this is because multiple LoRAs modify the same set of attention layer weights at once, and when the directions of their low-rank matrices conflict, the decoder cannot correctly distinguish the identity features of the two characters within the same forward pass. This is precisely the root technical cause of the "characters blending together" problem.
With the emergence of a new generation of open-source models, the situation has fundamentally changed. Now, you can not only create an entire set of AI characters but also have them perform and interact within the same scene. More importantly, these open-source models have reached a level of photorealism that rivals or even surpasses closed-source tools such as ChatGPT and Nano Banana Pro—and they can all run locally on personal hardware, completely free.
This article will systematically walk through the complete workflow, from dataset construction and LoRA training to multi-character interaction and dynamic video generation.
The Core of LoRA Training: Five Golden Rules
LoRA (Low-Rank Adaptation) is a small file that attaches on top of a large foundation model. The foundation model already knows "what humans generally look like," but it doesn't know what your specific character looks like. The essence of training a LoRA is feeding the model a large number of images of a specific character so that it learns that character's visual features.
LoRA was originally proposed by Microsoft Research in 2021 as a parameter-efficient fine-tuning method designed for large language models (LLMs). Its core idea is: without modifying the original model weights, it approximates full parameter updates by inserting two rank decomposition matrices into the model's attention layers. Specifically, for a weight matrix W (of dimension d×k), LoRA decomposes its update ΔW into the product of two small matrices BA (where B is d×r, A is r×k, and r is much smaller than d and k), and only trains A and B instead of directly updating W. This approach compresses the number of trainable parameters to just 0.01%–1% of the original, drastically reducing memory usage. In the field of image generation, the Stable Diffusion community was the first to introduce LoRA into diffusion model fine-tuning, primarily applying it to the Q, K, V projection matrices of the Self-Attention and Cross-Attention layers within U-Net or DiT architectures, enabling ordinary consumer-grade GPUs (such as the RTX 3090 with 24GB of VRAM) to complete model customization training. LoRA files are typically only a few MB to a few dozen MB in size, making them extremely easy to distribute and share compared to complete model checkpoints that often run into several GB. This is a key reason for LoRA's rapid popularization within the creator community.
The following five rules are the key to training high-quality LoRAs:
1. Set a Trigger Word
A trigger word is a word you make up yourself, and it must be written into every text description of the character during training. Any feature not explicitly mentioned in the description will be automatically associated with this trigger word. In other words, the trigger word becomes your character itself.
The trigger word mechanism is essentially a "residual feature binding" strategy. During LoRA training, the text encoder (usually CLIP or T5) encodes all explicit features described in the prompt (such as "black gown" or "short golden hair") into high-dimensional vectors, which directly guide image generation through the cross-attention mechanism. Meanwhile, those implicit features not explicitly mentioned in text—the character's unique facial structure, skin texture, and demeanor—cannot be precisely described with existing vocabulary. During training, they are "attributed" to the mysterious word that appears in every description: the trigger word. The trigger word thus becomes a high-dimensional semantic anchor, compressing and storing all the character's hard-to-articulate visual features. This also explains why the trigger word should be a meaningless string that doesn't exist in the base model's vocabulary (such as "xjsz01")—if you use an ordinary word (such as "alice"), the trigger word would become entangled with that word's original semantic meaning, resulting in impure feature activation.
2. Introduce Variation to Achieve Generalization
If you only train with close-up shots, the model will mistakenly assume the character "only exists in close-ups." Therefore, you must add diverse material such as distant shots, different lighting, poses, and outfits so the character can be generated naturally in various scenes.
3. Clarify Which Features Should Remain Consistent
If the character only wears one fixed outfit, you can train with the same outfit throughout. But if you want to change outfits in the future, the clothing in the dataset should vary.
4. Text Descriptions Determine Later Controllability
The more detailed the description, the more flexible you'll be later. The LoRA will learn that "these clothes are not bound to the trigger word," allowing you to modify the outfit down the road. The trade-off is that the prompts will grow increasingly long.
5. Captions Are Reverse Prompts
The caption style used for training must match the prompt style used during later generation. For example, Crea2 prefers long natural-language prompts, while Ideogram4 favors structured JSON with bounding boxes.
Automated Dataset Construction: From a Single Image to a Complete Asset Library
The entire workflow runs within ComfyUI, a free node-based interface. The standard installation method is: drag in the workflow file → open ComfyUI Manager → install missing nodes → restart → download and place the corresponding models.
ComfyUI is an open-source image generation interface released in early 2023 by developer comfyanonymous. It adopts a visual programming paradigm based on a node graph—each processing step (such as loading models, text encoding, image sampling, and post-processing) is presented as a node, with data flowing between nodes through connections. This design draws on the node-based compositing paradigm of professional visual effects (VFX) software such as Nuke and Houdini. Its core advantages include: data flow is visible and traceable, intermediate results can be previewed at any time, and individual nodes can be replaced independently without affecting the overall pipeline. ComfyUI's underlying execution engine implements fine-grained graph caching—when a user modifies a node, the system only recalculates the affected downstream nodes while reusing the cached results of the other nodes from VRAM. This makes iterative debugging far more efficient than script-based workflows. Workflows can be serialized into JSON files and shared directly, greatly lowering the barrier to distributing complex workflows. ComfyUI has now become the most mainstream advanced user interface in the Stable Diffusion ecosystem, and its plugin ecosystem (managed through ComfyUI Manager) already covers hundreds of extension nodes, including ControlNet, IPAdapter, and video generation.
In the "Consistent Character Creator," operations proceed from left to right: first name the character (usually the same as the trigger word), set the resolution, and it's recommended to first switch to Preview Mode (Mode 2). Once you're satisfied with the dataset, switch to Save Mode (Mode 1) for the official output.
Even if you only import a single half-body photo, the workflow will still function. But in this case, the prompt needs to be more specific—for instance, adding "wearing black formal shoes"—otherwise the model will improvise and add details at will. After running, the workflow will automatically extract facial close-ups and then generate a full set of character images with rich scenes, varied lighting, and diverse emotions.

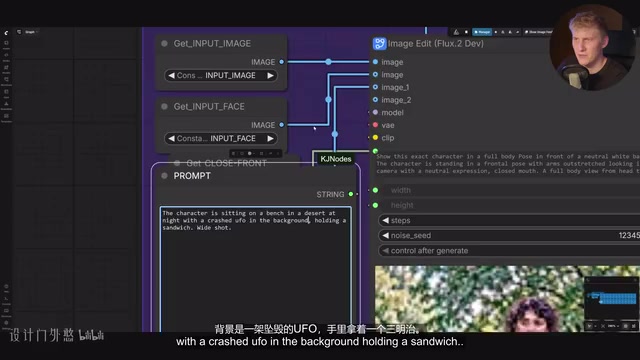
The biggest highlight of this workflow is that it is fully modular. You can copy any node group, modify the prompts (such as "the character sits on a desert bench at night, with a crashed UFO in the background, holding a sandwich"), and selectively re-run a few specific images. For easily varying detail accessories such as necklaces and earrings, you can also capture separate screenshots to inject into the sampler as additional reference images, ensuring visual consistency.
Injecting accessory screenshots into the sampler leverages IPAdapter (Image Prompt Adapter) technology. IPAdapter uses a lightweight adapter network to encode the visual features of a reference image into image prompt embeddings, which are injected into the diffusion model's cross-attention layers in parallel with text prompt embeddings. Compared to purely textual descriptions, image prompts can capture visual information that is difficult to precisely describe in words, such as color distribution, texture details, and geometric shapes. IPAdapter's advantages are especially prominent in scenarios that require consistency in character accessories: the intricate metal links of a necklace, the reflective material of earrings, and specific gemstone cuts—when these features are injected via image prompts, the detail consistency of the generated results is far higher than approaches that rely solely on textual descriptions.
In addition, the workflow's built-in Face Detailer intelligently identifies full-body shots where "the face is too small" (such as T-pose shots) and performs local upscaling only on those images, making the generated face closer to the original input.
Face Detailer (usually implemented in ComfyUI through the Impact Pack plugin) works in three stages: first, it uses a lightweight face detection model (such as MediaPipe Face Detection or UltraFace) to locate faces across the entire image and obtain bounding box coordinates; second, it crops the face region according to a certain padding ratio and upscales it to the model's optimal resolution (usually 512×512 or 768×768); finally, it performs a separate round of diffusion sampling on the upscaled face region (usually with an Inpaint model) and seamlessly blends the result back into the original image. This "detect-crop-repaint-blend" paradigm effectively solves the facial blur and feature distortion caused by insufficient face resolution in full-body shots, and is the standard solution for face quality control in current AI image generation pipelines.
Hands-On Comparison of Three Major Models: Crea2, Ideogram4, and Wan
Crea2: The Top Choice for Beginners
Creators strongly recommend beginners start with Crea2, for reasons including its low hardware requirements, fast generation speed, strong prompt responsiveness, and active community, along with the fact that many high-quality style LoRAs are already available for direct stacking.
Before training, you first need to use a dataset tagger to generate corresponding .txt description files for each image, and then use Ostris's AI Toolkit for training. Since new models have relatively high GPU requirements, you can choose to deploy on the RunPod cloud platform.
The rise of cloud GPU rental platforms such as RunPod and Vast.ai has fundamentally lowered the hardware barrier for AI model training. Compared to purchasing local high-end GPUs, the core advantage of cloud platforms is pay-as-you-go—a single LoRA training run usually only takes 1–3 hours, with a total cost of just $1–$3, whereas buying a local RTX 4090 costs over $1,500. Cloud platforms also provide ready-to-use pre-configured environments (such as Docker images pre-installed with CUDA, PyTorch, and ComfyUI), saving the time cost of environment setup. However, cloud platforms also have obvious limitations: transferring large amounts of image data and model files over the network consumes extra time, data privacy protection depends on the platform's reputation, and the cumulative cost of continuous operation (such as long-running inference tasks) can exceed local solutions. Therefore, mainstream workflows usually adopt a hybrid strategy of "cloud training, local inference": complete the compute-intensive LoRA training on a cloud platform, download the trained, small LoRA file (usually <200MB) locally, and then use a local GPU for daily image generation.

The RTX 3090 on RunPod costs about $1/hour. Regarding training parameters, single-character training uses rank 16 and about 3,000 steps; a sample is generated every 250 steps to observe progress.
Overfitting is a classic problem in machine learning, referring to a model performing too "perfectly" on the training data while losing its generalization ability. In LoRA training scenarios, the typical symptom of overfitting is: no matter what prompt is entered, the generated results closely resemble the training set images, with the character having stiff expressions, rigid poses, and backgrounds forcibly reproducing elements from the training images. From an information-theory perspective, the essence of overfitting is that the model memorizes both the noise and idiosyncrasies of the training samples, rather than extracting the general patterns within them (the character identity features). Too many training steps cause the model to "rote-memorize" the training images rather than truly learn the character's visual features. The LoRA's rank value is also directly related to overfitting risk—the higher the rank, the more trainable parameters, the greater the model capacity, the stronger the ability to memorize training data, and correspondingly the higher the overfitting risk. This is precisely why single-character training uses a lower rank (16) while multi-character training requires a higher rank (64). This is also why, in actual training, you need to generate sample images every certain number of steps (such as 250 steps) for manual evaluation and save multiple intermediate checkpoints—the optimal version often appears in the middle of the training process rather than at the end.
Experience shows that the final version is not necessarily the best, and usually the versions between step 1,000 and 2,000 perform best. It's recommended to download multiple intermediate versions and test them one by one.
Ideogram4: Precise Composition Control with Bounding Boxes
Ideogram4 supports bounding box composition control, allowing you to draw a box for each character and object. The model will precisely place the content within the box, achieving complete control over the image composition.
Bounding box composition control technology originated in the object detection field of computer vision and is widely used in detection models such as YOLO and Faster R-CNN. In the context of image generation, bounding boxes are introduced as a spatial conditioning mechanism: users draw rectangular boxes and attach text labels to precisely specify the position and size of each element in the image, and the generation model uses this as a constraint to perform layout-aware image synthesis. The technical implementation of this mechanism usually relies on geometry-aware attention bias: bounding box coordinates are encoded as positional embeddings, and at each attention layer computation, a positive bias is applied to the feature responses within the box region, guiding the model to concentrate the visual content of the corresponding text description within the specified region. Compared to Regional Prompting, the advantage of bounding box control lies in more precise geometric constraints and a lower region bleed-through rate; its limitation is a higher dependence on box precision—the box's size and aspect ratio directly affect the compositional reasonableness of the generated content. Ideogram4's bounding box implementation uses a rotated bounding box format, which can more flexibly describe the boundaries of tilted or rotated objects than axis-aligned rectangular boxes. This is also why large language models (such as Claude) tend to make misjudgments when parsing such JSON—the coordinate encoding method of rotated boxes differs from the standard COCO format, so care must be taken to distinguish between them.
Its dataset construction process is similar to Crea2, but the JSON file handling differs slightly. Ideogram automatically generates additional bounding boxes for elements in the image. If the recognition is inaccurate, you can manually correct it through the "Tag and Review" workflow. Note that Ideogram uses a rotated box format, which large language models (such as Claude) may misjudge as an error, but it is actually correct.
Ideogram is a gated model, so you need to log in to Hugging Face, accept the license, and create a read-only token. For training, it's recommended to use a version with about 2,000–2,250 steps; 3,000 steps often leads to "overfitting." In real-world testing, from a "squirrel standing on the head" to "a mantis crawling on a leather jacket," Ideogram4 could accurately reproduce them all, demonstrating excellent bounding box composition control.
Wan: From Static Images to Dynamic Video
The Wan series of models focuses on video generation and is compatible with both versions 1.2.1 and 1.2.2. Since many rendering workflows are based on 1.2.1, training a 1.2.1 model offers better compatibility.
The Wan series of models is an open-source video generation foundation model released by Alibaba's Tongyi team in 2025. It is based on the Diffusion Transformer (DiT) architecture and supports both Text-to-Video and Image-to-Video modes. Compared to the previous mainstream video diffusion models based on the U-Net architecture (such as Stable Video Diffusion), the DiT architecture flattens the video frame sequence into a one-dimensional patch sequence before feeding it into the Transformer for global self-attention computation, enabling the model to establish long-range dependencies across frames. This gives it better temporal consistency and global content understanding when processing long sequences, but at the cost of computational complexity growing quadratically with the number of frames, and its VRAM requirements are significantly higher than U-Net solutions. After the Wan model was open-sourced, it quickly gained wide adaptation in the ComfyUI community, forming two parallel versions, 1.2.1 and 1.2.2. LightX2v is a LoRA plugin designed specifically for accelerating Wan inference. Through sparse attention mechanisms and inter-frame feature reuse techniques, it skips some redundant attention computations along the temporal dimension, boosting generation speed by more than 2x without noticeably degrading image quality, greatly reducing the video generation time cost on consumer-grade hardware.
When training a video LoRA, you can directly reuse the previous image dataset. To save time, you can set the number of frames to 1, letting the model generate only static preview images. Combined with the LightX2v LoRA, this can significantly boost running speed, and a version with about 2,500 steps offers the best overall results.

Multi-Character Interaction in the Same Frame: The Key Is "Same-Frame Training Data"
To have multiple characters interact naturally within the same image, the key is: the dataset must include photos of these characters in the same shot so the model can learn to distinguish between different entities.
Method for generating same-frame material: In the character creator, copy the node group, load wide and close-up shots for each character separately, stitch them together as reference images to input into the sampler, then write a prompt like "three characters standing in the same image" and add interaction descriptions.
The rules for tagging must be clear, for example: "the blonde woman holding the bus pass is Berlin Model" or "the Black man wearing the gray turtleneck sweater is Male Model #1." If a single image has multiple characters, you also need to tag each of their trigger words, positions, and interaction methods. For multi-character training, the rank needs to be increased accordingly (for example, from 16 to 64).
The core challenge in multi-character same-frame training is "identity disentanglement"—the model needs to maintain multiple independent identity features simultaneously within the same forward pass. The logic behind increasing the rank from 16 to 64 is: a higher rank means greater representational capacity, capable of encoding more mutually orthogonal feature directions within the low-rank subspace, thus providing sufficient "storage space" for the identity features of different characters so they don't interfere with one another. Detailed position tagging ("the blonde woman on the left," "the Black man on the right") enables the model, through training, to establish conditional associations between trigger words and spatial positions, so that two trigger words in the same image respectively activate the identity features at their corresponding positions. When the number of same-frame images in the training data is sufficiently rich and the position descriptions are sufficiently precise, the model can ultimately learn to independently render the appearances of two characters in different spatial regions of the image during generation, based on the trigger words and position descriptions in the prompt, achieving true multi-character identity disentanglement.
The final result is impressive: with its precise prompt responsiveness, Crea2 can accurately place three characters in various scenes such as a hotel room, an ancient castle, a museum, and an empty swimming pool, while keeping details like necklaces and ear piercings highly consistent.
Conclusion: The Path of AI Character Generation from Chaos to Precision
From the early days of "images blending into a mess" to today's "multi-character interaction in the same scene," AI character generation technology has made a leap forward. This fully localized, free-to-run workflow puts capabilities that previously required paid, closed-source tools into the hands of every creator.
Beginners are advised to start with Crea2—it has low hardware requirements, fast speed, and a mature community ecosystem, and if you need a photorealistic style, ready-made LoRAs can be stacked directly. Once you're familiar with the entire LoRA training workflow, you can gradually explore Ideogram4's precise bounding box composition control and Wan's dynamic video generation, greatly unleashing your creative freedom.
Key Takeaways
- The trigger word is the character's high-dimensional semantic anchor: Use a meaningless string to avoid semantic entanglement with the base model's existing vocabulary.
- The optimal point for overfitting is in the middle of training: Capture the best version by generating samples every 250 steps and saving multiple checkpoints.
- The keys to multi-character training are same-frame data + high rank: Rank 64 provides orthogonal storage space for the identity features of different characters.
- Cloud training + local inference is the optimal cost strategy: Use cloud GPUs for compute-intensive training and deploy small LoRA files locally.
- Bounding box control has a lower bleed-through rate than Regional Prompting, but be mindful of the encoding differences between the rotated box format and the standard COCO format.
Related articles

The Truth Behind Codex 'Build a Website in 5 Minutes': AI Isn't Creating Sites—It's Helping You Copy Them
Exposing the truth behind viral Codex 5-minute website videos: creators aren't building original sites with AI—they're copying shared prompts or scraping others' work. Learn AI coding tools' real limits.

Getting Started with AI Agent Development: A Complete Guide from Concept to Practice
A comprehensive guide to AI Agent architecture and development, covering automated marketing, intelligent customer service, and investment analysis scenarios with single and multi-agent collaboration.

The Truth Behind Codex 'Build a Website in 5 Minutes': AI Isn't Creating Sites — It's Helping You Copy Them
Exposing the truth behind viral Codex 5-minute website videos: creators aren't building original sites with AI — they're copying shared prompts or scraping others' work.