AI-Generated Mini Program UI Components: Prompt Templates & Three-Step Review Method in Practice

A practical methodology for using precise prompts to have AI efficiently generate mini program UI components
Using a "Water Drinking Tracker" mini program as a hands-on case study, this article systematically introduces the complete workflow for AI-assisted UI development. Core methods include: three-part precise prompt templates (functional description, style specifications, component specifications) for first-try usable component generation; a three-step review method (run and preview → identify key issues → natural language feedback) for efficient iteration; and structured prompts for generating JS logic with data binding and interactions. This approach can boost UI development efficiency by 10x or more.
Introduction: Using AI to "Furnish" Your Mini Program
After setting up the mini program framework, the first challenge many developers face is building page UIs. Spending half a day writing a card component, tweaking it back and forth without satisfaction—that's the reality of traditional development. But if you shift your approach and let AI generate 80% of the code while you handle only 20% of the decisions, you'll see a quantum leap in efficiency.
This article uses a "Water Drinking Tracker" feature as a hands-on case study, demonstrating the complete workflow from writing prompts to producing usable components, helping you master the right approach to AI-assisted UI development.
Precise Prompt Templates: Getting AI to Generate Usable Component Code on the First Try
The Gap Between Vague Prompts and Precise Prompts
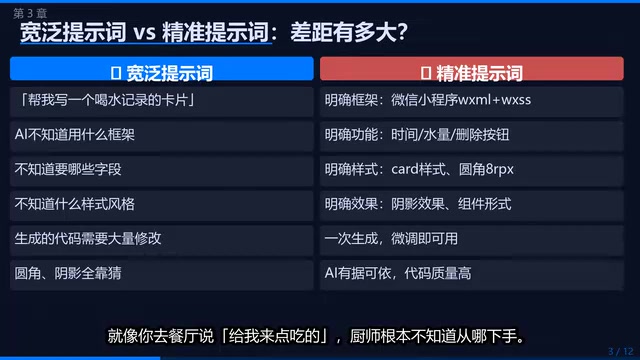
Asking AI to write a water drinking record card with different prompt quality yields vastly different results:
- Vague version: "Help me write a water drinking record card"—AI might generate HTML, React, or even a bare component without any styling
- Precise version: Specify functionality, styling, and technical requirements—AI generates code that runs immediately
This isn't a 10% difference—it's the difference between "usable or not." It's like ordering at a restaurant: saying "give me something to eat" versus "one spicy boiled fish, light on oil" produces completely different results.
This is backed by Prompt Engineering methodology. Research shows that structured prompts significantly improve LLM output quality compared to natural language descriptions, because the attention mechanism in LLMs is more sensitive to explicit constraints. Each additional constraint narrows the model's output distribution toward the target—functional description determines "what to generate," style specifications determine "what it looks like," and technical specifications determine "which tech stack to use." Only when all three are combined can the AI's output space be narrowed to a directly usable range.
The Three-Part Structure of Prompt Templates
My refined prompt template consists of three sections:
Section One: Functional Description—What elements are needed, such as time display, water amount display, and delete button.
Section Two: Style Specifications—Down to specific values: border radius, shadow parameters, padding sizes.
Section Three: Component Specifications—Which constructor to use (Component constructor, not Page), what parameters to pass (properties defining time, amount, index).
Pay special attention to Section Three. Many people forget to specify the Component constructor, and AI generates page-level code that can't be reused.
Component Constructor vs Page Constructor: Mini programs have two core constructors. Page() defines page-level logic, with each page having its own lifecycle (onLoad, onShow, etc.), and data and methods cannot be reused. Component() is the foundation of component-based development—it defines external data interfaces through properties, manages internal state through data, encapsulates behaviors through methods, and can be referenced multiple times across any page. The fundamental difference: Page is the endpoint of routing, while Component is a composable building block. Without explicitly specifying the Component constructor, AI tends to default to generating Page-level code—one of the most common pitfalls for beginners.
Defining properties upfront makes subsequent data binding much smoother.
This template is universal—swap in an order card or product card by simply modifying the functional and style descriptions while keeping the structure intact.
Three-Step Review Method: An Efficient Iteration Strategy for AI-Generated Code
Why You Shouldn't Read AI-Generated Code Line by Line
After AI generates code, many people's first instinct is to read it line by line. This is actually the least efficient approach—the code was written by AI, and understanding it doesn't mean you can improve it. The right approach: Drop it directly into the developer tools and check the rendered output. Your eyes can judge correctness in one second—ten times faster than reading code.

The Specific Three-Step Review Process
Step One: Run it first and see the result. It's like trying on clothes—you won't know if they fit until you put them on.
Step Two: Identify only 2-3 issues that most impact the experience. Don't pursue perfection in one round—this is a trap many fall into, wanting to reach 100 points at once, only to spend two hours going nowhere.
Step Three: Tell AI in natural language what's wrong and let AI fix it. Don't manually modify the code yourself. Once you start hand-editing AI's code, you enter an inefficient loop—fixing one spot breaks another, creating an ever-growing mess.
Run this process for 2-3 rounds and the component takes shape. It's like sculpture: AI gives you a rough form, you tell it what's excess and what's missing, it refines, and you judge. Clear division of labor, maximum efficiency.
Actual Efficiency Data for AI-Generated UI Components
Statistics from real projects:
- First-generation code usability rate with precise prompts: 80%
- Average iteration rounds: 2-3 rounds
- Efficiency improvement over hand-coded UI: 10x or more
- Developer decision space: 20%
This 20% doesn't mean you're only doing 20% of the work—it means you concentrate your energy on the highest-value activities: judging whether the result looks good, deciding what to change, and maintaining overall style consistency.
JS Logic Generation: Data Binding and Interactions in One Step
Writing Logic Layer Prompt Templates
Once the component is built, how do you wire up the data? This also requires a precise prompt template:
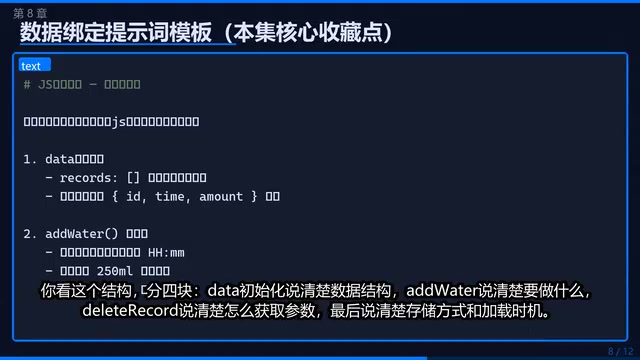
The template has four sections:
- Data initialization: Clearly define the data structure (records array, fields for each record)
- Add Water: Specify the addition logic (get current time, construct record object, update array)
- Delete Record: Specify how to get parameters (retrieve index from event object)
- Storage method: Specify local Storage, specify load timing (onLoad)
Two critical constraints:
- "Do not use any third-party libraries"—prevents AI from introducing dependencies that won't run in the mini program environment. LLM training data contains vast amounts of web development code, and without restrictions, it naturally tends to import npm packages, which will directly cause runtime failures in the mini program sandbox environment.
- "Store data locally in Storage for now"—get the interactions working first; when connecting cloud development later, you only need to swap the storage layer.
Quality Assessment of AI-Generated JS Code
The quality of JS code AI generates from the template is quite good: reading local storage in onLoad, getting the current time and constructing a record object in addWater, retrieving the index from the event object in deleteRecord to remove the corresponding item.
One noteworthy detail: new records are placed at the beginning of the array using the spread operator (...), so the latest record appears at the top—matching user expectations. There's an important technical reason behind this approach—directly modifying the array (e.g., push()) won't trigger the mini program's data reactivity mechanism, because setData needs to receive a new reference to detect changes. Using the spread operator to create a new array (e.g., [newRecord, ...this.data.records]) both places the new record at the top and generates a completely new array reference, ensuring setData correctly triggers view updates. This follows the "immutable data" principle widely adopted in frontend frameworks—don't modify existing data; instead, create new data containing the changes. The fact that AI automatically adopts this pattern shows that large language models have internalized modern frontend development best practices.
Complete Workflow & Common Pitfall Avoidance Guide
Linear Workflow for AI-Assisted Mini Program Development
Putting the entire process together: Write precise prompts → AI generates component code → Preview in developer tools → Natural language feedback iteration → AI generates JS logic → Locally functional complete page.

The core is that feedback loop: if the preview isn't satisfactory, go back to natural language feedback and let AI revise—don't do it yourself.
Three Common Pitfalls in AI Programming Collaboration
Pitfall One: Reading code line by line. In AI collaboration scenarios, this is a programmer's instinct but the least efficient approach. Running it and checking the visual result is the way to go.
Pitfall Two: Submitting ten modification requests at once. When AI handles multiple changes simultaneously, it tends to fix one thing while breaking another. Only mention 2-3 of the most important issues per round, letting AI focus.
Pitfall Three: Asking AI to generate an entire page at once. The more complex the page, the more likely AI is to make mistakes. Break it into individual components, generate and review each one separately—quality is much more consistent. It's like building with blocks: going piece by piece is faster than dumping everything out and sorting through the pile.
Summary: Next Steps from Local Storage to Cloud Development
This article covered three core aspects of page UI construction:
- Precise prompt templates—Getting AI to generate usable components on the first try
- Three-step review method—Efficient iteration through visual inspection and natural language feedback
- JS logic templates—Achieving data binding and interactions in one step
Related articles
 Tutorials
ChatGPT Plus Subscription Guide: Are GPT-5.5, image-2, and Codex Worth the Upgrade?
A detailed look at ChatGPT Plus features — GPT-5.5, image-2, and Codex — with a Plus vs Pro comparison and a complete step-by-step subscription guide for users outside the US.
 Tutorials
Harness AI Engineering in Practice: Using Claude Code to Master Enterprise-Level E-Commerce Development
Deep dive into Harness AI Engineering: master enterprise e-commerce development with Claude Code using the Rules, Skills, Wiki, and Changes framework.
 Tutorials
Cursor + Codex Dual-IDE Collaboration: A Practical Methodology for Open-Source Project Customization
A complete methodology for open-source project customization based on real-world experience, detailing the Cursor+Codex dual-IDE workflow, seven-stage process, MVP validation, and AI source code reading techniques.