Claude Code Desktop Third-Party API Integration Tutorial: CC-Switch Configuration Guide

A complete tutorial on integrating third-party APIs into Claude Code Desktop using the CC-Switch tool.
This article explains how to use the CC-Switch tool to configure third-party APIs (Claude and GPT models) and Chinese localization in Claude Code Desktop. Key points include: native Claude models don't require routing, while GPT models must enable routing for protocol conversion; API token groups determine available model types and cannot be mixed; Windows users may need to enable WSL2 and Virtual Machine Platform system features.
Claude Code Desktop (Terminal Edition) is increasingly popular among developers, but many users encounter various issues when configuring third-party APIs and Chinese localization. This article provides a detailed guide on how to use the CC-Switch tool to connect third-party APIs (including Claude models and GPT models) in Claude Code Desktop, and complete Chinese localization — helping you use this AI coding assistant efficiently while saving costs.
Why Use Claude Code Desktop
Many developers previously used Claude Code through the VS Code extension. While it works fine functionally, it always felt like being a guest in someone else's house — after all, it runs as a plugin inside another editor.
Claude Code was initially released as a VS Code extension, running within VS Code's Electron-based host process. Due to the sandbox mechanism of the extension API, its access to the file system and system processes was relatively limited. Claude Code Desktop (Terminal Edition), on the other hand, is built as a standalone Electron application that directly leverages system terminal capabilities, with full file system access and process control. This makes it more responsive when executing complex multi-file refactoring, running test suites, and other tasks — delivering a more native and complete experience.
However, Claude Code Desktop hasn't fully opened registration yet, and opening it directly will get you stuck at the login screen. This is where we need some workarounds to bypass the restrictions and connect our own third-party APIs.
Developer Mode Manual Configuration (For Reference)
The first approach is to manually configure through Claude Code's built-in developer mode:
- Open Claude Code Desktop, click the menu in the upper left corner
- Find Troubleshooting, click Enable to activate developer mode
- The app will restart automatically. Click the upper left menu again
- Click Develop, find Configure Shared Party (third-party configuration)
- Enter your Base URL, API Key, and other information here
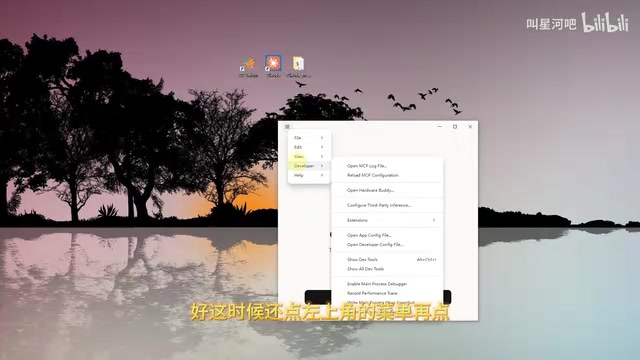
However, this method isn't beginner-friendly — manually filling in configuration fields is error-prone. The CC-Switch method described below is recommended instead.
Using CC-Switch to Configure Third-Party APIs (Recommended)
Identifying the Correct Configuration Entry
First, make sure your CC-Switch is up to date. After opening it, you'll see two Cloud icons:
- First one (with a command symbol in the lower right): For configuring the VS Code extension
- Second one (with a monitor icon in the lower right): For configuring the desktop terminal version
Today we're using the second one, specifically for configuring Claude Code Desktop.
Configuring Native Claude Models
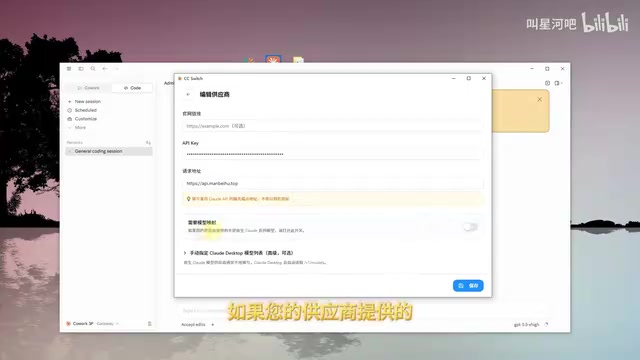
Click the second icon to enter the provider setup interface, and select Custom Configuration:
- Name: Enter anything you want — just make it recognizable
- API Key: Enter your proxy/relay token (make sure to select the group token corresponding to Claude models)
- Request URL: Enter the main domain of your API relay
- Route toggle: Since we're using native Claude models, routing does NOT need to be enabled
- Model mapping: Usually not required for native Claude model providers
After configuration, click "Add" and then enable the configuration. Next, you need to completely quit Claude Code (find the icon in the Windows system tray at the bottom right, right-click to exit), then restart it.
Resolving Virtual Machine Errors
Some users may encounter a "virtual machine not enabled" prompt after restarting. This is because Claude Code Desktop relies on the Linux runtime environment provided by WSL2 (Windows Subsystem for Linux 2) to execute certain low-level operations. Unlike WSL1, WSL2 runs a complete Linux kernel powered by a lightweight Hyper-V virtual machine, so the system's virtualization support components must also be enabled. Here's how to fix it:
- Search for "Turn Windows features on or off" in the Windows search bar
- Check the following three options:
- Windows Hypervisor Platform
- Virtual Machine Platform
- Windows Subsystem for Linux
- Confirm and restart your computer

After restarting, open Claude Code again and it should work normally. Since we didn't manually specify a model in CC-Switch, it will automatically load available models based on the model list returned by the API.
Configuring GPT Models (Routing Required)
If you want to use GPT models in Claude Code, the configuration process is slightly different — the key difference is that routing must be enabled.
This is because Claude's native API and OpenAI's API have fundamental differences in their interface specifications: Claude uses the Anthropic Messages API format, while the GPT series uses the OpenAI Chat Completions format. CC-Switch's routing function is essentially a Protocol Adapter that dynamically converts Anthropic-format requests sent by Claude Code into the format required by GPT models. Model mapping solves the model ID namespace inconsistency — for example, mapping Claude's internal model identifiers to external model names like GPT-4o.
Step 1: Enable Routing
Find the routing toggle in the upper left corner of CC-Switch and turn it on. Then go to Settings → Routing → Local Routing, expand it and:
- Enable the main routing toggle
- Check Cloud (enable routing for Claude)
Step 2: Modify Provider Configuration
- API Key: Switch to the group token corresponding to GPT models
- Model mapping toggle: Must be turned on (since GPT is not a native Claude model)
- Multipart format: Switch from the default option to the correct format (note the interface prompts)
- Model selection: Click "Get model list" and select the GPT models you need from the API-returned list
After saving, you'll again need to completely quit and restart Claude Code. After restarting, you'll find the model list has changed to GPT models, ready for normal conversation use.
Important Notes on Token Groups
Here's a common pitfall: the group selected when creating a token determines what model types that token can access.
The token grouping mechanism in API relays is essentially an RBAC (Role-Based Access Control) API permission management system. Each token is bound to a specific model group at creation time, and the relay backend validates whether the token's group permissions match the requested target model. This design facilitates usage tracking and billing isolation, while also preventing tokens from being misused on unauthorized models. Therefore:
- If you select a Claude model group when creating the token → that token can only be used for Claude models
- If you select a Codex/GPT model group when creating the token → that token can only be used for GPT models
So when configuring different models in CC-Switch, make sure to switch to the corresponding API Key, otherwise you'll encounter authentication failures.
Chinese Localization for Claude Code
By default, Claude Code Desktop has an English interface. The localization steps are very simple:
- Exit Claude Code Desktop first
- Download the Chinese language pack (usually available in tutorial attachments or comment sections)
- Install the Chinese language pack
- Reopen Claude Code
After installation, the left menu, settings pages, and other interface elements will all display in Chinese.

How CC-Switch Works
In essence, CC-Switch automates the manual configuration work from developer mode. It maintains a complete configuration management system in the background: routing rules define request forwarding logic, API keys handle authentication, and model mapping processes model ID conversion between different providers. You can view the configuration content it generates in the upper right corner of CC-Switch, including routing rules, API keys, model mapping, and other information. If you're interested in the underlying configuration, you can study these auto-generated settings to deepen your understanding.
Summary
For most users, using CC-Switch to configure Claude Code Desktop is the most hassle-free approach. The key points of the entire process are: distinguishing between the two configuration entries, correctly setting up routing (must be enabled for GPT models — essentially a protocol format conversion), and ensuring token groups match the model types. If you don't have a specific need for the desktop version, the VS Code + Claude Code extension approach works equally well and is even simpler to configure. Choose the approach that best fits your usage habits.
Related articles
 Tutorials
ChatGPT Plus Subscription Guide: Are GPT-5.5, image-2, and Codex Worth the Upgrade?
A detailed look at ChatGPT Plus features — GPT-5.5, image-2, and Codex — with a Plus vs Pro comparison and a complete step-by-step subscription guide for users outside the US.
 Tutorials
Harness AI Engineering in Practice: Using Claude Code to Master Enterprise-Level E-Commerce Development
Deep dive into Harness AI Engineering: master enterprise e-commerce development with Claude Code using the Rules, Skills, Wiki, and Changes framework.
 Tutorials
Cursor + Codex Dual-IDE Collaboration: A Practical Methodology for Open-Source Project Customization
A complete methodology for open-source project customization based on real-world experience, detailing the Cursor+Codex dual-IDE workflow, seven-stage process, MVP validation, and AI source code reading techniques.