Claude Code Installation Guide: Configuring Zhipu GLM as a Domestic Model Alternative

Complete guide to installing Claude Code and connecting it to Zhipu GLM domestic models
This article explains how to connect Claude Code to the domestic Zhipu GLM model for proxy-free, low-cost AI programming assistance. The process includes: confirming Node.js ≥ 18 and Git environment, installing Claude Code globally via npm, obtaining a Zhipu API Key, and creating a configuration file in the user directory's .claude folder pointing to Zhipu's API address for seamless model replacement—completed in just a few minutes.
Introduction: Why Choose Claude Code + Domestic Models
Claude Code is one of the hottest AI programming tools available today. It can directly operate your computer—creating files, modifying code, and executing command-line operations—making it an invaluable assistant for developers. However, many developers face a practical problem: the official model requires a VPN and comes with a hefty price tag.
The good news is that Claude Code is essentially just a tool framework. Its core design philosophy combines the language understanding capabilities of large language models with OS-level tool invocation. Through the Tool Use/Function Calling mechanism, it enables models to perform file read/write operations, terminal commands, code searches, and more. This means that as long as the underlying model supports the standard OpenAI-compatible API format, it can be replaced with any third-party model—this is the technical foundation for integrating domestic models. We can fully connect it to domestic Chinese models. The Zhipu GLM series is not only more affordable but can also be used directly without a proxy, with performance sufficient for everyday programming needs.
It's worth noting that Claude Code has a different positioning from Open Cloud (Computer Use). If you're only using it for programming assistance, Claude Code is more than sufficient—it's more focused on code scenarios and consumes fewer tokens. Open Cloud is better suited for scenarios requiring higher computer control permissions or integration with communication tools like Feishu/DingTalk for remote control.
Pre-Installation Environment Setup
Checking Node.js and Git Installation
Before installing Claude Code, ensure your computer has the following environment ready:
1. Node.js (version ≥ 18)
Open a CMD window and enter the following command to verify:
node -v
If it displays a version number greater than 18, your environment is ready. Node.js 18 is a critical version milestone that introduced native Fetch API and more complete ES module support—some of Claude Code's underlying dependencies require these features to function properly.
2. Git (must include Git Bash)
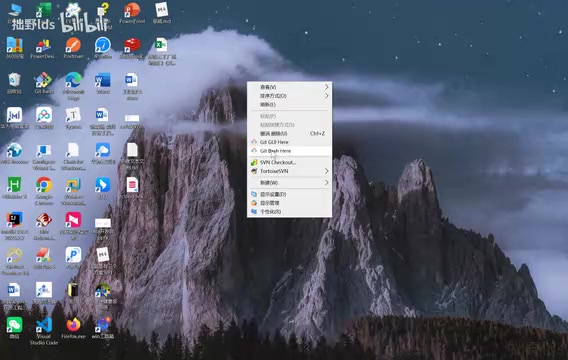
Right-click on your desktop. If you can see the "Git Bash Here" option, Git is properly installed. When installing Git, make sure to check the Git Bash option—this is mandatory. Git Bash provides a Unix-style Shell environment for Windows, which Claude Code relies on for executing certain scripts and commands.
Detailed Claude Code Installation Steps
Installing Claude Code Globally with npm
Once the environment is confirmed, the installation process is straightforward—just one command:
npm install -g @anthropic-ai/claude-code
npm (Node Package Manager) is Node.js's official package manager. The -g parameter indicates a global installation, allowing you to call the claude command from any directory after installation. Since npm downloads packages from overseas servers by default, speeds may be slow or timeout in China. You can switch to a domestic mirror to accelerate downloads:
npm config set registry https://registry.npmmirror.com
It's recommended to restore the official source after installation to avoid package version synchronization issues. After installation, verify with:
claude --version
If a version number is displayed, the installation was successful.
Handling Regional Restrictions
If you try to use the official model, you'll most likely encounter regional restriction errors—messages about being unable to connect to the API or to check your network region settings. This is because China is not on the official supported regions list.
For users who need to use overseas models, you can create a dedicated startup script to bypass restrictions:
- Create a
cld.batfile in any safe directory on your computer - Write in proxy configuration content, changing the port number to your local proxy port (e.g., 7892)
- Add the directory containing this file to your system PATH environment variable
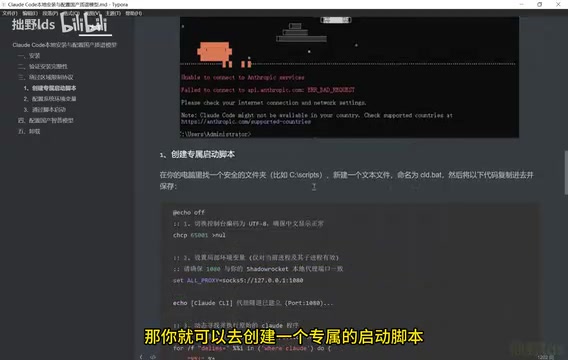
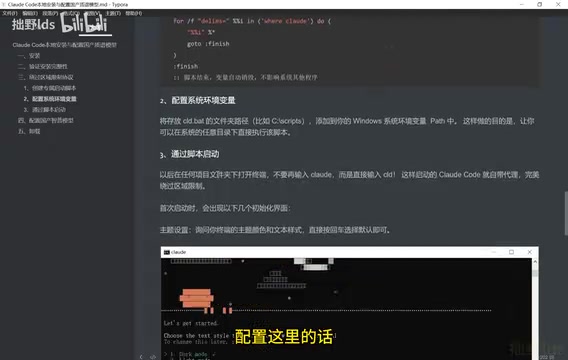
After configuration, type cld in any directory to launch Claude Code. On first launch, it will ask whether to trust the current directory—select trust to proceed.
Configuring the Zhipu GLM Domestic Model
Obtaining a Zhipu API Key
The biggest advantage of using Zhipu models is: no proxy needed, no regional restrictions, and affordable pricing.
Zhipu AI is an AI company incubated from Tsinghua University's Department of Computer Science Knowledge Engineering Laboratory. The GLM (General Language Model) series is based on a self-developed general language model architecture. The GLM-4 series excels in code generation and logical reasoning, supports 128K ultra-long context windows, and provides a fully OpenAI-compatible API interface format (including the /v1/chat/completions endpoint). This allows it to seamlessly replace the official model in Claude Code without modifying any calling logic.
First, go to the Zhipu Open Platform (open.bigmodel.cn) to apply for an API Key:
- Log in to the Zhipu Open Platform
- Navigate to the API Key management page
- Click "Create New" to generate a new API Key and save it
Creating the Model Configuration File
Claude Code's model configuration file essentially overrides the default API endpoint and authentication information. Domestic models like Zhipu and DeepSeekAd all provide OpenAI-compatible modes. The configuration file needs to point the request address to the domestic model's API server, and Claude Code will transparently forward all requests to that address, achieving seamless model replacement.
Next, create a configuration file in the specified directory:
- Press
Win+Eto open File Explorer - Navigate to
C:\Users\YourUsername\.claude\directory - If the directory doesn't exist, create it manually
- Create a configuration file in this directory with Zhipu's API address (
https://open.bigmodel.cn/api/paas/v4/) and the API Key you just obtained
Save and restart Claude Code.
Verifying the Model Switch
After re-entering Claude Code, check the current model list:
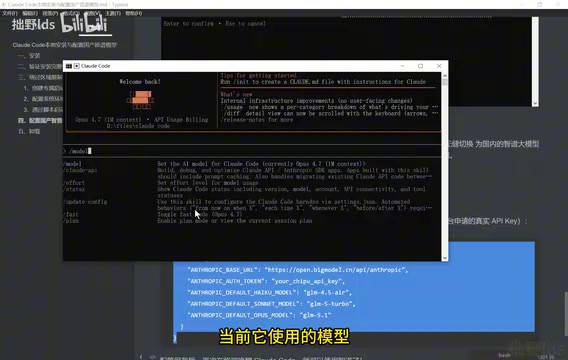
You can see that the model list has changed from the official Claude series to Zhipu's models. Test with a simple question to confirm the response shows it's using the GLM-5.1 model—if so, the configuration is successful.
Usage Tips and Considerations
How to Choose Among Domestic Models
- Zhipu GLM: Currently resources on the official website are limited and require quick purchasing
- DeepSeek 4.1 Pro: Has announced permanent price reductions, offering excellent value with strong performance
- The gap between domestic and overseas models has narrowed significantly—they're fully capable of handling daily programming assistance tasks
Practical Development Tips
In actual development, AI-generated code still requires manual testing and verification. Claude Code's "repeated confirmation" mechanism stems from AI Agent safety design best practices—in autonomous Agent systems, every irreversible operation (such as deleting files or executing system commands) should receive human confirmation. This is known as the "Human-in-the-Loop" pattern, which effectively prevents unrecoverable errors caused by model misunderstandings.
The correct workflow is:
- Describe your requirements to the AI and let it generate code
- Run tests and identify issues
- Feed the problems back to the AI for fixes
- Iterate until satisfied
As your proficiency increases, you can add startup parameters like --dangerously-skip-permissions to reduce confirmation frequency and improve efficiency. However, for production environments or important projects, it's still recommended to keep the confirmation steps for safety.
Summary
The entire installation and configuration process isn't complicated: Install Node.js and Git → Install Claude Code via npm → Apply for a Zhipu API Key → Create a configuration file pointing to the Zhipu model. The entire process requires no VPN and can be completed in just a few minutes. For developers in China, this is currently one of the most cost-effective ways to use Claude Code.
Key Takeaways
- Claude Code is an AI Agent tool framework focused on programming scenarios that controls the local environment through tool invocation. Compared to Open Cloud, it uses fewer tokens and is ideal for developers' daily use
- Before installation, ensure Node.js ≥ 18 and Git (with Git Bash) are ready; users in China can switch npm mirror sources to speed up installation
- Connecting to the domestic Zhipu model allows completely proxy-free usage with no regional restrictions and lower costs; Zhipu GLM provides a fully OpenAI-compatible API interface for seamless replacement
- The configuration method involves creating a config file in the .claude folder under your user directory, filling in Zhipu's API address (
https://open.bigmodel.cn/api/paas/v4/) and Key - Claude Code's repeated confirmation mechanism is a Human-in-the-Loop safety design; once proficient, you can adjust it via startup parameters. Domestic models (Zhipu GLM, DeepSeek, etc.) have capabilities approaching overseas models and are fully sufficient for daily programming assistance
Related articles
 Tutorials
ChatGPT Plus Subscription Guide: Are GPT-5.5, image-2, and Codex Worth the Upgrade?
A detailed look at ChatGPT Plus features — GPT-5.5, image-2, and Codex — with a Plus vs Pro comparison and a complete step-by-step subscription guide for users outside the US.
 Tutorials
Harness AI Engineering in Practice: Using Claude Code to Master Enterprise-Level E-Commerce Development
Deep dive into Harness AI Engineering: master enterprise e-commerce development with Claude Code using the Rules, Skills, Wiki, and Changes framework.
 Tutorials
Cursor + Codex Dual-IDE Collaboration: A Practical Methodology for Open-Source Project Customization
A complete methodology for open-source project customization based on real-world experience, detailing the Cursor+Codex dual-IDE workflow, seven-stage process, MVP validation, and AI source code reading techniques.