Claude Skills Tutorial: Building an AI Agent Skill System from Scratch

A systematic guide to AI Agent Skill concepts, structure, and hands-on Claude Code development
This article explains AI Agent Skills through an analogy with human professional skills—standardized capability encapsulation units composed of skill.md, references, scripts, and assets. It clarifies the fundamental differences between Skills and regular prompts in terms of complexity, reusability, and on-demand loading mechanisms, then demonstrates how to write and invoke Skills from scratch in Claude Code through two hands-on examples: restaurant creative copywriting generation and a complete workflow from copy to poster image generation.
What Is an Agent Skill? An Analogy with Human Skills
With the explosion of AI Agent tools like Claude Code and Hermes Agent, Skills—as the core module in Agent ecosystems—are becoming an essential capability for every AI user. However, many people still have a fuzzy understanding of the concept: what exactly is a Skill? How is it different from a prompt?
Before understanding Skills, it's necessary to clarify the technical background of AI Agents. An AI Agent is an AI system capable of autonomously perceiving its environment, making plans, and executing multi-step tasks—fundamentally different from traditional single-turn dialogue models. An Agent's core capabilities lie in "Tool Use" and "Planning"—it can decompose a complex goal into multiple sub-tasks and call different tools sequentially, rather than simply returning a text response. Skills were born within this architecture as standardized capability encapsulation units, making an Agent's tool-calling abilities reusable, distributable, and composable.
The most intuitive way to understand this is through an analogy with human professional skills. Programmers have skills in writing code and debugging; doctors have skills in diagnosis and treatment; students have skills in completing assignments. Agent Skills are the AI version of "professional skills"—each Skill defines how an Agent should work in a specific scenario.
A complete Skill consists of four parts, corresponding to the four elements a programmer uses when developing a project:
- skill.md (Development Process): The core file that defines the skill's metadata and execution instructions—the only required file
- references/ (Reference Documents): Supplementary documentation to keep skill.md from becoming too bloated
- scripts/ (Development Tools): Executable scripts, such as code that calls an API to generate images
- assets/ (Static Resources): Images, audio, and other reference materials
It's important to note that only skill.md is required; the other three folders are added based on actual needs.
The Fundamental Difference Between Skills and Prompts
Many people see the contents of a skill.md for the first time and say: "Isn't this just a complex prompt?" This perception needs correction. There are several key differences between the two:
Complexity and Functional Differences
Prompts are suited for single-step tasks (translation, summarization, Q&A), while Skills can handle complex multi-step workflows. Skills can internally contain loop logic, conditional branching, API calls, and other capabilities that pure prompts struggle to achieve.
Reusability
Prompts often need tweaking with each use, whereas Skills are encapsulated modules that users simply trigger without worrying about internal details—just like using an app without needing to understand its source code.
On-Demand Loading Mechanism and Token Economics
This is one of the most elegant designs in Agent Skills, involving the core unit of measurement for large models—Tokens. A Token is the basic unit by which large language models process text; typically one English word equals about 1-2 Tokens, and Chinese characters are about 1-2 Tokens. Since a model's Context Window is limited and API calls are billed by Token, how to convey the most effective information within a limited budget is a core challenge in Agent system design.
When you send a message to an Agent, it doesn't read the full contents of every Skill (that would waste too many Tokens). Instead, it only reads each Skill's metadata (name and description, usually no more than a few dozen Tokens). Only when it detects that the user's request matches a particular Skill does it load that Skill's complete instructions. This "Lazy Loading" engineering philosophy directly means that having multiple Skills coexist does not increase Token consumption.
Here's an analogy: a prompt is like asking an expert a question that they answer from memory; a Skill is like assigning a project to a work team—researching materials, writing outlines, designing layouts, adding charts—you just give the command without directing every step.
Environment Setup: Three Steps to Configure Your Claude Code Development Environment
Before writing Skills, you need to install three tools:
Step 1: Install VS Code Editor
Used as a code editor, the installation process is straightforward. If you need a Chinese interface, search for "Chinese" in the Extensions Marketplace and install the official Chinese language pack. Those who prefer Cursor can use it as a complete substitute.
Step 2: Install Claude Code Agent
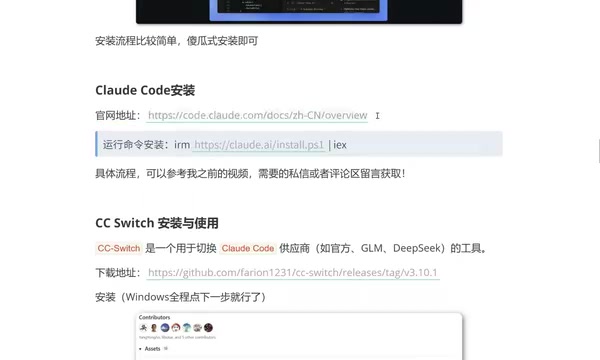
This is our core Agent tool. After installation, it integrates as a conversational panel on the right side of VS Code. If you encounter installation issues, refer to the official documentation for step-by-step troubleshooting.
Step 3: Configure CC Switch Model Switching Tool
This tool is used to switch Claude Code's model provider. You can use the official model or switch to domestic providers like DeepSeekAd or Zhipu—lower prices with solid performance.
Key steps for configuring CC Switch: Click the plus icon in the top-right corner → Select a provider (e.g., DeepSeek) → Enter your API Key → Select a model (e.g., DeepSeek V4 Pro) → Click Enable. Once configured, chat with Claude in the VS Code terminal and confirm the model information is correct to verify the environment is ready.
Hands-On 1: Writing the Simplest Agent Skill
With the environment ready, let's start with the simplest Skill. We'll use a restaurant creative copywriting Skill as an example:
Creating the Skill Directory Structure
Create a .claude/skills/evan-creative/ folder in the project root directory, then create a skill.md file inside it (note: the first letter of skill should be capitalized as SKILL.md).
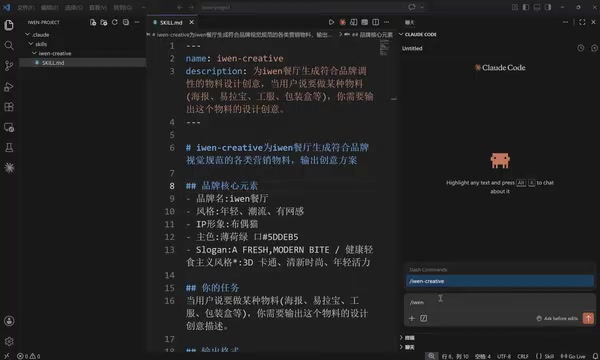
Core Structure of skill.md
skill.md consists of two parts:
Metadata (separated by three dashes ---): Contains the skill name and description—this is what the Agent reads first during on-demand loading.
Instructions section: Defines brand core elements (brand name, style, IP character, primary colors, slogan), task descriptions, output format (theme concept, visual style, scene composition, detail suggestions), etc. in detail. The more detailed the description, the better the generated content matches expectations.
After creation, restart VS Code to let the Agent recognize the new Skill, then type a forward slash / to find and invoke the skill.
Hands-On 2: Complete Workflow from Copywriting to Image Generation
Pure creative copy is far from enough for a restaurant—we need to directly generate printable poster images. This requires using the scripts and assets extension capabilities.
Adding Image Generation Scripts
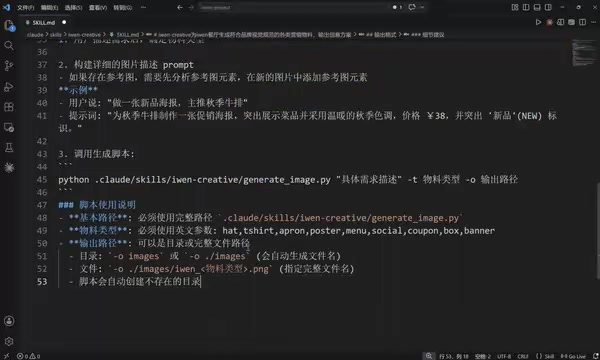
Create a scripts/ folder under the skills directory and add a script file that calls the Qwen Image 2.0 Pro API. This script supports both text-to-image and image-to-image modes.
Qwen Image 2.0 Pro (Qwen-VL series) is a multimodal large model released by Alibaba Cloud, built on Diffusion Model technology: text-to-image mode generates images through progressive denoising based on semantic understanding of prompts; image-to-image mode performs style transfer or content modification constrained by the visual features of a reference image—particularly suitable for commercial scenarios requiring brand consistency. Encapsulating such APIs in a Skill's scripts directory is essentially the implementation of "AI Composition" thinking—using a language model to drive an image model, achieving cross-modal automated workflows.
Adding Brand Reference Assets
Create an assets/ folder and add brand logos and other reference images. Through the image-to-image function, you can ensure that generated posters maintain consistency with the brand's visual style.
Modifying skill.md to Add Image Generation Workflow
Add image generation workflow to the instructions section: Ask the user if they need an image generated → Convert the creative concept into an image generation prompt → Call the script to generate the image → Save to the specified directory.
Real-world results: Input "Help me generate a poster for free weekend beer" and the complete workflow executes automatically from concept to finished poster.
Related articles
 Tutorials
ChatGPT Plus Subscription Guide: Are GPT-5.5, image-2, and Codex Worth the Upgrade?
A detailed look at ChatGPT Plus features — GPT-5.5, image-2, and Codex — with a Plus vs Pro comparison and a complete step-by-step subscription guide for users outside the US.
 Tutorials
Harness AI Engineering in Practice: Using Claude Code to Master Enterprise-Level E-Commerce Development
Deep dive into Harness AI Engineering: master enterprise e-commerce development with Claude Code using the Rules, Skills, Wiki, and Changes framework.
 Tutorials
Cursor + Codex Dual-IDE Collaboration: A Practical Methodology for Open-Source Project Customization
A complete methodology for open-source project customization based on real-world experience, detailing the Cursor+Codex dual-IDE workflow, seven-stage process, MVP validation, and AI source code reading techniques.