Codex CLI Third-Party API Integration Tutorial: Configure GPT-5.5 Local Calls in 5 Minutes

Connect Codex CLI to third-party APIs via RouterLink for multi-model local calls
This article explains how to connect OpenAI Codex CLI and Desktop to multiple AI models including GPT-5.5, Claude, and Gemini through RouterLink. The core configuration requires only two files—Config TOML (model and endpoint address) and Auth (API Key authentication)—covering both macOS and Windows platforms. The entire setup takes just 5 minutes of copy-pasting and supports free switching between multiple models.
Introduction
OpenAI's Codex CLI is a powerful terminal-based AI programming assistant. Codex was originally a large language model specifically trained by OpenAI for code generation, and serves as the underlying technology behind GitHub Copilot. The CLI (Command Line Interface) form factor allows developers to invoke AI programming capabilities directly from the terminal, deeply integrating with shell scripts and automation workflows—ideal for batch code processing or server-side usage. However, Codex CLI only supports the official OpenAI API by default, which presents various inconveniences for users outside the US.
This article provides a detailed guide on connecting Codex Desktop and CLI to third-party APIs through RouterLink, enabling local calls to models like GPT-5.5. The tutorial covers both macOS and Windows platforms. The entire process requires only copy-pasting and takes just 5 minutes—extremely beginner-friendly.
How the Integration Works: OpenAI's API uses a standard REST architecture, and its request format has become the de facto industry standard. Third-party services like RouterLink implement an interface specification fully compatible with the OpenAI API, allowing any client tool originally designed for OpenAI to seamlessly switch to a third-party service by simply modifying the
base_url(base address) and API Key—no client source code modifications needed. This is currently the mainstream approach for AI service integration.
Prerequisites: Environment Setup and API Access
Obtain a RouterLink API
First, you'll need to set up RouterLink's API service. After opening the RouterLink official documentation, you can switch to your preferred language for easier reading. The docs provide installation tutorials for various AI tools—find the Codex-related section to get started.
Install Node.js Runtime
Whether on macOS or Windows, ensure your system has the latest version of Node.js installed. Node.js is a runtime dependency for Codex CLI—the CLI tool itself is distributed as an npm package and requires Node.js to execute. If your current version is outdated, simply download and install the latest version from the Node.js official website. Open your terminal and type node -v to check the version number.
macOS Platform: Installing and Configuring Codex CLI
Step 1: Install Codex CLI
Open Terminal and copy the first command from the documentation to begin installing Codex:
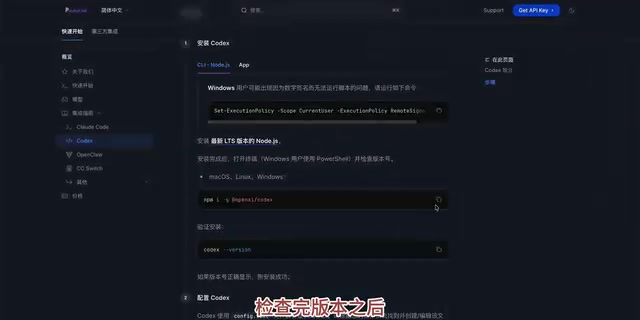
After installation completes, copy the second command to check the version. If the version information displays successfully, Codex is installed.
Step 2: Configure the Config TOML File
Next comes the core configuration step. Codex CLI uses TOML format for its configuration file—TOML (Tom's Obvious, Minimal Language) is a format specifically designed for configuration files. Compared to JSON, it supports comments and offers better readability; compared to YAML, it has stricter indentation rules and is less error-prone. The key fields in the configuration file typically include model (model name) and base_url (API address)—you only need to replace the corresponding values.
Follow these steps:
- Create the configuration file: Copy the command from the documentation to create the Config TOML file
- Edit the configuration: Copy the next command to open the config file. After pressing Enter, you'll enter a black editing screen (nano editor)
- Paste the configuration content: Copy and paste the entire configuration block from the tutorial
About nano editor: nano is a lightweight terminal text editor built into macOS/Linux systems. All common keyboard shortcuts are displayed at the bottom of the screen, requiring no additional learning. The core operations to remember are:
Ctrl+Oto save,Ctrl+Xto exit.
If you want to configure other models (such as Claude, Gemini, etc.), find the corresponding model on the RouterLink website, click to view examples, copy the relevant instructions to replace the model name in your configuration, then fill in your own API Key.
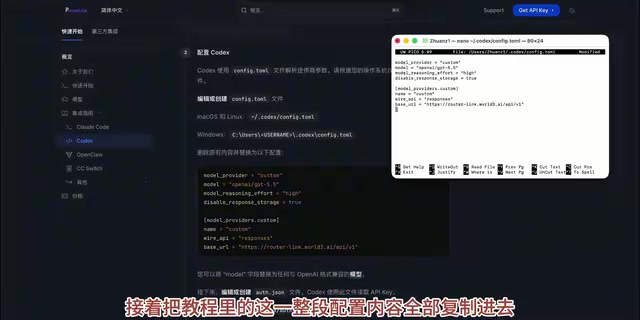
After configuration is complete:
- Press
Ctrl + Oto save the file - Press
Ctrl + Xto exit the editor
Step 3: Configure API Key Authentication
The API Key is your credential for accessing AI services—essentially your account password. It needs to be stored separately in an authentication file (Auth file), kept separate from the model configuration for better security management and independent updates.
Open the Auth file editor (which will also enter the black screen interface), then go to the RouterLink website to obtain your API Key.
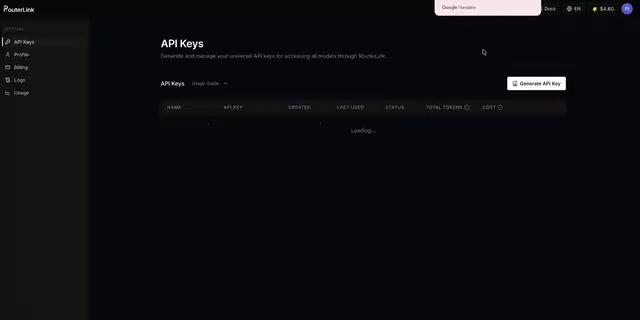
After generating a new Key, replace it in the configuration template provided in the tutorial. Again, press Ctrl + O to save and Ctrl + X to exit.
Once everything is complete, type codex in the terminal to launch and start using it.
Windows Platform: Installing and Configuring Codex CLI
Installation Process
The Windows installation logic is essentially the same as macOS:
- Install Node.js: Download and install the latest version
- Install Codex CLI: Open a terminal (PowerShell or CMD), copy and paste the installation command
- Verify installation: Run the version check command to confirm successful installation
Configuration File Setup
The configuration approach on Windows differs slightly, mainly in file paths and the editor used (Windows doesn't have built-in nano, so you typically use a text editor directly):
- Create the configuration folder: Create the corresponding directory via command
- Edit the Config file: Paste the configuration instructions directly into a text editor and save
- Create Auth.json: Create a new authentication file and paste the configuration content containing your API Key
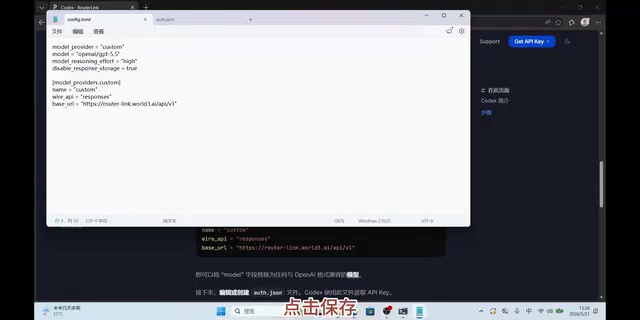
Go to RouterLink to obtain your API Key, paste it into the configuration file, save, and the entire installation is complete.
Codex Desktop Configuration
If you prefer a graphical interface, you can download and install the desktop App directly from the Codex official website. Since the API information has already been configured in the terminal, the desktop version can read the configuration directly after installation—no need to set it up again. Just open and use it. This is thanks to Codex Desktop sharing the same configuration file system as the CLI—authentication and model configurations are fully interoperable between the two.
Multi-Model Switching Tips: Freely Switch Between GPT-5.5, Claude, and Gemini
One major advantage of RouterLink is its support for multi-model switching. GPT-5.5 (OpenAI), Claude (Anthropic), and Gemini (Google) belong to different companies, each with their own native API formats. RouterLink's core value lies in providing a unified OpenAI-compatible interface that abstracts away the differences between models on the server side.
In the configuration file, you only need to modify the model field value (for example, changing from gpt-4o to claude-3-5-sonnet), and RouterLink will automatically route the request to the corresponding model provider. This means you can use the same Codex client to experience different AI models' programming capabilities, finding the best fit for your workflow without needing to understand each provider's specific API differences.
Summary
By integrating third-party APIs through RouterLink, the barrier to using Codex CLI is significantly lowered. The entire configuration process revolves around just two files: one for model and endpoint configuration (Config TOML), and one for authentication (Auth file). The separation of concerns in this design also facilitates future maintenance—switch models by editing Config only, update keys by editing Auth only. Once you understand this approach, you can quickly make adjustments whenever you need to change models or update keys.
Key Takeaways
- RouterLink enables connecting Codex CLI and Desktop to third-party APIs, supporting multiple models including GPT-5.5
- The configuration workflow is essentially the same on both macOS and Windows—the core task is creating two configuration files: Config TOML and Auth authentication
- RouterLink's OpenAI-compatible interface abstracts away API differences between models—simply modify the model name in the config file to switch between GPT, Claude, Gemini, and more
- The entire installation and configuration process requires only copy-pasting commands and can be completed within 5 minutes—very beginner-friendly
- The desktop version can directly reuse the API information configured in the terminal, requiring no repeated setup
Related articles
 Tutorials
ChatGPT Plus Subscription Guide: Are GPT-5.5, image-2, and Codex Worth the Upgrade?
A detailed look at ChatGPT Plus features — GPT-5.5, image-2, and Codex — with a Plus vs Pro comparison and a complete step-by-step subscription guide for users outside the US.
 Tutorials
Harness AI Engineering in Practice: Using Claude Code to Master Enterprise-Level E-Commerce Development
Deep dive into Harness AI Engineering: master enterprise e-commerce development with Claude Code using the Rules, Skills, Wiki, and Changes framework.
 Tutorials
Cursor + Codex Dual-IDE Collaboration: A Practical Methodology for Open-Source Project Customization
A complete methodology for open-source project customization based on real-world experience, detailing the Cursor+Codex dual-IDE workflow, seven-stage process, MVP validation, and AI source code reading techniques.