Complete Guide to Configuring Codex Desktop SSH Remote Connection to Linux Hosts

Configure Codex desktop to SSH into Linux for the best of both Windows GUI and Linux CLI.
This tutorial walks through configuring OpenAI's Codex desktop client on Windows to remotely connect to a Linux host via SSH, combining the graphical interface of Windows with Linux's powerful command-line environment. It covers installing Codex and CC Switch on Linux, configuring AI model access through CC Switch, setting up SSH key authentication for passwordless login, and creating remote projects in the Codex desktop client.
Why Connect Codex to a Remote Linux Host
As AI programming tools become mainstream, OpenAI's Codex has become an indispensable assistant for many developers. However, in practice, Codex on Windows frequently encounters various pain points: PowerShell throws errors when executing commands, software installation via command line feels clunky, and development environment configuration is cumbersome.
The root cause lies in the fundamental design differences between PowerShell and the Linux command line. PowerShell is an object-oriented shell built on Microsoft's .NET framework, while most development toolchains (such as Node.js npm scripts, Python virtual environments, Docker CLI, etc.) were originally designed for Unix/Linux Bash environments. When ported to PowerShell, you often run into issues like incompatible path separators (backslash vs forward slash), environment variable syntax differences ($env:VAR vs $VAR), and shell scripts that can't be executed directly. This is the fundamental reason why AI programming tools like Codex frequently encounter command execution errors on Windows. These issues have driven many users to switch to Codex CLI on Linux.
But the Linux environment has its own obvious shortcomings. Codex CLI runs in the terminal and lacks a user-friendly graphical interface; meanwhile, common Linux environments like cloud servers and WSL (Windows Subsystem for Linux) aren't convenient for installing a full desktop system. WSL is a compatibility layer technology Microsoft introduced starting with Windows 10. Its second generation, WSL 2, uses a real Linux kernel (running in a lightweight Hyper-V virtual machine), providing complete system call compatibility and excellent I/O performance. However, since WSL 2 runs as a lightweight VM without the full GUI desktop overhead of traditional virtual machines, it starts quickly and uses minimal resources—but isn't convenient for installing and running a complete graphical desktop environment. This creates a dilemma: Windows has a graphical interface but poor command-line experience, while Linux has a powerful command line but no GUI.
The solution presented in this tutorial takes the best of both worlds—use the Codex desktop client on Windows, connecting to a Linux server via SSH. This preserves the graphical interaction experience of the desktop client while fully leveraging Linux's command-line capabilities and development ecosystem. The entire workflow works equally well for local WSL environments and actual remote Linux servers.
Installing Codex and CC Switch on Linux
The starting point is preparing the Linux environment. Using Debian 13 as an example, first run apt update to refresh the package list. If you encounter repository issues on a freshly installed system, consider switching to a domestic mirror source, such as USTC's (University of Science and Technology of China) Debian 13 mirror—simply copy and paste the mirror configuration into /etc/apt/sources.list to resolve slow or failed downloads.
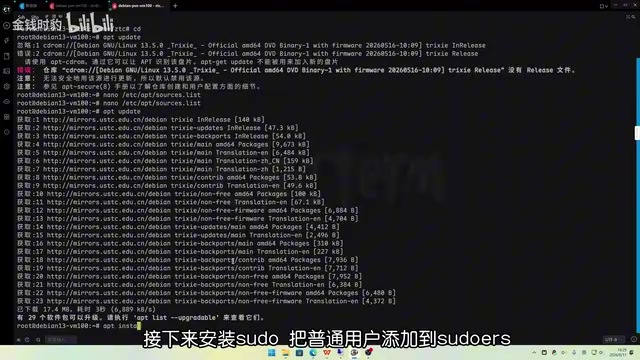
Next is permission configuration. After installing sudo, you need to add your regular user to the sudo group. Edit the configuration file with nano /etc/sudoers and add an authorization line for the corresponding user below the %sudo configuration at the end. If this is already configured or you're using the root account directly, skip this step. After configuration, switch back to the regular user and test whether sudo works.
Then install Git for cloning script repositories. The tutorial author provides an automated script repository adapted for Debian 13. After downloading it via git clone, enter the Linux folder and execute the init script sequentially, entering the corresponding numbers in the menu and pressing Enter to execute commands.

After completing the basic environment initialization, execute the codex-cc-switch script and sequentially enter menu commands 1, 2, and 3 to install Codex and CC Switch. If NPM download failures occur during installation, try switching the NPM mirror source. NPM (Node Package Manager) is Node.js's official package manager. Since its official repository servers are located overseas, users in mainland China often experience slow speeds or connection timeouts when downloading dependency packages. Common domestic NPM mirrors include the Taobao NPM mirror (npmmirror.com), which can be globally switched using the npm config set registry command. Both Codex CLI and CC Switch are built on the Node.js ecosystem and require downloading numerous dependency packages via NPM during installation, making mirror switching almost a necessary step in mainland China's network environment.
After installation, enter the codex and ccs commands to verify successful installation. You may not have noticed, but the operational logic for WSL environments and remote Linux is virtually identical—users can choose either environment based on their needs.
Configuring CC Switch to Connect AI Models
CC Switch is a tool for managing and switching between different AI model providers. It essentially acts as a local proxy layer for AI model API requests. Its core function is to intercept API requests from Codex locally and forward them to different AI model providers (such as OpenAI, DeepSeek, Claude, etc.) based on user configuration. The advantage of this proxy architecture is that users don't need to modify Codex's own configuration files—they can manage API Keys and model switching centrally in CC Switch to flexibly switch between different models.
This tutorial demonstrates the configuration process using DeepSeek model integration as an example. DeepSeek is a large language model series from China's DeepSeek company. Among them, DeepSeek-V3 and DeepSeek-Coder excel in code generation, understanding, and debugging, with API call prices relatively lower than overseas providers like OpenAI. First, you need to obtain an API Key from the official website or a relay service. A "relay service" refers to third-party API proxy services that typically provide interface addresses compatible with the original API, helping users bypass network access restrictions or centrally manage billing across multiple model providers—when using relay services, be aware of data security risks, as all API requests (including code content) pass through the relay server.

In the SSH terminal, enter ccs to open the TUI (Terminal User Interface). TUI is an interaction form between pure command line and graphical interface, providing structured operation interfaces through text menus, keyboard shortcuts, and pseudo-graphical elements in the terminal—ideal for use on servers without desktop environments. Once inside, you can first switch the language to Chinese in Settings for easier operation. When returning to the homepage, the default selected app may be Cloud—press the right bracket key ] to switch to Codex. Then select the provider on the left, press A to add a model configuration. In the model selection list, choose DeepSeek, enter a custom note and the API Key you obtained, then save and return to the homepage with Ctrl+S.
The crucial step is pressing P to enable CC Switch's proxy function, making the configuration take effect. Once done, open Codex to test the chat function—if it can chat normally, the command-line version of Codex is working properly.
Generating and Uploading SSH Keys for Passwordless Login
To allow the Windows Codex desktop client to securely connect to the Linux host without a password, SSH key authentication must be configured. SSH (Secure Shell) is an encrypted network protocol for secure remote login and command execution over insecure networks. SSH key authentication is based on asymmetric encryption: the user generates a key pair locally—a private key (kept locally, never shared) and a public key (uploaded to the remote server). When the user initiates a connection, the server encrypts a random piece of data with the stored public key and sends it to the client. The client decrypts it with the private key and returns it. Once the server verifies it, authentication is complete—no password transmission required.
In Windows PowerShell, use ssh-keygen -t ed25519 to generate an SSH key pair, pressing Enter through all prompts to use default settings. ed25519 is an elliptic curve-based signature algorithm designed by cryptographer Daniel J. Bernstein. Compared to traditional RSA, it has shorter keys (only 256 bits), faster signing and verification speeds, higher security, and is not affected by known side-channel attacks—it has become the currently recommended SSH key type in the industry.
After generation, use the cat command to print the contents of the .pub public key file and copy it. This public key needs to be added to the authorization file on the Linux host. Switch back to the SSH terminal, create a .ssh folder in the user's home directory, and create the .ssh/authorized_keys file, pasting the copied public key content and saving. The authorized_keys file is the default public key authorization list read by the OpenSSH server, storing one authorized public key per line. The server compares public key information in connection requests against this list during authentication.

Return to Windows PowerShell to test passwordless login: enter ssh username@Linux-IP-address. The first connection will prompt whether to continue (this is SSH's host key fingerprint verification mechanism to prevent man-in-the-middle attacks)—type yes and press Enter. If you can log in without entering a password, the SSH key configuration is successful. Similarly, the operation logic in a WSL environment is exactly the same—WSL 2 bridges with the Windows host through a virtual network adapter and can SSH via localhost or a virtual IP.
Adding an SSH Remote Host in Codex Desktop
With key configuration complete, you can now connect the remote host in the Codex desktop client. Open Codex desktop, click the avatar in the lower-left corner to enter settings, scroll down to find the "Connections" option, and click "SSH Add."
In the configuration interface, enter the connection information in the format "username@host-IP-address," set the port to the default 22 (SSH protocol's standard port—adjust if the server has changed the SSH port for security reasons), and select "No authentication" for the authentication method (since key authentication is already configured, the Codex desktop client will automatically read the private key file from the system's default path, i.e., ~/.ssh/id_ed25519). Save and click connect. Users can add multiple Linux hosts this way, including local WSL and remote servers, for unified management.
Creating a Remote Project and Starting AI-Assisted Development
Once the host is successfully added, the Codex desktop client can work in the remote environment. When creating a new project, the interface offers "Local" and "Remote" options. Select "Remote," specify the project name and the Linux file path where the project will be stored, and create it.
In a remote project, start a new conversation to directly ask Codex questions and observe its responses. Even more practically, clicking the view toggle in the upper-left corner opens a Linux file tree view for intuitively browsing the remote file system; you can also open an integrated terminal to execute Linux commands directly in the graphical interface. This means developers get a three-in-one experience of "Windows graphical interface + Linux runtime environment + AI programming assistant." This architectural pattern shares the same philosophy as VS Code's Remote-SSH extension—keeping UI rendering local while offloading file system access, code execution, terminal sessions, and other computationally intensive tasks to the remote host, with bidirectional communication over the SSH channel.
Summary and Reflections
The value of this solution lies in cleverly bridging the experience gap in cross-platform AI programming. It doesn't force Codex CLI to simulate a graphical interface on Linux, nor does it try to solve all command-line compatibility issues on Windows. Instead, it uses SSH remote connection to let each platform play to its strengths.
For users developing with cloud servers or WSL, this configuration is especially practical—you can enjoy the visual operations of the desktop client while ensuring code runs in a stable, clean Linux environment. Although the process involves multiple steps, the logic is clear, and the configuration methods for WSL and remote hosts are highly consistent—master it once and you can apply it broadly. For developers looking to improve their AI-assisted development efficiency, this is a workflow optimization worth trying.
Key Takeaways
Related articles

Big Mike: The AI Sports Betting Advisor Living Inside iMessage
Big Mike is an AI product that delivers sports betting advice via iMessage, covering MLB, NFL, NBA with real-time odds analysis, public track records, and fantasy lineup advice.

Joy: A Mac Menu Bar App That Automatically Showers Confetti to Celebrate Your Every Small Win
Joy is a macOS menu bar app that monitors GitHub stars, Stripe orders, Docker pulls and more, automatically showering confetti on screen when milestones are hit. Designed for indie devs and SaaS founders.

FileRouter: A Productivity Powerhouse for Customizing Default File Openers on Mac
FileRouter is a macOS menu bar tool that lets users precisely control default file-opening apps via a radial picker and custom rule system. Think Velja, but for files.