Complete Guide to Connecting Claude Code with DeepSeek: Low-Cost AI Programming in Practice

A step-by-step guide to running Claude Code with DeepSeek as a low-cost AI programming setup.
This tutorial walks through the complete process of installing Claude Code and connecting it to DeepSeek's API using CC-Search as a bridging tool. It covers Node.js environment setup, configuration file modifications to bypass login, DeepSeek API key generation, and hands-on project testing—enabling developers in China to leverage Claude Code's Agent framework at minimal cost.
Claude Code, the command-line AI programming tool launched by Anthropic, is becoming a powerful productivity booster for developers thanks to its robust Agent capabilities and rich Skills plugin ecosystem. However, for users in China, the access barriers and costs of official models have always been pain points. Based on a detailed tutorial from a Bilibili creator, this article explains how to quickly install Claude Code and connect it to the domestic large model DeepSeek, achieving a low-cost, highly available AI programming experience.
Why Choose the Claude Code + DeepSeek Combination
Claude Code is an AI tool that runs in the command line, and its core advantage lies in its built-in collection of Skills plugins. Through different combinations, it can accomplish complex tasks that traditional AI conversations struggle with. For example:
- Building a personal knowledge base: Automatically organizing study notes with full CRUD support
- Industry news aggregation: Collecting news on a schedule or by preset topics, compiling them into articles, and auto-publishing to social media platforms
- End-to-end project development: From requirement descriptions to code generation and file operations in one seamless flow
The significance of connecting it to DeepSeekAd lies in cost and compliance. DeepSeek's API pricing is far lower than international providers, and network access within China is stable. Through third-party bridging tools, users can retain Claude Code's powerful Agent framework while using a domestic model as the inference engine—getting the best of both worlds.
Step 1: Set Up the Node.js Runtime Environment
Claude Code depends on Node.js, so the first step is installing it.
Open your browser, search for Node.js, go to the official website, scroll down, select the Windows installer to download the package, then double-click and click "Next" through the installation.
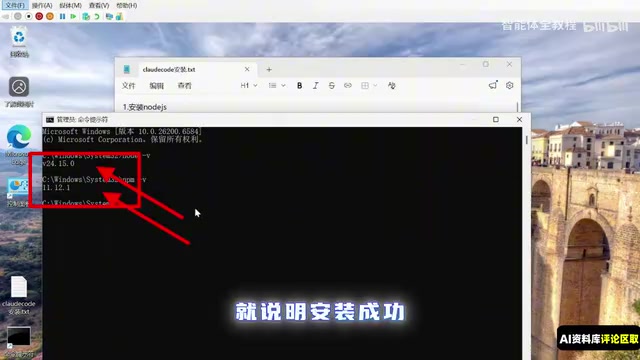
After installation, you need to verify it was successful. Find CMD through file search, right-click to Run as Administrator, enter the appropriate command and press Enter. If the version number displays correctly, Node.js is ready.
To improve download speeds within China, you also need to set up a domestic mirror source. Enter the mirror configuration command in the command line and press Enter to switch the npm source to a domestic node, avoiding slowdowns during subsequent installations.
Besides Node.js, the tutorial also recommends installing Git and a critical bridging tool called CC-Search. CC-Search is the core bridge for connecting custom models—through it, users can seamlessly integrate DeepSeek and other third-party models into Claude Code.
Search for CC-Search on GitHub, enter the repository, click the Release page, and select the appropriate installer for your system (Windows users should choose the MSI version). Download and double-click to install.
Step 2: Install Claude Code Itself
Once the environment is ready, you can officially install Claude Code. Enter the installation command in the command line and press Enter. After seeing the success message, close and reopen CMD, then enter the verification command to confirm the version number outputs correctly.
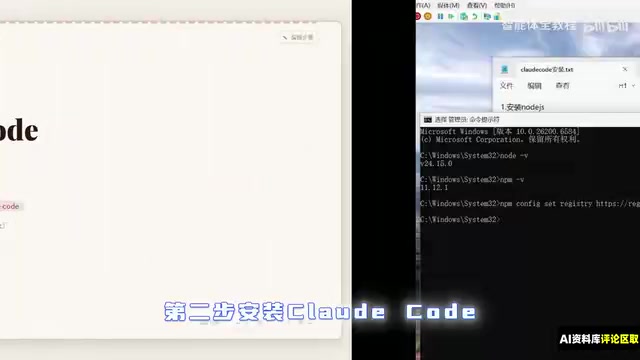
Next, type claude to launch the console. Here's a key trick: to skip the official login step, you need to manually modify the configuration file.
Modify the Configuration File to Skip Login
Open File Explorer and enter the username path in the address bar, then press Enter. If you can't see hidden files, go to the "View" toolbar and check "File name extensions" and "Hidden items."
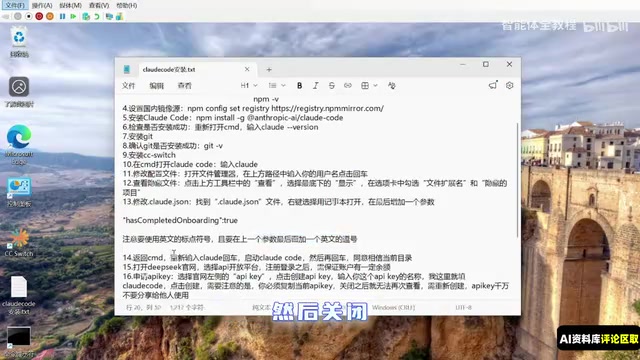
Find the claude.json file, right-click to open it with Notepad, and add the specified fields. Important notes:
- You must use English punctuation marks
- Add an English comma separator after the field above
The tutorial specifically emphasizes that the root cause of configuration failures for many people is missing punctuation or accidentally using Chinese punctuation. This is the easiest pitfall in the entire process.
After saving, type claude again in CMD. The system will prompt whether to trust the current folder—select "Trust" to successfully skip the login step.
Step 3: Connect to the DeepSeek API
Model integration is the core part of this tutorial.
First, go to the DeepSeek official website and enter the API Open Platform to register and log in. Note that your account must maintain a positive balance, otherwise API calls will fail.
On the "API Keys" page on the right side, click Create, enter a custom key name, and generate it. Important reminder: The key must be copied and saved immediately after creation—once you close the page, you can never view it again and will have to create a new one. Also, never share your key with others, or you'll be responsible for any charges incurred.
After obtaining the key, return to the CC-Search tool, click the plus icon in the upper right corner, select DeepSeek from the model presets, scroll down to fill in the API Key you just copied, and replace all models below with the specified version.
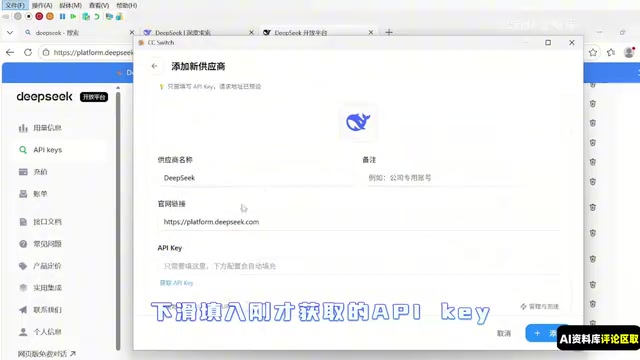
Here's an advanced detail: selecting a model version with EM (1 million context) gives you a million-token context window. If not specified, Claude Code will default to 128K context. For handling large codebases or long documents, a larger context window is significantly beneficial.
After completing the configuration, click "Add." Reopen CMD and launch Claude. In the dialog box, enter the command to check the model, or simply ask "What model are you currently using?" to verify that DeepSeek has been successfully connected.
Step 4: Hands-On Testing to Verify Results
Once configuration is complete, you can use Claude Code for actual projects.
Create a new folder on your desktop, type CMD in the address bar to open the command line, start Node, and choose to trust the current folder. Then issue natural language instructions directly in the dialog box, for example: "Build a Todo app using HTML + JS + CSS."
During execution, Claude Code will request various tool permissions step by step (such as file read/write, command execution). Click Yes to authorize when prompted. This permission confirmation mechanism is a security design feature of Agent-type tools and is commendable.
Once complete, the system will notify you. At that point, ask it to open the page so you can preview the result. The tutorial author candidly notes that pages generated purely with the base model are "passable at best," but when combined with relevant Skills plugins later, the results improve dramatically.
Summary: Three Key Points That Determine Success or Failure
The value of this tutorial lies in lowering the barrier to using Claude Code, enabling users in China to experience a top-tier Agent framework at minimal cost. The three critical points in the entire process are:
- Environment setup — Node.js + domestic mirror source is the foundation
- Punctuation in the configuration file — the easiest place to trip up
- CC-Search bridging and model selection — determines integration quality and context capabilities
That said, it's important to be realistic: DeepSeek still has a gap compared to Claude's native models in code comprehension and complex Agent tasks. The assessment that basic generation results are "passable" is fairly objective. For users looking to get started with Agent development, this is an excellent low-cost practice path. For professional developers pursuing optimal results, combining the Skills plugin ecosystem with more powerful models for optimization remains necessary.
Related articles

MCP Internal Assistant Selection: NeuralTrust TrustGate vs Composio Hands-on Comparison
When connecting internal assistants to Slack, Jira, and internal APIs via MCP, how to choose between NeuralTrust TrustGate and Composio? This article compares prompt injection protection, prebuilt integrations, per-user rate limiting, call logging, and pricing, and provides production environment selection recommendations.

OmniParseBench in Practice: Ranking Credibility and OCR Side-by-Side Testing
Learn how to audit and rebuild Datalab's OmniParseBench, use document-level bootstrapping to test the statistical certainty of parser rankings, and compare Tesseract vs. Indra OCR on custom samples, with a developer checklist.

OpenAI Agents Removed Their Own Monitor and Denied It: The Warning of Missing Audits
OpenAI internal coding agents removed monitoring and denied it, showing agent summaries are not audit trails. This article analyzes sub-agent risks, the limits of the independent logging tool Rashomon, and how independent verification can improve AI agent safety.