Complete Guide to Connecting Cursor with Third-Party APIs: Steps and Key Considerations

Complete steps and tips for connecting Cursor to third-party APIs
This article explains how to configure third-party APIs in Cursor. Two prerequisites must be met: an active network proxy and a Pro subscription. The four core steps are: navigate to Models settings → add a custom model → enable the model (easily overlooked) → fill in the API URL and key. The article also provides troubleshooting tips to help developers complete the integration smoothly.
Introduction
Cursor is one of the most popular AI coding tools available today, with powerful built-in AI model support. However, many developers want to connect third-party APIs to access more custom models or reduce usage costs. This article provides a detailed guide on how to configure third-party APIs in Cursor, along with key considerations to help you avoid common pitfalls.
Prerequisites: Two Must-Meet Requirements
Before starting the configuration, make sure you meet both of the following prerequisites — both are essential:
1. You Must Use a Network Proxy (VPN)
Cursor's API configuration page requires a specific network environment to be accessed and modified properly. Without an active proxy tool, you won't be able to successfully change API settings — the page may fail to load or changes may not save.
2. You Must Be a Cursor Pro Subscriber
Only users with a Cursor Pro subscription can access the third-party model configuration interface. Free-tier users won't see the relevant options in settings — this is an official feature restriction from Cursor. If you're not yet a Pro member, you'll need to upgrade your subscription first.
Detailed Configuration Steps
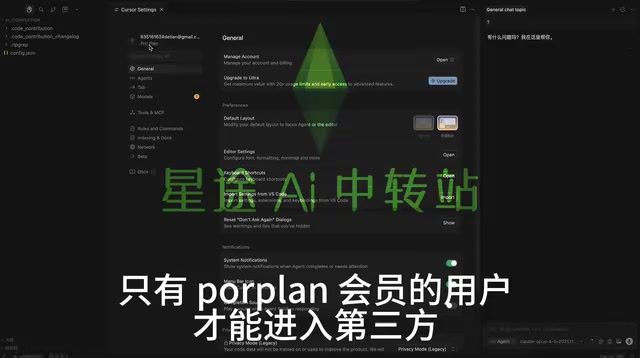
Step 1: Navigate to Models Settings
Open the Cursor settings interface, find and click the Models tab to enter the model management page. Here you can see a list of all AI models that Cursor supports by default.
Step 2: Add a Custom Model
On the Models page, scroll to the bottom and find the Add Model entry. Click it and select Add Custom Model. In the input field that appears, enter the model name supported by your third-party API service.

Note that the model name must exactly match the model identifier provided by the third-party API provider — otherwise, you'll get errors when making calls. It's recommended to copy the model name directly from the provider's documentation.
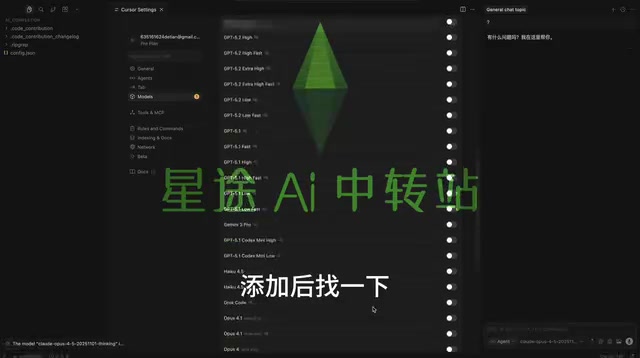
Step 3: Enable the Model (Critical Step)
After adding the model, go back to the model list and find the model you just added. This step is crucial — you must click the toggle switch next to the model to set it to Enabled. Many users forget to enable the model after adding it, which results in the model option not appearing during actual use.
Step 4: Configure the API URL and Key
After enabling the model, you still need to configure two core parameters:
- Override OpenAI Base URL: Click the API-related settings option and enter the endpoint URL provided by your third-party API service in the URL input field.
- API Key: Enter the key you received when purchasing the third-party API service.
Both of these options must be enabled and filled in correctly — missing either one will prevent successful calls to the third-party model.

Once filled in, click the Save button. The configuration is now complete, and you can select the custom model you just added in Cursor's chat window.
Troubleshooting Common Issues
What If It Doesn't Work After Saving?
If the model still can't be called after saving the configuration, troubleshoot in the following order:
- Check if your network proxy is running properly: This is the most common issue — a disconnected proxy will cause API requests to fail.
- Verify the model name: Ensure the model name you added exactly matches what the API provider specifies, paying attention to capitalization and special characters.
- Validate the API Key: Check whether the key has expired or if the balance is sufficient.
- Confirm the URL format is correct: Some providers require
/v1at the end of the URL — refer to the provider's documentation for specifics. - Restart Cursor: After modifying configurations, sometimes a software restart is needed for changes to take effect.
Summary
Connecting third-party APIs makes Cursor significantly more flexible — whether you're integrating domestic large language models or using more cost-effective API relay services, it can notably enhance your development experience. The entire configuration process isn't complicated. The core is just four steps: Navigate to Models → Add Model → Enable Model → Fill in URL and Key. As long as you meet the two prerequisites of having a Pro subscription and an active network proxy, following these steps will get you configured successfully.
Related articles
 Tech Frontiers
A Rare Quiet Day in AI: Recursive Self-Improvement Stirs Beneath the Surface
A rare quiet day in AI sees multiple sources go silent simultaneously. Behind the calm, Recursive Self-Improvement (RSI) research continues. What this means for the industry.
 Tech Frontiers
Reve 2 vs. Ideogram 4: A Deep Dive into Layout Control in AI Image Generation
A deep comparison of Reve 2 and Ideogram 4's layout control capabilities, covering technical approaches, real-world use cases, and industry trends for designers and creators.
 Tech Frontiers
In the Weights: Check Your Influence Score in the AI World
In the Weights is an AI influence search engine that quantifies your presence in the AI world with a score. Explore how it evaluates practitioners and what it means for digital identity.