Complete Guide to Connecting Gemini 3.5 Flash with Codex CLI: Configuration for macOS and Windows

Connect Gemini 3.5 Flash to Codex CLI using RouterLink API proxy service
This article explains how to connect Google Gemini 3.5 Flash to OpenAI Codex CLI on both macOS and Windows using the RouterLink API proxy service. The core steps include: obtaining model configuration code from RouterLink and writing it to Codex's TOML config file, generating and configuring an API Key in the auth file, then restarting to verify. This approach leverages the OpenAI-compatible interface's status as an industry standard to achieve transparent model switching through protocol proxying.
OpenAI's Codex CLI is a powerful terminal-based AI programming assistant, but it only supports OpenAI's own models by default. What if you want to try Google's newly released Gemini 3.5 Flash? This article provides a detailed walkthrough on how to connect Codex to third-party models on both macOS and Windows using the RouterLink proxy service.
Why Switch Models for Codex CLI?
As a command-line programming tool from OpenAI, Codex CLI natively supports the GPT model family. However, with the release of Google's Gemini 3.5 Flash, many developers want to experience this new model within their familiar Codex workflow.
Gemini 3.5 Flash is Google's lightweight, high-speed inference model that excels at code generation, completion, and debugging tasks while offering lower latency and cost advantages. For use cases like command-line programming assistants where response speed is critical, Flash-series models are often more practical than larger flagship models — and that's the core reason they've attracted developer attention.
The fundamental principle behind API proxy services like RouterLink is protocol proxying: they expose a standard OpenAI-compatible interface to upstream tools (like Codex), receive requests, then translate and route them to the actual downstream model provider. This architecture works because the OpenAI API specification has become the de facto communication standard in the AI industry — numerous model providers including Anthropic, Google, and Mistral all offer interfaces compatible with this format. For developers, this means maintaining just one configuration and one API Key to flexibly switch between model providers without modifying any business code.
macOS Configuration Steps
Step 1: Get the Model Configuration Code
First, navigate to RouterLink's model page, which continuously updates with the latest models and their corresponding configuration tutorials. Find Gemini 3.5 Flash, open its detail page, scroll down, and locate the configuration code snippet for later use.
Step 2: Modify the Codex Configuration File
Open your installed Codex (if you haven't installed it yet, you'll need to do so via npm or another method first), and navigate to the configuration page. Copy and paste the model configuration code obtained from RouterLink, then save and exit.
Codex CLI uses TOML (Tom's Obvious, Minimal Language) format for storing configurations. This is a markup language designed specifically for configuration files — its syntax is more concise than JSON and stricter than YAML, making it a popular configuration file format in the Rust and Go ecosystems.
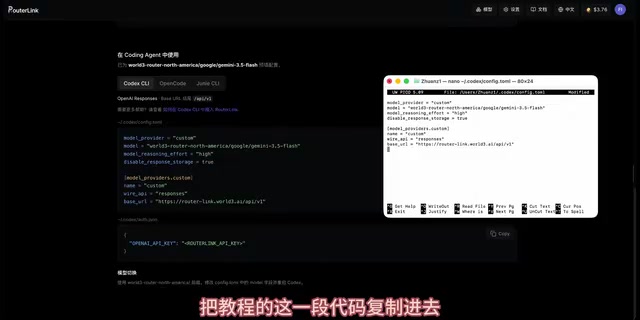
Step 3: Configure the API Key
Next, you need to configure the API key. Codex stores the auth credentials directory separately from the general config directory — this design follows the principle of least privilege, avoiding mixing keys with general configuration to improve security. Copy the configuration command and paste it into your terminal, then replace the Key placeholder with your own key.
How to get your Key: Go to the RouterLink website, click generate on the key management page, copy the newly generated Key, and return to the configuration page to complete the replacement. Save and exit the configuration page, pressing Y to confirm the save.
Step 4: Verify the Configuration
Open Codex and confirm the update. After a successful update, restart it. You should now see that the model in use has switched to Gemini 3.5 Flash.

Run a quick test by sending a command and confirming it responds normally. Open the Codex App to check the current model information — the response should now show Gemini. You can further verify by checking RouterLink's log page for the specific version called, confirming that requests are indeed going through Gemini 3.5 Flash.
Windows Configuration Steps
The configuration approach on Windows is identical to macOS, but file operations differ slightly.
Step 1: Create the Configuration File
In your terminal, locate Codex's configuration folder, navigate into it, and manually create the configuration document (Config TOML file).
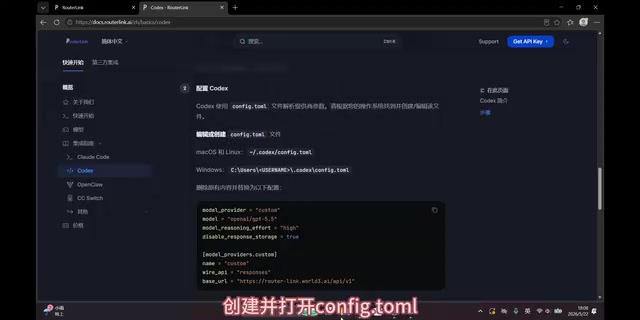
Step 2: Write the Model Configuration
Open the document you just created, go to the RouterLink website to find the Gemini 3.5 Flash model configuration code, copy it, paste it into the document, and save.
Step 3: Configure the API Authentication Key
Create a new document in the authentication configuration directory (Auth), open it, and paste the API configuration command.
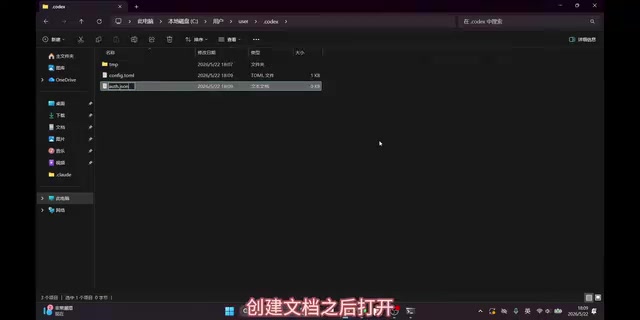
You'll also need to go to the RouterLink website to generate your own Key, copy it, return to the text file to replace the placeholder, then save and exit.
Step 4: Launch and Verify
Open Codex to confirm the settings have taken effect. The interface should show that the model being called is now Gemini 3.5 Flash. Opening the App side will also automatically sync to the new model — configuration is complete.
Configuration Summary
The entire configuration process can be distilled into three core steps:
- Model configuration: Get the target model's configuration code from RouterLink and write it to Codex's config file
- Key configuration: Generate an API Key on RouterLink and write it to Codex's auth credentials file
- Verification: After restarting Codex, confirm the model switch was successful through both the interface display and log records
It's worth noting that RouterLink supports far more than just Gemini 3.5 Flash — its model page is continuously updated with new models. This means that when other models are released in the future, you only need to replace the configuration code and corresponding Key to quickly try them in Codex, keeping your entire workflow unchanged.
Final Thoughts
Using API proxy services to connect development tools with third-party models is an extremely practical technique in today's AI development ecosystem. Its essence lies in leveraging the fact that the OpenAI-compatible interface has become an industry standard, achieving transparent model provider switching through a protocol proxy layer. It frees developers from being locked into a single model provider, allowing them to flexibly choose the most suitable model based on task requirements — whether prioritizing speed, cost, or specific capabilities. For Codex users, Gemini 3.5 Flash's fast response characteristics may deliver a noticeable experience improvement in daily programming assistance scenarios — it's worth trying.
Related articles
 Tutorials
ChatGPT Plus Subscription Guide: Are GPT-5.5, image-2, and Codex Worth the Upgrade?
A detailed look at ChatGPT Plus features — GPT-5.5, image-2, and Codex — with a Plus vs Pro comparison and a complete step-by-step subscription guide for users outside the US.
 Tutorials
Harness AI Engineering in Practice: Using Claude Code to Master Enterprise-Level E-Commerce Development
Deep dive into Harness AI Engineering: master enterprise e-commerce development with Claude Code using the Rules, Skills, Wiki, and Changes framework.
 Tutorials
Cursor + Codex Dual-IDE Collaboration: A Practical Methodology for Open-Source Project Customization
A complete methodology for open-source project customization based on real-world experience, detailing the Cursor+Codex dual-IDE workflow, seven-stage process, MVP validation, and AI source code reading techniques.