Complete Tutorial: Build an iPhone App from Scratch with AI in 24 Hours

Complete beginners can independently develop an iOS app within 24 hours using AI tools.
This article uses the development of an iOS teleprompter app as an example to detail how users with zero programming experience can build an app from scratch using AI (Gemini 2.5 Pro). With just a Mac, Xcode, and an AI tool, you can complete the entire development workflow — from describing requirements to the AI to get code, creating a project in Xcode, pasting the generated code, and leveraging AI for rapid error debugging. The article emphasizes the importance of prompt engineering and the natural synergy between the SwiftUI framework and AI code generation.
Introduction: In the AI Era, Everyone Can Be a Developer
In 2025, AI capabilities have far surpassed simple chat conversations. A creator with absolutely no programming background independently developed a working iPhone app in less than 24 hours with AI assistance. This isn't a fairy tale — it's a real, reproducible path available to everyone right now.
This article uses iOS app development as an example to break down in detail how to leverage AI tools to build an app from scratch. The same methodology also applies to Android apps, Windows programs, and even web development.
What You Need to Get Started with Zero Experience
Define Your Development Goal
Before getting your hands dirty, the most important step is figuring out: what app do you want to build? This decision determines all subsequent technical choices and development direction.
In this case study, the author chose to build a "teleprompter app" — an essential everyday tool for video creators. It has clear functionality and moderate complexity, making it an ideal first project for a complete beginner.
Three Tools Are All You Need
The entire development process requires just three things:
- A Mac computer: The essential hardware platform for iOS development
- Xcode: Apple's official free development tool, downloaded directly from the App Store
- Gemini 2.5 Pro: Google's AI large language model, responsible for generating and debugging code
About Gemini 2.5 Pro: This is a multimodal large language model released by Google DeepMind in 2025, with particularly outstanding performance in code generation. The model ranks among the top in mainstream programming benchmarks such as HumanEval and SWE-bench, capable of understanding complex natural language requirements and generating structurally complete engineering code. Compared to earlier AI coding assistants, Gemini 2.5 Pro's core advantage lies in its ultra-long context window (supporting million-token level input), meaning it can process multiple files across an entire project simultaneously rather than just individual code snippets — which is especially critical for debugging cross-file errors.
Regarding Gemini version selection: The Pro version has stronger code generation capabilities and lower error rates, but the free quick version also works — you'll just need more debugging rounds when encountering bugs. Currently, Gemini Pro offers free users several trial uses per day, and first-time users can get a one-month Pro subscription trial.
Hands-On: Generating Your First iOS Project with AI
Step 1: Describe Your Requirements to the AI
Open Gemini and paste your pre-organized requirement description. The more specific your description, the higher the quality of AI-generated code. The AI will quickly respond with complete operational steps and core code.
This involves an important concept — Prompt Engineering: The quality of AI-generated code is highly correlated with the precision of your requirement description. "Build a teleprompter app" versus "Build a teleprompter app that displays scrolling text with speed adjustment and mirror flip support, developed using SwiftUI" — these two descriptions will produce significantly different code quality. How to design input prompts to achieve optimal output has gradually become one of the core skills of the AI era.
Step 2: Create a New Project in Xcode
Following the AI's guidance, perform these operations in Xcode:
- Create a new project, select "App" as the type
- Fill in the project name (e.g., "My Teleprompter")
- Select Swift for the language and SwiftUI for the interface framework
- Choose a save location (the desktop is recommended for easy access)
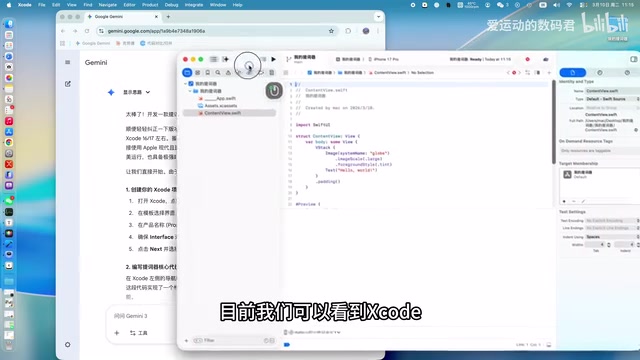
Why Swift and SwiftUI: Swift is a programming language released by Apple in 2014, designed to replace Objective-C as the preferred language for iOS/macOS development. SwiftUI is a declarative UI framework introduced in 2019 — developers only need to describe what the interface "should look like" rather than imperatively describing "how to draw it step by step," dramatically reducing the complexity of interface development. This declarative nature happens to align perfectly with how AI generates code — AI can express complex interface logic with relatively concise code. This is the core reason why this article chooses SwiftUI over the older UIKit framework.
Step 3: Paste the AI-Generated Code
After the project is created, locate the ContentView.swift file — this is the code file corresponding to the app's home screen interface. Simply select all and replace with the AI-generated code. The code for the basic functionality in this case is only about 75 lines.
What to Do When Code Shows Errors: Quick Debugging with AI
Don't Panic When You See Errors
Red errors appearing after pasting code is completely normal. If "Build Failed" shows up after clicking the run button (the play icon), it means there are issues in the code that need fixing.
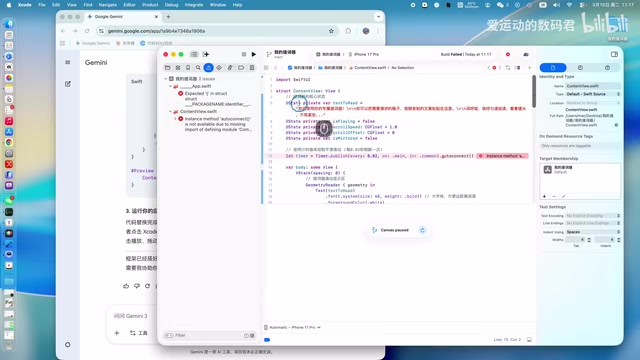
Understanding the Nature of Errors: Xcode uses the LLVM compiler infrastructure behind the scenes — code must pass strict static type checking and compilation before running, which differs from the immediate execution mode of dynamic languages like Python. Because of this, errors in iOS development are often precisely captured before runtime, with specific line numbers and error types attached. This mechanism actually provides AI with extremely precise error location information for debugging, making AI's code repair efficiency remarkably high — this is why the "screenshot + error log" feedback approach is so effective.
The Most Efficient Way to Report Errors to AI
The best approach for feeding errors back to AI:
- Screenshot: Send a screenshot of the error-showing code interface to the AI
- Export error logs: Click the issues panel icon in Xcode, select "All Issues" and export the file
- Upload source code files: Upload the corresponding .swift file as well
Send these three items to Gemini with a simple message like "The code has errors, please help me fix it."
Related articles
 Tutorials
ChatGPT Plus Subscription Guide: Are GPT-5.5, image-2, and Codex Worth the Upgrade?
A detailed look at ChatGPT Plus features — GPT-5.5, image-2, and Codex — with a Plus vs Pro comparison and a complete step-by-step subscription guide for users outside the US.
 Tutorials
Harness AI Engineering in Practice: Using Claude Code to Master Enterprise-Level E-Commerce Development
Deep dive into Harness AI Engineering: master enterprise e-commerce development with Claude Code using the Rules, Skills, Wiki, and Changes framework.
 Tutorials
Cursor + Codex Dual-IDE Collaboration: A Practical Methodology for Open-Source Project Customization
A complete methodology for open-source project customization based on real-world experience, detailing the Cursor+Codex dual-IDE workflow, seven-stage process, MVP validation, and AI source code reading techniques.