Cursor AI Beginner's Guide: 10 Core Features Explained with Hands-On Examples

A systematic breakdown of Cursor AI's 10 core features to help you build an efficient dev workflow.
Using a dog training tracker app as a hands-on example, this article systematically covers Cursor AI's 10 core features: three working modes (Agent/Ask/Manual), model selection, project rules, MCP server plugin ecosystem, Taskmaster task management, precise context passing, checkpoint restore, Stagewise visual extension, and Custom Modes. The article emphasizes that effective Cursor usage depends on setting rules first, providing precise context, leveraging mode combinations, and codifying repetitive workflows into custom modes.
Cursor, an AI-powered integrated development environment, consistently tops various developer tool rankings. It's powerful and affordably priced, but for beginners, the sheer number of features can be overwhelming. This article walks through Cursor AI's 10 core features one by one using a real project—a dog training tracker app—to help you get started quickly and build an efficient development workflow.
Cursor Pricing: Beginner-Friendly
Cursor offers a free plan with a two-week Pro trial included. The Pro plan costs $20/month and includes the following key benefits:
- Unlimited code completions
- 500 premium model requests per month (using top-tier models like Claude, GPT, etc.)
- Unlimited slow requests (after exceeding 500 requests, the service doesn't stop—it just responds more slowly)
- Max Mode (activates the model's maximum context window, but switches to usage-based billing)
An important note: while Max Mode can handle more complex tasks, it incurs additional charges beyond the $20 monthly fee, so use it cautiously.
Three Core Modes: Agent, Ask, and Manual
Press Command + I to open Cursor's chat interface—the primary entry point for AI interaction. Cursor provides three core working modes suited to different development scenarios:
Agent Mode is the most powerful. It can autonomously plan, search for information, edit any file in your project, and execute terminal commands—like an AI programming assistant that works independently. For example, you can say "Create an environment file with Supabase data," and it will automatically handle file creation and variable configuration.
Ask Mode is ideal for querying your codebase without modifying any code. For instance, if you need to know "What steps do I need to complete in Supabase to get the local app running," it will provide detailed instructions without touching your code.
Manual Mode gives you full control, allowing you to enter specific files and perform precise modifications.
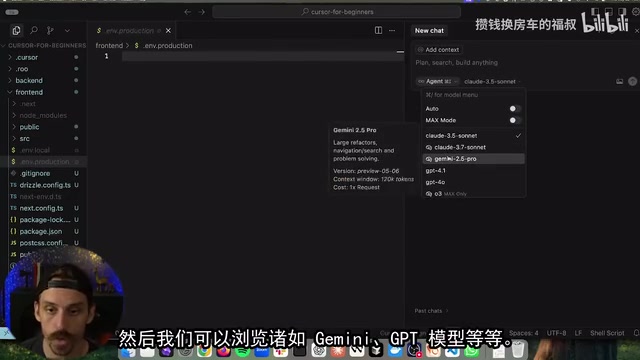
Model Selection: Auto Mode vs. Manual Switching
Cursor recommends using Auto Mode by default, where the system automatically selects the most appropriate AI model based on task complexity. You can also switch manually, choosing from Claude 3.5, Claude 3.7 Sonnet Thinking (consumes double the request quota), Gemini, GPT series, and more.
Additional models like Groq and DeepSeek can be enabled in settings. Each model displays its context window size and relative cost, helping you make informed trade-offs. For resource-intensive planning tasks, choosing a more powerful model is usually worth the investment.
Project Rules: Setting Precise Guardrails for AI
Rules are an extremely important yet often overlooked feature in Cursor. They're essentially specific guidelines and coding conventions passed to the language model, ensuring AI generates code the way you expect.
At minimum, consider creating the following rule categories:
- Frontend rules (e.g., Next.js coding standards)
- Backend rules
- Authentication rules (e.g., how to use Supabase Auth)
- Styling rules
Creating rules is straightforward: go to Settings → Project Rules → Add New Rule, then paste your rule content. Two recommended sources for rules:
- Cursor Directory (cursordirectory.com) — provides framework-categorized rule sets, including official rules
- Playbooks.com — offers rules, MCP server configurations, and prompt templates
Rules can be triggered in four ways: manually attached, automatically requested by the agent, file pattern matching (e.g., auto-loaded when matching .tsx files), or always attached.
A practical example: When using MagicMCP to build components, it kept trying to initialize a new Next.js project in the root directory, even though a project already existed in the frontend directory. Creating a rule—"Never initialize a new project; check the frontend directory first"—completely solved this recurring issue.
MCP Server Configuration: Cursor's "App Store"

MCP (Model Context Protocol) servers function as Cursor's third-party plugin ecosystem, similar to the iPhone's App Store. They dramatically expand Cursor's capabilities:
- Taskmaster AI: Automatically converts PRD documents into task lists with dependency relationships
- MagicMCP (21st.dev): AI-driven UI component design and generation
- Exa / Perplexity: Web search and research
- Context: Fetches up-to-date documentation for third-party tools
- Memory MCP: Project memory management
Installing MCPs follows a unified, simple process: go to Cursor Settings → MCP → Add New Global MCP Server, then paste the configuration JSON (containing the server name and startup command). Each MCP's documentation page provides ready-to-use configuration code.
Hands-On Demo: Managing Development Tasks with Taskmaster AI
Taskmaster AI is a powerful project management tool. By passing a PRD document as context, it automatically generates structured task lists and establishes logical dependency chains—ensuring you don't start building a dashboard before the data layer is ready.
In practice, Taskmaster generated 25 tasks from the PRD, with 7 assessed as high complexity and 18 as medium complexity. Complex tasks can be further broken down into subtasks (e.g., 10.1, 10.2, 10.3), making each step manageable.
Context Management: Helping AI Precisely Understand Your Intent

Context management is the most critical skill for using Cursor effectively. You can provide precise context to AI through multiple methods:
- Entire files: Reference a file directly as context
- Code snippets: Hold Command and select specific code lines to pass only the relevant parts
- Task files: Reference Taskmaster-generated task descriptions
- Public documentation: Search and reference third-party docs (e.g., Supabase documentation)
- Git history: Pull change information from version history
- Past chat history: Reference related operations from previous conversations
- Cursor rules: Manually attach specific rule sets
- Terminal output: Connect directly to the terminal to view run logs
- Web search: Instruct AI to find the latest documentation online
A best practice: before every request, ask yourself "What context should I provide?" Passing relevant files, past conversations, rules, and documentation effectively prevents AI from performing unexpected operations.
Checkpoint Restore: One-Click Rollback When AI Makes Mistakes
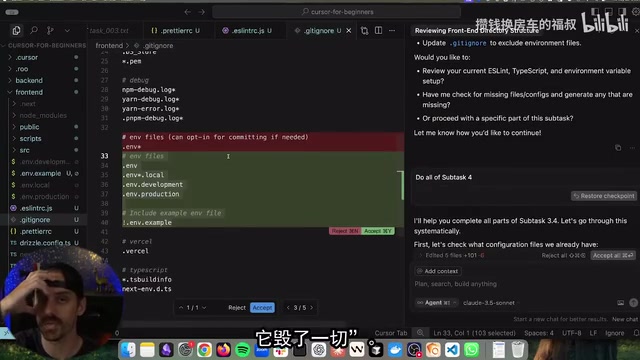
When AI modifications don't meet expectations, Cursor provides a Restore Checkpoint feature. Simply scroll up to the message before things went wrong, click "Restore Checkpoint," and all subsequent operations are undone, returning everything to a working state. This feature is an indispensable safety net during AI-assisted programming.
Code changes are highlighted in green (additions) and red (deletions/modifications), giving you clear visibility into the specific impact of each operation.
Stagewise Extension: Visually Select Components with Precise Feedback
Stagewise is a practical Cursor extension that, once installed, lets you directly highlight and select specific components on a page in the browser, then send them as precise context to Cursor.
For example, if you notice a dog avatar still shows the "upload button" after an image has been uploaded, simply click that component on the page, type "Don't show this section when the user has already uploaded an image," and Stagewise automatically locates the corresponding code file and specific line numbers. AI completes the fix in under a second.
Installation: search for Stagewise in the extensions marketplace → install → Command + Shift + P → enter the relevant command to complete initialization.
Custom Modes: Codify Your Best Workflows
Custom Modes are one of Cursor's most advanced and powerful features. They allow you to define AI workflows, available tools, and specific instructions.
Debug Mode example:
- Identify the 5 main root causes of the issue
- Add console logs and early returns in the code to locate data anomalies
- Use Perplexity to search related GitHub Issues
- Verify hypotheses and execute the fix
Security Audit Mode example:
Get a security audit prompt from Playbooks.com covering authentication, input validation, data protection, API security, and more to create a dedicated security review agent.
The real power of Custom Modes lies in feature stacking—you can integrate Taskmaster task management, Memory MCP style guides, MagicMCP component generation, and other tools into a single mode, forming an end-to-end automated workflow.
Summary: Building Your Efficient Cursor AI Workflow
The key to using Cursor effectively lies in organically combining its features:
- Rules first: Set up project rules before writing a single line of code
- MCP empowerment: Install MCP servers suited to your project to expand capabilities
- Precise context: Carefully select the context you pass with every request
- Leverage modes: Choose Agent, Ask, or Manual mode based on task requirements
- Codify with Custom Modes: Package repetitive workflows into custom modes
- Safety net: Use the checkpoint restore feature to safeguard your code
Whether you're a programming beginner or a seasoned developer, Cursor offers enough depth for continuous improvement. The key isn't how powerful the tool itself is, but whether you can choose the right combination of tools and continuously refine your workflow through practice.
Related articles
 Tutorials
ChatGPT Plus Subscription Guide: Are GPT-5.5, image-2, and Codex Worth the Upgrade?
A detailed look at ChatGPT Plus features — GPT-5.5, image-2, and Codex — with a Plus vs Pro comparison and a complete step-by-step subscription guide for users outside the US.
 Tutorials
Harness AI Engineering in Practice: Using Claude Code to Master Enterprise-Level E-Commerce Development
Deep dive into Harness AI Engineering: master enterprise e-commerce development with Claude Code using the Rules, Skills, Wiki, and Changes framework.
 Tutorials
Cursor + Codex Dual-IDE Collaboration: A Practical Methodology for Open-Source Project Customization
A complete methodology for open-source project customization based on real-world experience, detailing the Cursor+Codex dual-IDE workflow, seven-stage process, MVP validation, and AI source code reading techniques.