Cursor Beginner's Guide: Build a Complete Project with AI from Scratch

A beginner's guide to building a complete Python project using Cursor's AI-powered coding modes.
This guide introduces Cursor, an AI-powered code editor built on VS Code, and walks complete beginners through building a Python student management system. It covers the three chat modes (Agent, Ask, Manual), why Claude is recommended for production projects, and how Cursor's auto-run and auto-debugging features can save hours of troubleshooting.
What Is Cursor: A Code Editor for the AI Era
Cursor is one of the hottest AI programming tools right now — essentially a code editor with a large language model deeply integrated into its core. Built on VS Code's open-source framework (Code - OSS), it embeds LLM API calls directly into the editor engine, delivering capabilities far beyond traditional code completion plugins like IntelliSense. While traditional completion relies on static analysis and rule matching, LLMs can understand contextual semantics, reason across files, and even generate entire function bodies from comments. This approach was first commercialized by GitHub Copilot in 2021; Cursor takes it further by extending AI capabilities to project-level architecture design and multi-file collaborative editing.
If you've used VS Code, picking up Cursor is nearly effortless — the layout, shortcuts, and plugin ecosystem are all familiar. The real difference is the AI chat panel on the right side.
For complete beginners, Cursor's biggest appeal is this: you barely need to write any code yourself. Just describe what you want in plain language, and the AI handles everything from project structure design and code generation to dependency installation and bug fixing. This guide walks you through the entire process using a "Student Management System" as a hands-on example.
Download and Installation
Getting Cursor is straightforward: search for "Cursor" in your browser, visit the official website, and download the version for your operating system. Note that you'll need to register an account on first use — the app will prompt you to log in when you open it. Once installed, open a folder as your workspace (e.g., create a new Cursor Workspace directory), and you're ready to start chatting with the AI.
Three Chat Modes: Agent, Ask, and Manual
All of Cursor's core interactions happen in the AI panel on the right. Understanding its three chat modes is the first step to using this tool effectively.
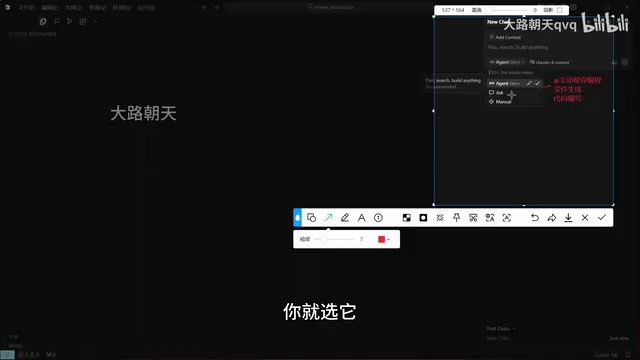
- Agent mode: The AI actively takes over the coding process — generating files, writing code, and executing commands. Choose this when you want the AI to build out an entire project for you.
- Ask mode: Answers specific questions without proactively creating files or taking over the project. Best for technical consultation, exploring options, and Q&A.
- Manual mode: Returns full coding control to the developer; the AI only offers reference suggestions. Suited for experienced users who just want occasional hints.
A simple rule of thumb: choose Agent when you want the AI to write code, Ask when you just have questions, and Manual when you only need suggestions.
Under the hood, Agent mode is an engineering implementation of the "ReAct" (Reasoning + Acting) framework. The AI doesn't just generate text — it can call tools, including file system read/write, terminal command execution, and code search. After each action, the AI observes the result and decides the next step, forming a closed loop of "think → act → observe → think again." This is fundamentally different from a traditional chat AI's single-turn Q&A: Agent mode gives the AI the ability to continuously drive a task forward, rather than just outputting text suggestions.
Model Selection: Prioritize Claude for Production Projects
The chat panel lets you switch between different AI models — both premium paid models and free ones. Here's a direct recommendation: if your project is headed for a production environment, prioritize Claude (the Claude Sonnet series).
The Claude model family is developed by Anthropic, and its code generation capabilities consistently stand out across multiple benchmarks. SWE-bench specifically tests a model's ability to resolve real GitHub Issues, and Claude Sonnet 3.5 has long ranked near the top of that leaderboard. Anthropic places particular emphasis on the "Constitutional AI" training approach, which leads the model to produce more explainable, maintainable code structures rather than just chasing functional output. This is why Claude performs especially well in complex projects requiring multi-file collaboration. Compared to the value of a real production project, the model usage cost is negligible — and Claude is widely regarded as one of the strongest models for code generation today.
If you're only using Ask mode for technical consultation without code generation, the choice of model is more flexible and you can switch freely based on your needs.
Hands-On: Building a Student Management System in Python from Scratch
Now let's get practical. We'll approach this as a complete beginner and have Cursor build us a student management system.
Step 1: Use Ask Mode to Determine the Tech Stack
Start with Ask mode: "I want to build a student management system in Python — can you recommend a tech stack?" Claude will quickly provide a complete technical proposal, including recommended web frameworks and databases. Since we're building a small project, you can add "I need something lightweight," and it will tailor its recommendations accordingly (e.g., Flask + SQLite).
Flask is a micro web framework in the Python ecosystem, created by Armin Ronacher in 2010. "Micro" doesn't mean weak — it means the core stays lean and extensions are added as needed, in contrast to Django's "batteries-included" philosophy. SQLite is an embedded database that requires no separate server process and stores the entire database as a single file; Python's standard library includes built-in support for it via the sqlite3 module, so no extra installation is needed. The Flask + SQLite combination has become a classic choice for small projects and prototyping: zero configuration, easy deployment, minimal code — all of which make it ideal for AI-assisted generation, since simpler generated code means fewer chances for the AI to make mistakes.
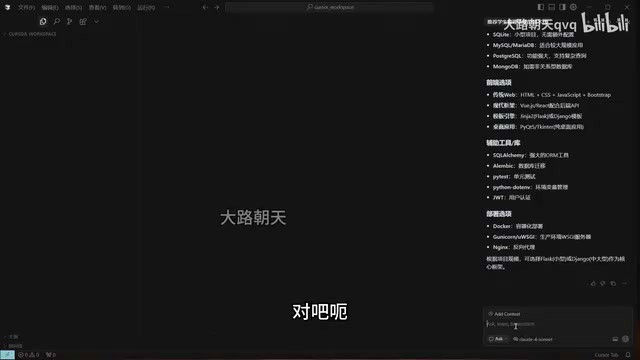
The value of this step is clear: let the AI help you map out the overall approach and tech stack before writing any code, avoiding the costly rework that comes from diving in blindly.
Step 2: Switch to Agent Mode to Generate the Code
Once the tech stack is decided, switch to Agent mode and simply tell it to "generate the relevant code for me." The AI will then work through the following in sequence:
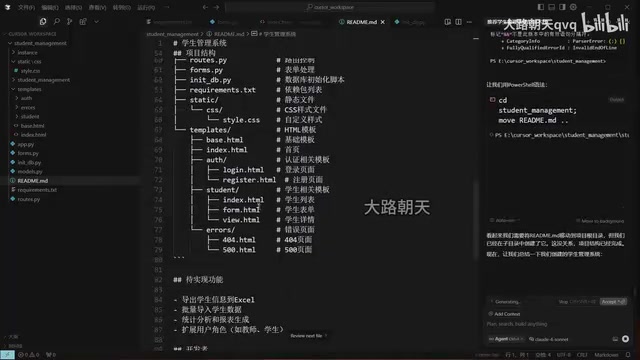
- Plan the project's directory structure;
- Build the directories and files step by step via the command line;
- Generate each code file one by one, automatically checking and fixing errors if they arise.
During generation, you'll see yellow and red highlighted changes indicating newly generated or modified content — you'll need to click "Accept" to save them. You can approve changes as they come in, or wait until everything is done and accept them all at once.
A Note on the "Auto-Run" Permission Setting
There's one key setting to be aware of: whether to enable auto-run. When the AI needs to execute commands (like installing dependencies or starting a service), you have two options — have it ask you each time, or let it run automatically. If you want to hand the entire process over to the AI, enabling auto-run avoids constant interruptions. With it on, the experience is close to "one-click generation" — the AI autonomously handles everything from code generation to environment setup.
AI Auto-Debugging: Saving Hours of Troubleshooting
Once the project is generated, have the AI run the application. During startup, a dependency version compatibility issue appeared — but since auto-run was enabled, the AI immediately reinstalled the correct dependency versions and resolved it automatically.
Dependency version conflicts in the Python ecosystem have plagued developers for years. The root cause is that early versions of pip lacked strict dependency locking mechanisms. Different libraries may have conflicting version requirements for the same underlying dependency (like Werkzeug or Jinja2), leading to the classic "works on my machine" problem. The community has responded with a succession of tools — virtualenv, pipenv, Poetry, uv — to isolate and lock dependency environments. The AI can quickly pinpoint these issues because its training data includes vast amounts of Stack Overflow Q&As and GitHub Issues, giving it a rich library of "version conflict → solution" pattern-matching experience. An experienced developer might spend 30 minutes tracking down this kind of issue; someone less familiar could spend two hours without finding the answer. The AI resolved it almost instantly. This is one of the scenarios where AI coding tools deliver the most tangible efficiency gains.
After the fix, the application launched successfully at 127.0.0.1:5000. Copy the address into your browser and you'll see the login page. After logging in with the default credentials, you can view, add, edit, and delete student records, and the grade tracking module has also been scaffolded.
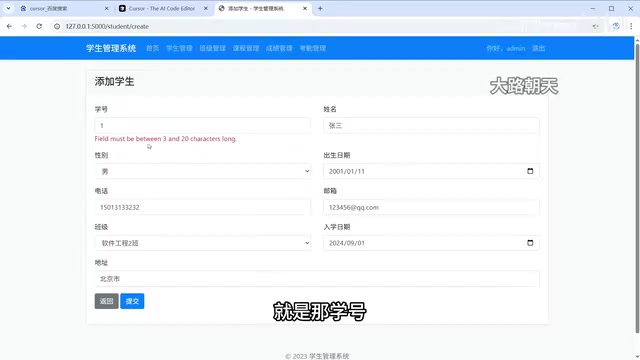
Some minor issues also surfaced during testing — for example, the validation message "Student ID must be between 3 and 20 characters" appeared in English when adding a student. These small issues can simply be reported to the AI, which will update them to display in Chinese.
Important Limitations to Keep in Mind
While Cursor dramatically lowers the barrier to programming, there are a few things every beginner must understand:
Features Are Only Implemented If You Ask for Them
During the demo, clicking "Grade Records" triggered a loading error — because that feature hasn't been implemented yet. The AI clearly distinguished between "implemented features" and "features to be implemented" during generation; this demo only fully built out the "Add Student" module. If you need the full feature set, simply describe all your requirements upfront and let the AI implement them one by one — the trade-off is time: it may take anywhere from 30 minutes to an hour.
You Still Need a Basic Runtime Environment
Whether installing dependencies or starting the Flask server, the entire process depends on a working Python environment. That means Python must already be installed on your machine. If you're using MySQL instead of SQLite, you'll also need to set up a database environment separately. The AI can write your code and fix bugs, but having a working runtime environment is still a prerequisite that users need to handle themselves.
Summary
Cursor makes "building a complete project with natural language" a reality by deeply integrating powerful AI models — especially Claude — into a familiar editor interface. For beginners, mastering the three chat modes, choosing the right model, and making good use of auto-run and auto-debugging is enough to produce a working application prototype in a very short time.
That said, it's not magic: features need to be clearly described to be implemented, and the runtime environment still needs to be set up manually. Think of Cursor as a highly efficient "AI pair programmer" rather than a completely mindless black box — that's how you'll get the most out of it.
Key Takeaways
Related articles
Understanding GitHub's Availability Report: Platform Stability and Developer Response Strategies
Deep dive into GitHub's monthly availability report: analyzing service degradation impacts, CI/CD fault tolerance, and platform dependency risk strategies for resilient development.
OpenAI's Claim of Solving a Millennium Prize Problem Sparks Academic Controversy
OpenAI claims its AI solved a Millennium Prize Problem, sparking debates over attribution, verification, and AI's role in reshaping mathematical research.
Ledoit-Wolf Covariance Shrinkage in Practice: 57% Lower Turnover + 10x GPU Acceleration
Learn how Ledoit-Wolf covariance shrinkage reduces portfolio turnover by up to 57% and how cuML GPU acceleration cuts backtest time from 1.5 hours to 9 minutes.