Cursor + Claude in Action: Building a Python Student Management System from Scratch with AI

Build a Python student management system from scratch with Cursor and Claude—no coding experience needed.
This hands-on guide walks through using the AI-native editor Cursor with the Claude model to build a Python student management system from scratch. It covers the three chat modes (Agent, Ask, Manual), model selection tips, auto error-fixing, and an honest look at AI's limits.
In an era where AI coding tools emerge one after another, Cursor has become a name that developers can't ignore. As a code editor with deeply integrated AI capabilities, it has pushed the concept of "writing code in natural language" to new heights. This article, based on a complete hands-on demonstration, walks through the core usage of Cursor and, combined with the Claude model, completes the full development process of a Python student management system.
What Is Cursor: More Than an Editor with Plugins
Cursor is essentially an AI-native code editor. Its interface layout will feel familiar to anyone who has used VSCode or PyCharm: the project directory on the left, the code display area in the middle, with almost identical interaction logic between the two. The real difference lies in the AI chat panel on the right—this is the soul of Cursor.
Some industry background is worth adding here: Cursor is developed by Anysphere. Rather than building an editor from scratch, it is based on a deep fork of the open-source VSCode. This strategy is quite common in the AI coding space—directly reusing VSCode's mature interface framework, plugin ecosystem, and keyboard shortcut system greatly reduces the migration cost for developers. Unlike GitHub Copilot and similar solutions that embed AI as plugins into existing editors, Cursor took the "AI-native" route: it elevated AI capabilities from an auxiliary layer to the architectural core, redesigning the entire editor around AI interaction. This difference is reflected in Cursor's ability to read the entire codebase as context, understand project structure across files, and directly execute terminal commands—rather than just making single-line completions at the cursor.
Unlike the traditional editor model of "humans write code, tools assist," Cursor flips the logic: developers manage the AI conversation on the right, and the code directory on the left gets generated "naturally." In other words, your core work shifts from typing on the keyboard to describing requirements. This paradigm shift is exactly what sets it apart from ordinary code completion tools.
Downloading is simple—just search for the official website to get the installer. But note that Cursor requires an account registration before use. After installation, use "Open Folder" to select a workspace (for example, create a dedicated working directory), and you can start collaborating with the AI.
Cursor's Three Chat Modes: Understanding Them Is the First Step
Before using Cursor, you must first understand its three chat modes—these are the core switches that determine how much the AI intervenes.
Agent (Autonomous Coding Mode)
This is the most "aggressive" and powerful mode. Once selected, the AI will actively take over the entire coding process: from creating files and writing code to organizing project structure, all done automatically by the AI. If your goal is to have the AI build a complete project from scratch, this is the only choice.
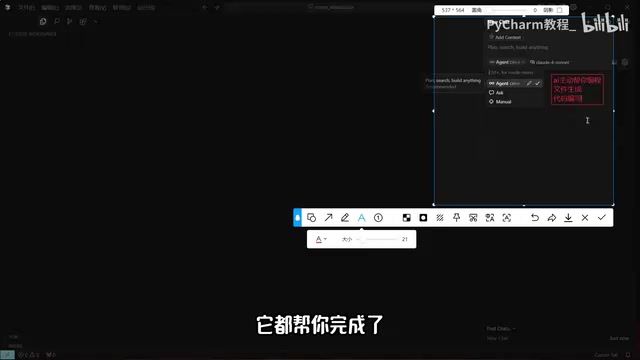
Ask (Question Mode)
Ask mode is more restrained—it only provides answers to the specific questions you raise, without proactively creating large numbers of files or taking over your coding workflow. When what you need is technical consultation or solution suggestions rather than directly generated projects, Ask is the more suitable choice.
Manual (Manual Mode)
Manual mode returns full control of coding to the developer. The AI steps back and only offers reference suggestions. It's suited for experienced developers who want to lead the coding themselves and only want an "AI copilot."
There's no ranking among the three modes—the key is flexibly switching based on the scenario. The approach in the demo is quite representative: first use Ask mode for technical consultation, then switch to Agent mode to actually get to work once the plan is decided.
Cursor Model Selection: For Production Projects, "Just Go with Claude"
In the AI panel, Cursor offers two categories of choices: paid premium models and free models. The presenter's advice is very direct: if the project is for a production environment, choose Claude (the Sonnet series) directly.
There are two reasons. First, Claude is currently recognized as one of the strongest coding models, standing out in code generation accuracy and complex logic handling. Second, from a cost perspective, for a project that will actually be put into use, the small cost of model calls is "not worth mentioning." In other words, in professional scenarios, don't sacrifice code quality to save a few dollars.
This conclusion isn't unfounded—it has quantitative backing. In widely used code capability benchmarks in the industry, such as HumanEval (measuring function-level code generation correctness) and SWE-bench (measuring the ability to resolve real GitHub Issues), Anthropic's Claude 3.5/3.7 Sonnet series has long ranked at the top, excelling especially in multi-step reasoning, complex refactoring, and long-context code understanding. The gap in coding ability between models may not be obvious on simple tasks, but it is significantly amplified when handling complex scenarios such as cross-file dependencies, implicit business logic, and boundary condition validation. This also confirms from another angle the rationality of "just going with Claude"—the cost per model call is usually measured in cents, while a single logic error can lead to hours of debugging or even a production incident. The two are on entirely different cost scales.
It's worth noting that free models are sufficient for learning and small experiments, but once a formal project is involved, the gap in model capability is significantly amplified.
Hands-On: Building a Python Student Management System with AI
The presenter, as a "complete beginner," walked through the entire development process, making it ideal for absolute beginners to follow.
Step 1: Use Ask Mode to Decide the Tech Stack
First, use Ask mode to ask: "I want to develop a student management system with Python—recommend a tech stack for me." Claude quickly provided framework suggestions. Once the requirement was clarified as a "small project," the AI further narrowed down the options and ultimately settled on a lightweight tech combination based on Flask.
It's worth elaborating on this tech selection. Flask is one of the most popular lightweight web frameworks in the Python ecosystem, belonging to the "microframework" category. Compared to the feature-rich, all-in-one Django, Flask's core is minimalist, providing only basic capabilities like routing, request handling, and template rendering, with everything else introduced on demand through extensions. This "just enough" philosophy makes it very suitable for small projects like student management systems and rapid prototyping. The project's default use of SQLite is an embedded database—no separate database service needs to be installed, and data is stored directly in a single file, so it works "out of the box." By contrast, MySQL is a relational database server that requires independent deployment, suited for production scenarios with large data volumes and concurrent access. The AI's choice of Flask + SQLite when recommending the tech stack is exactly a reasonable decision that weighs project scale against configuration complexity.
Step 2: Agent Mode Auto-Generates Code
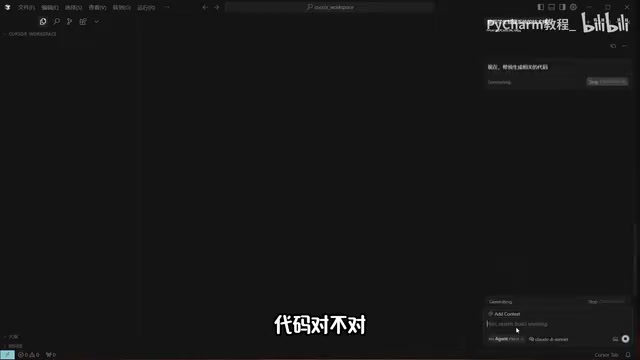
After deciding the tech stack, switch to Agent mode and let the AI start writing code. This step demonstrates Cursor's most impressive capability:
- The AI first plans out the complete project structure, then builds it step by step through commands;
- Newly generated content is highlighted in yellow/red, and developers can confirm each item one by one or "approve and save all";
- The project is written from the tech stack, directory structure, page templates, and startup scripts all the way to the documentation—all in one go.
Step 3: Auto-Run and Error Self-Healing
Cursor has a key setting—Auto-run. When enabled, if the AI encounters an error while executing a command, it will automatically check, fix, and re-run without asking the developer each time whether to continue.
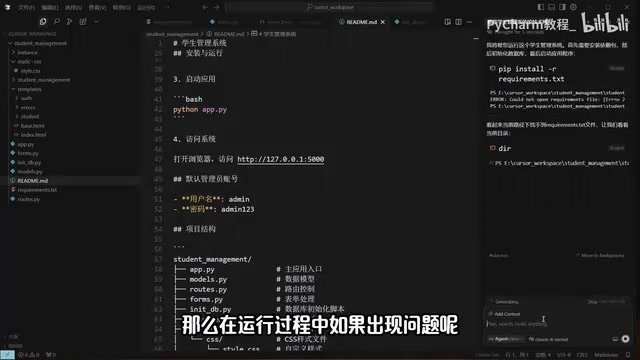
In the demo, the AI encountered a version compatibility issue while installing dependencies. It automatically reinstalled the appropriate version of the dependency and completed the fix. In the Python ecosystem, such issues are extremely common—different third-party libraries have strict version requirements for one another, and upgrading one package may make it incompatible with another package's interface, the so-called "Dependency Hell." Manual troubleshooting often requires repeated trial and error, consulting documentation, or even comparing changelogs. The presenter's comment on this is spot-on: for this kind of issue, "a skilled developer might spend half an hour finding it, an unskilled one might not find it in two hours—but it solved it instantly." This is exactly the enormous productivity that AI coding unleashes in the debugging phase.
Step 4: Running and Verification
After the fix was complete, the AI set up the database and launched the Flask application, with the service running at 127.0.0.1:5000. Copying the address into the browser and logging in with the default account and password reveals the completed management interface. Here, 127.0.0.1 is the local loopback address (localhost), meaning the service is currently only accessible on the local machine; 5000 is the default port of the Flask development server. This is also the typical debugging form of web development—first get it running locally, then consider deploying to the public internet.
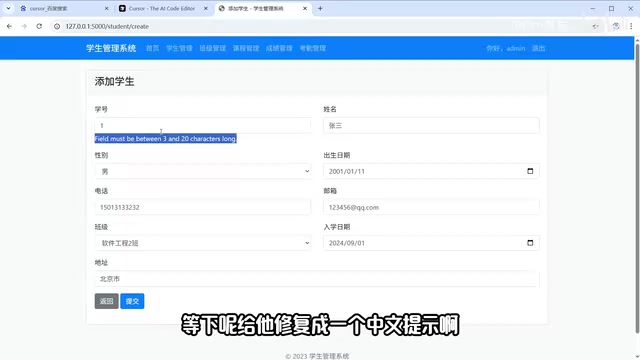
In testing, functions such as adding students (student ID, name, gender, birthday, contact info, etc.), editing, deleting, and viewing all worked normally. The process also exposed two real development details: first, the student ID has a "3 to 20 characters" length validation, with an English prompt; second, the grade recording feature threw a NotFound error.
An Honest Reminder: AI Is Not Omnipotent
The grade recording error is not a bug, but rather a feature not yet implemented. The presenter admitted that Claude had already distinguished between "implemented features" and "features to be implemented" before development, and this demo only implemented the core student management module.
There's an important insight here: the completeness of an AI-generated project depends on the completeness of your requirement description. If you write all features into the requirements at once, the AI can implement them all as well—it just takes longer (perhaps half an hour to an hour). Only part of the functionality was done for the sake of demonstration efficiency.
In addition, one point cannot be overlooked: no matter how intelligent the AI is, the basic runtime environment still needs to be configured yourself. The prerequisite for the entire project to run is that a Python environment already exists locally; if MySQL is used instead of SQLite, then MySQL needs to be installed separately. The AI can help you write code, install dependencies, and fix bugs, but OS-level environment preparation remains the developer's basic skill.
Conclusion: The Right Way to Use AI Coding
From this hands-on demonstration, we can see that the combination of Cursor and Claude is already capable of handling the complete loop of a small project, from requirements to running. Its true value lies not in "replacing programmers," but in:
- Lowering the barrier: Even absolute beginners can produce runnable projects through natural language;
- Boosting efficiency: Freeing developers from tedious dependency management and debugging;
- Changing collaboration: A developer's core competency is shifting from "writing code" to "precisely describing requirements and reviewing results."
Of course, to use this toolset well, understanding the three chat modes, choosing models wisely, and having basic environment configuration skills remain indispensable prerequisites. AI is a powerful copilot, but the steering wheel always stays in the hands of those who understand the technology.
Key Takeaways
Related articles

WebMCP in Practice: How MakeMyTrip Is Reshaping the Travel Booking Experience
India's largest OTA platform MakeMyTrip uses WebMCP to standardize AI Agent interactions with web apps, replacing fragile DOM scraping with natural language-driven test automation and simplified complex booking scenarios.

Deep Dive into the EYG Programming Language: A New Portable Programming Paradigm Designed for Humans
Deep analysis of the EYG programming language's core design, including algebraic effects, program state persistence, and cross-platform portability, exploring how it addresses modern software fragmentation.

WebMCP in Practice: How MakeMyTrip Is Reshaping the Travel Booking Experience
India's largest OTA platform MakeMyTrip uses WebMCP to standardize AI Agent interaction with web apps, solving DOM scraping fragility, enabling natural language test automation, and simplifying complex international flight bookings.