Cursor + Codex Dual-IDE Collaboration: A 7-Step Practical Guide for Open-Source Project Customization

AI tools reshape the workflow for open-source project secondary development
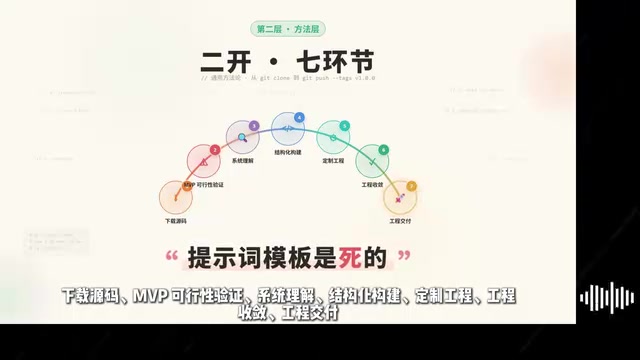
This article distinguishes the fundamental differences between building from scratch (greenfield) and secondary development (brownfield), noting that the core challenge of customization lies in understanding existing system architecture. With AI IDEs like Cursor and Codex, the previously most time-consuming "reading source code" phase can be dramatically accelerated. The article presents a 7-step workflow for open-source project customization: download source code, MVP feasibility validation, system understanding, structured planning, custom engineering, engineering convergence, and engineering delivery—forming a complete methodology from source code to production.
Building from Scratch vs. Secondary Development: Two Fundamentally Different Paths
When facing a business requirement, engineers typically have two options: build from scratch or customize an existing open-source project. It sounds like a simple choice, but anyone who's actually done both knows these two paths operate on completely different underlying logic.
This difference is captured by a classic framework in software engineering: Greenfield vs. Brownfield projects. Greenfield projects involve building from the ground up in a fresh environment, where engineers have full architectural decision-making authority. Brownfield projects, on the other hand, require working within the constraints of an existing codebase—technical debt, historical decisions, and implicit dependencies are all realities you must confront. Research shows that engineers spend roughly 60-70% of their time in brownfield projects understanding existing code rather than writing new code. This number explains why secondary development is so time-consuming, and why AI tools deliver such enormous value in this scenario.
Building from scratch is "constructing a world first"—use Deep Research to determine the tech stack, design the architecture based on requirements, break it into modules, and build them piece by piece. You have complete control over the entire system; every line of code is your own decision.
Secondary development is "understanding a world first"—someone has already built the system, and you need to first understand its skeleton, figure out what can be modified and what absolutely cannot be touched. One wrong move and the whole thing collapses.
This cognitive difference is the foundation of everything. Many people grab an open-source project and immediately ask an LLM to modify the code, only to end up with a mess—it's not that the AI is incapable, it's that you haven't thoroughly understood the system architecture first. In the past, secondary development meant spending at least two weeks just reading and comprehending someone else's source code: well-structured open-source projects were rare, dependency configurations didn't match, environments wouldn't start, and you had no idea what the author was thinking at the time.
But with AI IDEs like Cursor and Codex, the previously most time-consuming step of "reading source code" can now be delegated to large language models. The old joke about being a "package installer" used to be mockery—now it's a methodology. Except this time, the "package" isn't a single function; it's an entire Agent Runtime, an entire frontend-backend stack, an entire Skills ecosystem.

The 7 Steps of Open-Source Project Customization: A Complete Workflow from Source Code to Production Delivery
Distilled from real project experience, the secondary development workflow can be broken down into seven steps. Each step solves a specific problem, and they build upon each other sequentially.
Step 1: Download the Source Code — Don't Trip at the Starting Line
This step seems simple, but many people already start hitting pitfalls here. It's not just about git clone—you also need to confirm branch versions, check dependency file integrity, and verify runtime environment requirements. Many open-source projects have incomplete READMEs, and the environment variables and third-party service configurations needed for actual deployment are often scattered throughout the code.
Modern open-source projects commonly adopt Monorepo architectures (managed by Turborepo, Nx, etc.), where multiple sub-packages share a single repository with complex inter-package dependencies. Cloning the repository is only the first step; understanding the package structure and workspace configuration is the real starting point.
Step 2: MVP Feasibility Validation — Get It Running First
After getting the code, the first thing to do is not read the code—it's to get it running. The MVP (Minimum Viable Product) concept has a special meaning in the secondary development context—it's not product-level validation, but rather environment and dependency-level feasibility confirmation.
The "Dependency Hell" problem in modern software projects remains prevalent: a Node.js project's node_modules might contain thousands of indirect dependencies, Python projects face virtual environment version conflicts, Docker image platform architecture differences (AMD64 vs ARM64)—any of these can prevent a project that "runs on the author's machine" from starting in your environment. The core value of rapid MVP validation lies in: exposing environment issues at minimal cost, avoiding investing significant understanding and modification effort on a foundation that simply won't run. This step requires quickly identifying environment issues and dependency conflicts, leveraging Cursor or Codex to help analyze error logs when necessary.
Step 3: System Understanding — The Make-or-Break Step of Secondary Development
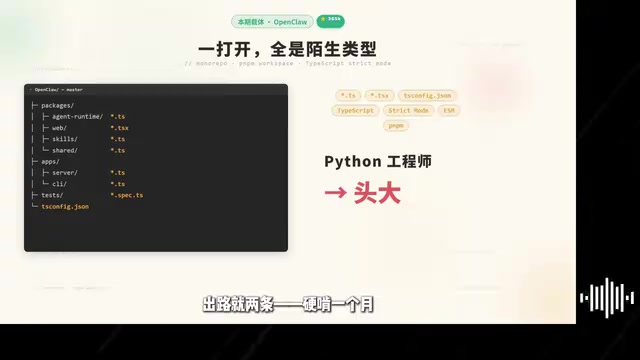
This is the most critical step in the entire secondary development workflow. You need to understand the project's overall architecture, module breakdown, data flow, and core logic. Take the OpenClaw project as an example—both frontend and backend are written in TypeScript. If you're a Python-background engineer, you'll get a headache just scanning through the file structure.
TypeScript, as the current mainstream full-stack language, presents significant cognitive barriers for Python-background engineers with its type system, decorator patterns, and module resolution rules. The deeper challenge lies in understanding the project's data flow topology: where events originate, which middleware they pass through, and which handler they ultimately reach—these implicit architectural decisions often have no documentation and exist only within the code structure itself.
This is where AI IDEs truly shine—let Codex or Cursor perform code-level architectural analysis, generate module relationship diagrams, and annotate core entry points and key dependencies.
Step 4: Structured Planning — Map the Territory Before Making Moves
After understanding the system architecture, you need to structure your modification plan. Which modules need changes, where are the boundaries of those changes, and what upstream/downstream components will be affected—all of this must be thought through before writing any code. The essence of this step is "drawing the map," not "carpet bombing."
Structured planning is essentially Change Impact Analysis: in complex systems, any single modification can propagate through dependency chains to unexpected places. Drawing a change impact map in advance, marking high-risk areas (such as core data models, shared utility functions, and cross-module interfaces), can significantly reduce rework costs during the subsequent engineering convergence phase.
Step 5: Custom Engineering — Integrating Your Business Logic
This is the step where you actually start writing code. Based on the understanding and planning from previous steps, you make targeted code modifications to integrate your own business logic. For example: connecting custom LLMs, integrating with Feishu or DingTalk, adding custom Skills, etc.
Step 6: Engineering Convergence — Don't Let Module B Crash When You Modify Module A
After making changes, convergence is needed—testing, debugging, and fixing newly introduced issues. The most common scenario in secondary development projects is: you modify Module A, and Module B inexplicably breaks. This phenomenon is known as Regression Bugs in software engineering and is the most frequent problem type in brownfield project development, rooted in insufficient understanding of implicit coupling between modules. This step requires systematic regression testing, and using Codex for global code review can effectively reduce the risk of oversights.
Step 7: Engineering Delivery — From "It Runs" to "It's Usable"
The final deployment and launch step. This includes environment configuration, CI/CD pipelines, documentation writing, and more. There's a world of difference between a deliverable project and one that merely "runs on my computer."
Related articles
 Tutorials
ChatGPT Plus Subscription Guide: Are GPT-5.5, image-2, and Codex Worth the Upgrade?
A detailed look at ChatGPT Plus features — GPT-5.5, image-2, and Codex — with a Plus vs Pro comparison and a complete step-by-step subscription guide for users outside the US.
 Tutorials
Harness AI Engineering in Practice: Using Claude Code to Master Enterprise-Level E-Commerce Development
Deep dive into Harness AI Engineering: master enterprise e-commerce development with Claude Code using the Rules, Skills, Wiki, and Changes framework.
 Tutorials
Cursor + Codex Dual-IDE Collaboration: A Practical Methodology for Open-Source Project Customization
A complete methodology for open-source project customization based on real-world experience, detailing the Cursor+Codex dual-IDE workflow, seven-stage process, MVP validation, and AI source code reading techniques.