Cursor Tutorial: Build a Python Student Management System in 5 Minutes with AI Programming

A comprehensive guide to Cursor AI editor's core features through a hands-on Python project example
This article covers the installation and configuration of the AI code editor Cursor, its three chat modes (Agent for automated programming, Ask for Q&A consultation, and Manual for manual control), and model selection strategy. Through a hands-on example of building a Python Student Management System from scratch, it demonstrates the complete workflow of using Ask mode for tech stack consultation and Agent mode for automatic code generation, recommending Claude Sonnet as the go-to model for coding tasks.
Introduction
Cursor, currently the hottest AI code editor, is redefining how developers write code. For programming beginners, it can essentially "generate code from descriptions"; for experienced developers, it's a powerful tool for dramatically boosting productivity. This article will walk you through a complete hands-on project—building a Python Student Management System from scratch—to help you master Cursor's core features and usage techniques.
Downloading, Installing, and Configuring Cursor
Getting the Installer
Getting Cursor is straightforward—simply search "Cursor" in your browser to find the official website (cursor.com). The site provides download links for Windows, Mac, and Linux. After downloading and installing, you'll need to register an account to use it.
The interface is highly similar to VS Code—and this is no coincidence. Cursor is built on VS Code's open-source fork (Code - OSS), inheriting VS Code's complete plugin ecosystem, keyboard shortcuts, and interface layout. VS Code itself is developed by Microsoft using the Electron framework (built on Chromium + Node.js) and supports the Language Server Protocol (LSP) for multi-language intelligent suggestions. Cursor deeply integrates AI capabilities on top of this foundation, rather than simply layering them on as plugins, making AI interactions with the editor much more fluid and natural. So if you have experience with VS Code, the learning curve is essentially zero.
Workspace Setup
After installation, the first step is to open a folder as your workspace. It's recommended to create a dedicated directory, such as D:\\Cursor\\WorkSpace, for storing your project files. Cursor's interface consists of three core panels:
- Left panel: Project directory structure, consistent with VS Code, PyCharm, and other IDEs
- Middle panel: Code display and editing area
- Right panel: AI chat window—this is what fundamentally distinguishes Cursor from traditional editors
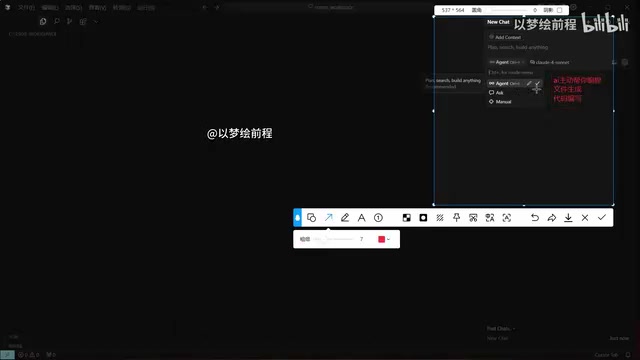
Cursor's Three Chat Modes Explained
Cursor's AI chat window offers three modes. Understanding their differences is key to using Cursor efficiently.
Agent Mode (Automated Programming)
In Agent mode, the AI proactively takes over the coding process, including file creation, code writing, dependency installation, and even error fixing. If your goal is to have AI directly generate a complete project for you, choose this mode.
Behind this mode is the cutting-edge "AI Agent" architecture in the AI field. Unlike traditional single-round Q&A, an Agent has a "perceive-plan-act" loop capability: it can read file system states, execute terminal commands, and adjust its next steps based on execution results. Cursor's Agent mode is essentially a large language model with tool-calling (Tool Use / Function Calling) capabilities, with available tools including file read/write, terminal execution, web search, and more. This architecture enables AI to handle multi-step tasks with dependencies, rather than merely generating static code snippets—it's like a fully automated programming assistant where you just describe your requirements and leave the rest to it.
Ask Mode (Q&A Consultation)
Ask mode is suited for scenarios where you want to get answers to specific questions. When you don't need AI to create files or write code, and just want to understand a technical approach or get debugging ideas, choose Ask mode.
Manual Mode (Manual Control)
Manual mode returns full coding control to the developer, with AI only providing reference-level hints and suggestions. It's suitable for experienced developers who need fine-grained control over their code.
Model Selection Strategy in Cursor
Cursor comes with multiple built-in AI models, including free models and premium paid models. Here's a core recommendation: If your project is destined for production, choose Claude Sonnet without hesitation.
Claude Sonnet is the mid-tier version of Anthropic's Claude model series, and it excels particularly in coding tasks. In authoritative benchmarks like SWE-bench (Software Engineering Benchmark), the Claude series consistently ranks at the top. Its advantages stem from several factors: an ultra-long context window (supporting 200K tokens) enables understanding of the global structure of large codebases; deep understanding of code semantics allows it to not only generate syntactically correct code but also grasp architectural soundness; its reasoning capabilities in error diagnosis and repair are especially outstanding. Compared to competitors like GPT-4o, Claude demonstrates higher consistency and accuracy when handling complex multi-file projects—this is the core reason the industry lists it as the preferred coding model. Compared to the value of the project itself, the cost of using the model is almost negligible. Of course, for simple Q&A consultations (Ask mode), other free models work perfectly fine.

Hands-On: Building a Student Management System from Scratch with Cursor
Step 1: Consult on Tech Stack Using Ask Mode
Suppose you're a complete programming beginner who wants to develop a student management system using Python. First, switch to Ask mode and ask the AI:
"I want to use Python to develop a student management system. Please recommend a tech stack."
The Claude model will quickly provide comprehensive tech stack recommendations, including suggested web frameworks (like Flask), database choices (SQLite), frontend templates (Jinja2), and more.
Here's a brief explanation of the logic behind this tech stack selection: Flask is the most popular lightweight web framework in the Python ecosystem, following a "micro-framework" design philosophy—it only provides the most basic features like routing and request handling, with everything else added as needed. Compared to Django's "batteries-included" approach, it's more suitable for small-to-medium projects and rapid prototyping. Jinja2 is Flask's default template engine, with syntax similar to Python, implementing basic separation of frontend and backend logic. SQLite is an embedded relational database that requires no separate server process—data is stored in a single file, and Python's standard library includes the built-in sqlite3 module for direct support, eliminating the installation and configuration costs of databases like MySQL. It's ideal for development stages and small applications. Depending on your project scale, you can choose the appropriate solution.
Step 2: Auto-Generate Code Using Agent Mode
Once the tech stack is confirmed, switch to Agent mode and input:
"Now help me generate the relevant code."
One-line Summary
A comprehensive guide to Cursor AI code editor's core features and techniques through a hands-on project example.
Related articles
 Tutorials
ChatGPT Plus Subscription Guide: Are GPT-5.5, image-2, and Codex Worth the Upgrade?
A detailed look at ChatGPT Plus features — GPT-5.5, image-2, and Codex — with a Plus vs Pro comparison and a complete step-by-step subscription guide for users outside the US.
 Tutorials
Harness AI Engineering in Practice: Using Claude Code to Master Enterprise-Level E-Commerce Development
Deep dive into Harness AI Engineering: master enterprise e-commerce development with Claude Code using the Rules, Skills, Wiki, and Changes framework.
 Tutorials
Cursor + Codex Dual-IDE Collaboration: A Practical Methodology for Open-Source Project Customization
A complete methodology for open-source project customization based on real-world experience, detailing the Cursor+Codex dual-IDE workflow, seven-stage process, MVP validation, and AI source code reading techniques.