Cursor/Windsurf Rules Configuration Guide: Generate Consistent UI Components with AI

Configure Rules files in Cursor/Windsurf to make AI generate visually consistent UI components every time.
AI coding tools often generate inconsistently styled UI components due to the lack of design constraints. Developer Adnan Halilovic shares a method: configure Rules files in Cursor and Windsurf — structured instructions injected into the LLM's system prompt — to define a design system covering colors, typography, spacing, and component styles. Using Apple's Liquid Glass design language as a real-world example, he demonstrates how this approach effectively ensures visual consistency across multiple generated components.
Why AI-Generated UI Always Looks Inconsistent
Developers who use AI coding tools like Cursor or Windsurf have almost universally run into the same problem: every time you ask the AI to generate a component, the styles come out differently — buttons are different sizes, colors are random, spacing is all over the place. This isn't a limitation of the AI's capabilities; it's the absence of a clear "design specification" to constrain it.
Adnan Halilovic, a developer with over 15 years of software engineering experience, recently shared a practical approach: by configuring Rules files in Cursor and Windsurf, you can make the AI strictly follow your defined design system, generating UI components that are visually consistent and professionally polished. Let's break down every key step of this method in detail.
What Are Rules Files — and Why Are They Essential?
Rules files are essentially "behavioral guidelines" you write for the AI. They tell the large language model what constraints to follow when generating code, preventing the AI from going off-script and producing random styles at the source.
From a technical standpoint, Rules files work based on the System Prompt mechanism in LLMs. In an LLM's conversation architecture, there are three types of message roles: System, User, and Assistant. The System Prompt has the highest priority — it defines the model's behavioral boundaries and output constraints. Rules files in Cursor and Windsurf are essentially structured instructions injected into the System Prompt layer. They're "planted" into the model's context window before each conversation begins, which is why they continuously influence all subsequent outputs. Understanding this mechanism will help you write and organize your rules more effectively.
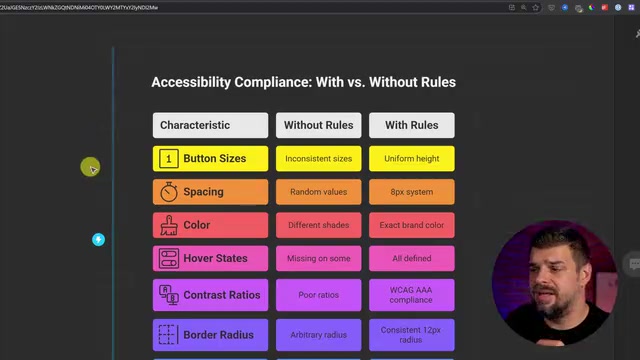
Without Rules, the AI might:
- Generate buttons of different sizes each time
- Use inconsistent color schemes
- Ignore accessibility standards
- Apply varying border radii, spacing, and other details
With Rules configured, all of these design decisions become automated. Adnan emphasizes an important point: while the Cursor and Windsurf communities already have many ready-made rule templates, the best rules are always the ones you write yourself — because only you truly understand your project's design requirements and code style.
Six Benefits of Structured Rules
- Brand consistency: Unified colors, typography, and component styles ensure your visual language stays on track
- Faster development: Design decisions are automated, reducing time spent on repeated revisions
- Quality control: Standards like contrast ratios and accessibility are enforced automatically, lowering manual review costs
- Scalability: New components automatically inherit the design system — the larger the project, the greater the advantage
- Accessibility: Ensures compliance with international standards like WCAG. WCAG (Web Content Accessibility Guidelines), published by the W3C, is currently at version 2.2 and defines three compliance levels: A, AA, and AAA. The most directly relevant requirement for UI design is color contrast — AA level requires a contrast ratio of at least 4.5:1 for normal text against its background, and at least 3:1 for large text. Without explicitly defining these numeric constraints in your rules, the model can easily generate visually appealing color schemes that fail contrast requirements
- Less back-and-forth: No more repeatedly telling the AI "that's not what I meant"
How LLMs Apply Design Rules
The AI's rule application workflow is a closed loop: load rules → parse request (understand what component is needed) → apply rules to generate code → output result. Every time you issue a prompt, the AI first "reviews" your defined design system, then generates code within those constraints. This mechanism ensures consistent output.
Hands-On: Creating an Apple Liquid Glass Design System
Adnan prepared a special set of design rules for this demonstration — based on Apple's "Liquid Glass" design language introduced in 2025.
Liquid Glass is Apple's new design language announced at WWDC 2025, applied across iOS 26, macOS Tahoe, watchOS 26, and other operating systems. Its core concept is making interface elements exhibit the optical properties of real glass — including transparency, refraction, reflection, and depth-of-field effects. At the CSS implementation level, the Liquid Glass effect primarily relies on the backdrop-filter property (for Gaussian blur and saturation adjustments), semi-transparent background colors (typically using rgba or hsla values), and carefully layered borders and shadows. This design style places higher demands on contrast and readability, so your rules file needs to explicitly define minimum contrast ratios between text and backgrounds to ensure accessibility compliance.
This ruleset covers core design principles, material differentiation, content clarity, precision, and more — totaling approximately 400–500 lines.
Configuring Rules in Cursor
Creating rules in Cursor is straightforward:
- Create a
.cursorfolder in your project root - Create a
rulessubfolder inside it - Add Markdown rule files in
.mdcformat - Choose how to apply them: smart apply, target specific files, or trigger manually
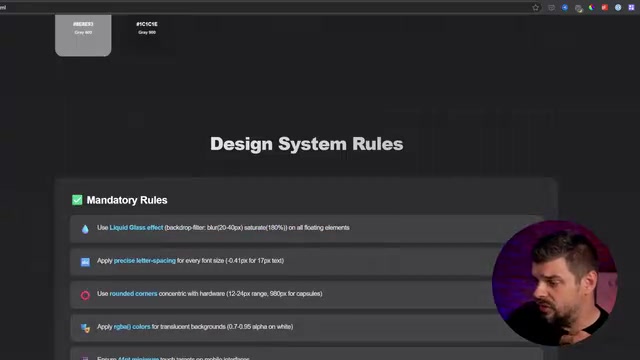
On choosing an application mode, Adnan offers an important reminder: if you select "Always", these rules will be sent to the LLM as context on every interaction, continuously consuming tokens.
It's worth understanding what token consumption actually means here. A token is the basic unit by which LLMs process text — roughly 1–2 tokens per English word, and about 1–2 tokens per Chinese character. Every time you call an LLM API, all input content (including the System Prompt, conversation history, and current instruction) is counted as input tokens, while the model's response counts as output tokens. GPT-4o, for example, has a 128K token context window, while Claude 3.5 Sonnet supports 200K tokens. A 400–500 line rules file occupies roughly 2,000–4,000 tokens. In "Always" mode, these tokens are sent repeatedly with every interaction — increasing API costs and compressing the context space available for actual code generation.
The recommendation is to choose flexibly based on your actual use case — enable design rules when generating new UI components, but skip them when fixing bugs.
Configuring Rules in Windsurf
Windsurf's configuration path is similar to Cursor: simply place the same rules files in the .windsurf/rules/ directory. Adnan uses Windsurf as his primary editor in the demo, working through Windsurf's Cascade interface.

Notably, he chose the SWE 1.5 language model for the demonstration. SWE 1.5 is a dedicated software engineering model from Windsurf (developed by Codeium), where SWE stands for Software Engineering. Compared to general-purpose LLMs like GPT-4o or Claude, the SWE model series is specifically optimized for code generation, code comprehension, and software development workflows — typically performing better at code completion, project context understanding, and multi-file editing, while also offering lower inference latency. Windsurf's Cascade is its core interaction interface, supporting multi-step autonomous coding workflows — the AI can not only generate code but also automatically run terminal commands, read project files, and execute tests, forming a complete development loop.
The reason for choosing SWE 1.5 is that the model responds extremely fast, allowing real-time effect demonstration without needing to speed up the video. Of course, you can choose Claude or other models based on your preference.
What Should a Rules File Include?
A complete UI design system ruleset typically needs to cover the following dimensions:
- Color system: Primary colors, secondary colors, semantic colors, gradient definitions
- Typography: Font families, type scale, line heights, font weights
- Spacing system: A consistent spacing scale (e.g., 4px, 8px, 16px, 24px). This spacing scale follows the "Design Token" concept in design systems — Design Tokens are the smallest atomic units of a design system, abstracting visual properties into reusable variables. The 4px base grid (4-point grid) is the most widely adopted spacing system in the industry, popularized by Google Material Design. All spacing values are multiples of 4, ensuring pixel-perfect alignment across different screen densities (1x, 1.5x, 2x, 3x) and avoiding blurriness from sub-pixel rendering. In CSS, these tokens are typically defined as custom properties (e.g.,
--spacing-sm: 8px). Once these values are specified in your rules file, the AI will use these variables rather than arbitrary numbers - Component styles: Specific specifications for buttons, cards, inputs, and other common components
- Mandatory rules: Design constraints that must be followed
- Prohibited practices: Explicitly disallowed approaches (e.g., no inline styles)
- Effect formulas: CSS implementations for effects like Liquid Glass
Validation: Testing AI-Generated Components
Generating a Product Card Component
Adnan ran the test in a brand-new Angular project. He gave the AI a simple instruction:
"Create a card component with some product details inside of it, import the card in our app."
The AI immediately got to work, automatically referencing the Liquid Glass design system rules and generating a product card that matched Apple's design language.
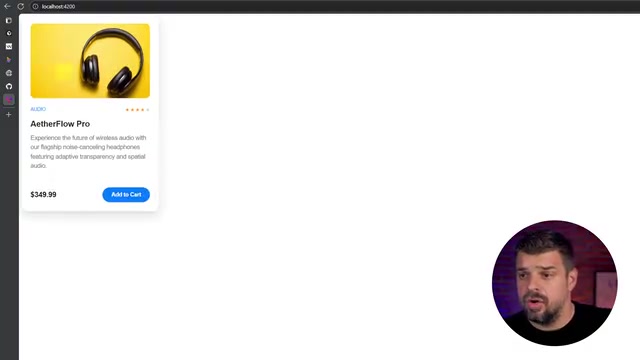
The generated card has clear Apple design language characteristics: clean layout, elegant glass texture (achieved via backdrop-filter: blur() and semi-transparent backgrounds), consistent spacing and typography. Without any additional tweaking, the component already delivered a professional-grade visual result.
Generating a Search Bar Component
Next, he asked the AI to generate a product search bar and import it into the app. The AI again followed the design system rules, and the resulting search bar was visually consistent with the product card — which is precisely the core value of design system rules.
The final result showed a combined page with multiple product cards and a search bar, presenting a clean, minimal, and unified Apple-style design. While the minimum card height still needed minor adjustment, the overall design consistency was fully achieved.
Best Practices for Writing Rules
Four Key Writing Tips
- Be specific, not abstract: Instead of writing "use appropriate spacing," write "use 16px for intra-component spacing and 24px between components." Specific numeric constraints eliminate the model's room for "creative interpretation" — when faced with vague instructions, LLMs make choices based on statistical distributions in their training data, and "appropriate spacing" can vary wildly across different training samples
- Include positive and negative examples: Explicitly tell the AI what to do and what not to do to reduce ambiguity. For example, include both "✅ Define colors using CSS custom properties" and "❌ Never hardcode hex color values in components." This contrasting rule format significantly improves the model's compliance accuracy
- Organize in layers: Keep base rules (colors, typography) separate from component rules for easier maintenance. This layered approach aligns with design system architecture in frontend engineering — the atomic layer (Design Tokens) defines base variables, the molecular layer defines component styles, and the organism layer defines page layout patterns
- Iterate continuously: Continuously refine your rules based on the AI's actual output, gradually converging toward the ideal result
Applicable Scenarios and Framework Compatibility
This approach isn't limited to any specific frontend framework — whether you're using Angular, React, Next.js, Vue, or plain HTML/CSS, you can use rules files to constrain the AI's output. The key lies in the quality and completeness of the rules themselves, not the framework choice. This is because Rules files constrain the AI at the "design decision" level (what colors to choose, how much spacing, what visual effects) rather than at the framework-specific syntax level. The AI will automatically select the appropriate syntax for the current project's framework to implement these design rules — JSX and CSS Modules in React, template syntax and component styles in Angular, SFC and Scoped CSS in Vue.
Conclusion: Trade Rules Files for Long-Term Design Consistency
By defining UI design system rules in Cursor or Windsurf, you gain the following practical benefits:
- Every component the AI generates follows a unified design language
- Significantly less time spent manually adjusting styles
- Visual consistency maintained as the project continues to grow
- Design decisions encoded and easy to share across the team
The core idea is simple: instead of telling the AI "that's not right" every time, set the rules upfront. A 400–500 line rules file buys you design consistency across the entire project lifecycle — an investment that's absolutely worth making.
Related articles
 Tutorials
ChatGPT Plus Subscription Guide: Are GPT-5.5, image-2, and Codex Worth the Upgrade?
A detailed look at ChatGPT Plus features — GPT-5.5, image-2, and Codex — with a Plus vs Pro comparison and a complete step-by-step subscription guide for users outside the US.
 Tutorials
Harness AI Engineering in Practice: Using Claude Code to Master Enterprise-Level E-Commerce Development
Deep dive into Harness AI Engineering: master enterprise e-commerce development with Claude Code using the Rules, Skills, Wiki, and Changes framework.
 Tutorials
Cursor + Codex Dual-IDE Collaboration: A Practical Methodology for Open-Source Project Customization
A complete methodology for open-source project customization based on real-world experience, detailing the Cursor+Codex dual-IDE workflow, seven-stage process, MVP validation, and AI source code reading techniques.