Figma Tutorial: Recreating Google AI Studio's Flowing Light Border Animation

A complete Figma tutorial for recreating Google AI Studio's flowing light border animation.
This article breaks down how to recreate Google AI Studio's flowing multicolor light border in Figma. The approach spans three layers: the visual layer uses angular gradients, layer blur, and masks to build the diffused light border; the depth layer employs dual shadows for dimensionality; and the animation layer uses 7 rotated keyframes with Smart Animate to achieve a seamless looping flow effect, exportable as Lottie or GIF for development handoff.
Google AI Studio's dialog box design features an unforgettable detail — a flowing, multicolored light border around the input field, paired with soft shadows to create a futuristic AI interaction experience. While this animation effect appears complex, it can be fully recreated in Figma. This article breaks down the entire workflow, from static light borders to looping flow animations, guiding you through the implementation step by step.
It's worth noting that this flowing light border has become a signature visual language in AI product interface design. Google AI Studio, Google's platform for AI model debugging and prototype development, extends the Material Design 3 design system while incorporating extensive visual innovations tailored for AI products. Similar design approaches have become an industry trend — OpenAI's ChatGPT uses pulsing light dots to indicate thinking states, Microsoft Copilot employs gradient light streaks as brand identity, and Apple Intelligence uses soft colorful halos as its visual symbol. These designs collectively convey a metaphor: AI is a flowing, living intelligence rather than a static tool interface. Google's choice of blue, purple, pink, and orange hues also aligns with their Gemini brand color system, reinforcing product brand recognition.
Creating the Static Light Border
Step 1: Draw the Base Rectangle
The core of this effect is a "flowing colorful border." The approach isn't to directly add a stroke to a rectangle, but rather to achieve the effect through layering two rectangles with a mask.
Start by drawing a rectangle as the base shape for the border, then duplicate it. The second rectangle will carry the diffused light effect — the key is its fill method: use an Angular Gradient, where colors distribute along angular directions, making it naturally suited for creating wrap-around light effects.
An angular gradient is a gradient type that distributes colors along 360° from a center point, also known as a conic gradient. Unlike linear gradients that transition along a straight line or radial gradients that expand outward from the center, angular gradients follow a complete circular path for color transitions, making them naturally ideal for simulating light wrapping around object edges. In CSS, the corresponding property is conic-gradient(), which gained broad browser support around 2020. In Figma, you can control the start and end angles of each color segment by dragging color stops, and combining with opacity changes creates rhythmic light and dark variations.
Step 2: Mix Vibrant Gradient Colors
Select multiple color stops in the angular gradient to simulate the blue, purple, pink, and orange color transitions seen in Google AI Studio. After choosing colors, carefully adjust each color stop's position and the coverage range of the light effect to ensure natural color distribution that covers the entire dialog box area.
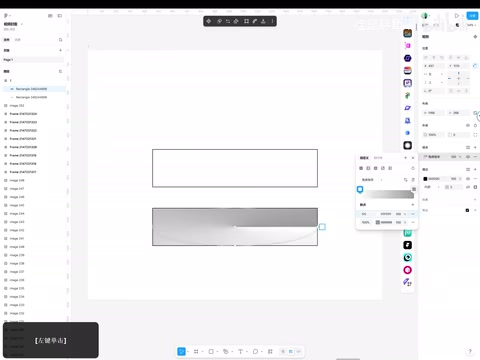
After completing the color mix, add some white light nodes. The addition of white spots makes the overall colors more translucent and prevents the visual heaviness that pure colors can create.
Step 3: Blur Processing and Mask Clipping
To soften the edges of the light spots naturally, apply a Layer Blur to the light effect layer. The blur value shouldn't be too high — moderate is sufficient. The goal is to eliminate hard boundaries between gradient colors and create a diffused light quality.
Figma provides two blur methods: Layer Blur and Background Blur. Layer Blur applies Gaussian blur to the current layer's own pixels, softening edges and smoothing color transitions. Background Blur blurs the content beneath the layer, commonly used for frosted glass effects. The mathematical principle of Gaussian blur is to calculate a weighted average of surrounding pixels' color values for each pixel according to the Gaussian distribution function — the larger the blur radius, the wider the sampling range, and the softer the image. In this case, we use Layer Blur rather than Background Blur because we need to soften the gradient hard edges of the light effect layer itself, not blur what's visible through it.
After applying the blur, place the light spot layer on top, select both the light spot and the base rectangle, and create a Mask. The light effect will be clipped into the shape of the rectangular border, producing a vibrant multicolored border effect. Finally, adjust the border radius to match the dialog box and verify that the light spots completely cover the entire dialog box edge.
A mask is a non-destructive clipping technique that uses one shape (the mask layer) to control the visible area of another layer. In Figma, the mask layer sits below the masked content — only the area covered by the mask layer will display the content of layers above it. Unlike direct cropping, masks preserve the complete data of the original layer, allowing you to adjust the mask shape or remove the mask relationship at any time. The cleverness of the mask in this case lies in clipping a complete angular gradient light spot into a ring-shaped border — the base rectangle serves as the mask defining the visible area, while portions of the light spot layer extending beyond the rectangle edges are hidden, preserving only the light effect distributed along the edges.
Fine-Tuning the Shadow Effects
After completing the light border, add shadows to enhance depth. Two layers of shadows are needed:
- Primary shadow: A colored shadow hugging the dialog box edge, with colors following the light effect's dominant hues, making the light appear to "spill over"
- Base gray shadow: Placed at the very bottom of the dialog box, providing overall depth and a floating sensation
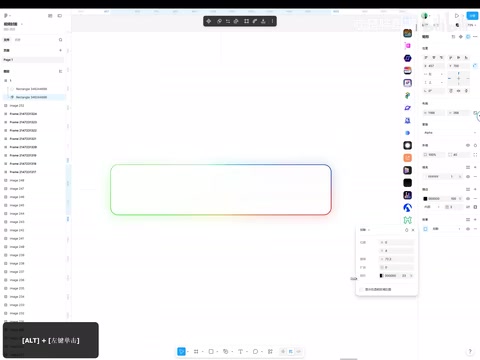
When adjusting shadow parameters, always compare against the Google AI Studio reference. Shadow opacity, blur, and offset all require iterative fine-tuning. The gray shadow's opacity shouldn't be too high — maintain a subtle presence so the dialog box appears more dimensional without being visually overwhelming.
Implementing the Looping Flow Animation
Keyframe Animation Principles
With the static effect complete, it's time to make the light "flow." This animation is essentially a keyframe animation — you only need to create several key states within the full animation cycle, and Figma's Smart Animate will automatically tween the transitions.
Keyframe Animation is a fundamental paradigm in animation production, originally derived from the traditional hand-drawn animation workflow where lead animators drew key poses and assistant animators filled in the in-between frames. In digital animation, software handles the tweening calculations. This case uses 7 keyframes to cover a 360° rotation, meaning approximately 51.4° of rotation between each frame. The choice of frame count balances smoothness against production cost — too few frames result in excessive tweening spans with noticeable jumping; too many frames increase production and maintenance workload.
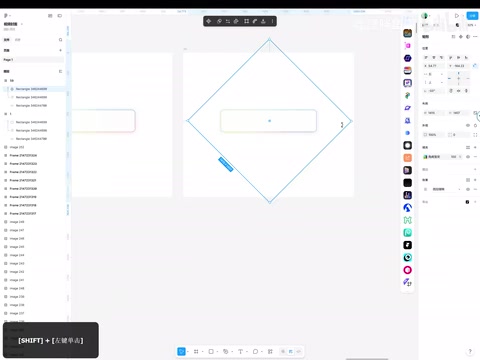
Since this is a looping animation, duplicate the frame seven times, rotating the light spot layer to a different angle in each copy. The seven keyframes are evenly distributed across the 360° rotation cycle, ensuring smooth head-to-tail transitions.
Interaction Wiring and Parameter Settings
Enter Figma's Prototype mode and wire up interactions for each frame. The key parameters are:
- Trigger: After Delay
- Delay time: 10 milliseconds (extremely short delay for near-continuous playback)
- Animation type: Smart Animate

Smart Animate is the core animation feature in Figma's prototype mode. It compares property differences of identically-named layers between two Frames and automatically generates intermediate transition frames. Properties that can be tweened include position, size, rotation angle, opacity, fill color, border radius, and more. Its working principle is similar to tween animations from the Flash era or CSS transition — the system calculates intermediate states for each frame based on an easing function. It's particularly important to note that Smart Animate relies on layer naming consistency — only layers with exactly the same name in both Frames will be recognized as the same element and produce transition animations. This is why duplicating Frames rather than redrawing is a more reliable approach when creating multi-frame animations.
After setting up the first connection, wire the subsequent frames with identical parameters. Connect the last frame back to the first to form a closed loop, enabling infinite looping playback. Combined with the 10-millisecond micro-delay trigger, Smart Animate's tweening fills the gaps between frames during actual playback, making the animation appear far smoother than just 7 frames.
Final Adjustments and Export
Once all wiring is complete, return to design mode for overall border refinements. Adjust the border width to 0.5px — a thinner border creates a cleaner, more premium look and prevents the light effect from being too intense.
Click the preview button to check the animation, confirm that the light flows smoothly with natural color transitions, then export. Figma supports exporting as Lottie animation files or GIF format — the former is suitable for handing off to developers for direct product integration, while the latter works for presentations and communication.
Lottie is a lightweight animation format open-sourced by Airbnb. Its core concept is exporting animations as JSON files rendered in real-time through platform-specific Lottie players. Compared to GIF, Lottie offers significant advantages: file sizes are typically one-tenth or even smaller than GIF; vector-based rendering stays crisp at any resolution; and it supports dynamic control of playback speed, colors, progress, and other properties through code. Figma can export prototype animations to Lottie format via plugins (such as the LottieFiles plugin). In front-end development, the lottie-web library can play Lottie animations directly on web pages, while iOS and Android have native library support through lottie-ios and lottie-android respectively. This means animations created by designers in Figma can be reproduced in final products with virtually no loss, significantly reducing communication overhead between design and development teams.
Technical Key Points Summary
The implementation approach for this animation can be summarized in three layers:
- Visual layer: Angular gradient + Layer Blur + Mask to build the diffused light border
- Depth layer: Dual shadows (colored + gray) to enhance dimensionality
- Animation layer: Multi-frame rotation + Smart Animate + delay trigger to achieve looping flow
This technique isn't limited to AI product dialog box design — any scenario requiring a "flowing light" effect can reuse this approach. By mastering the combination of angular gradients and Smart Animate, you can easily create various stunning light animations that add a sense of technology and refinement to product interfaces.
Related articles
 Tutorials
ChatGPT Plus Subscription Guide: Are GPT-5.5, image-2, and Codex Worth the Upgrade?
A detailed look at ChatGPT Plus features — GPT-5.5, image-2, and Codex — with a Plus vs Pro comparison and a complete step-by-step subscription guide for users outside the US.
 Tutorials
Harness AI Engineering in Practice: Using Claude Code to Master Enterprise-Level E-Commerce Development
Deep dive into Harness AI Engineering: master enterprise e-commerce development with Claude Code using the Rules, Skills, Wiki, and Changes framework.
 Tutorials
Cursor + Codex Dual-IDE Collaboration: A Practical Methodology for Open-Source Project Customization
A complete methodology for open-source project customization based on real-world experience, detailing the Cursor+Codex dual-IDE workflow, seven-stage process, MVP validation, and AI source code reading techniques.