Gemini CLI API Key Configuration Tutorial: Use Gemini 3 Model for Free

Complete tutorial on configuring an API key in Gemini CLI to unlock the Gemini 3 model
This article provides a detailed walkthrough for using the Gemini 3 model in Gemini CLI via API key configuration. The process includes creating a project in Google AI Studio, associating a billing account (with $300 in free credits for first-time users), generating an API key, switching authentication in the CLI with /auth, and enabling preview features via /settings. Auto mode is recommended for balancing performance and cost, and typical daily usage costs remain manageable.
Why You Need to Configure an API Key
The Gemini 3 model in Gemini CLI is currently only available to two types of users: AI Ultra paid subscribers (approximately £120/month in the UK), and users authenticated via API key (Vertex API keys are also supported). While Google may eventually open Gemini 3 to all standard accounts, free access will most likely come with usage limits.
An API Key is a common authentication and authorization mechanism widely used in cloud services and developer platforms. It's essentially a unique string generated by the service provider, used to identify the caller and track their API usage. Unlike token-based authentication methods such as OAuth, API keys are typically embedded directly in request headers or URL parameters, making them simpler to use—but with higher security requirements. Once leaked, anyone holding that key can impersonate you and make requests. Google's API key system is tightly coupled with its Cloud projects; each key is associated with a specific project, enabling granular usage monitoring and billing management.
The core advantage of configuring an API key is: you gain full control over your usage without being constrained by free tier limits. Additionally, future new models or other services (such as image generation) may also require API key authentication, so it's worth mastering this configuration early.
A note about Vertex API keys: Vertex AI is Google Cloud's enterprise-grade machine learning platform, offering more comprehensive security controls, VPC network isolation, IAM permission management, and compliance auditing. When accessing Gemini models through Vertex AI, authentication is typically based on Service Accounts and OAuth 2.0, rather than simple API keys. For individual developers and learning purposes, AI Studio's API key is sufficient; but for enterprise production environments, Vertex AI provides higher-level security assurance and more flexible deployment options, including Data Residency controls and Private Endpoint support.
If you only need to use Gemini 2.5 models for now, you can skip this step. But for those who want to experience Gemini 3, here's the complete Gemini CLI API key configuration process.
Creating an API Key in Google AI Studio
Log in to Google AI Studio
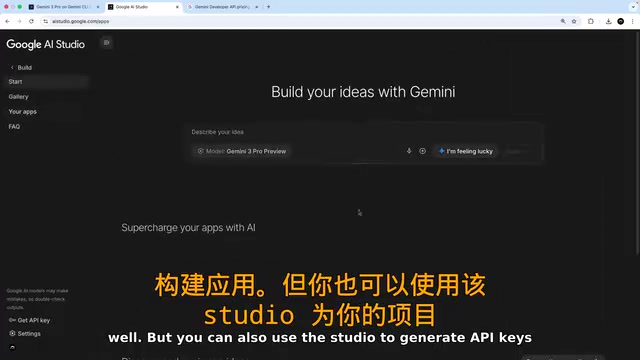
First, visit aistudio.google.com and sign in with your Google account. Google AI Studio is Google's one-stop AI development platform for developers, positioned between consumer-grade products (like the Gemini chat app) and enterprise platforms (like Vertex AI). It provides a visual model interaction interface, prompt engineering tools, and API key management features. Beyond chatting with Gemini models like ChatGPT, AI Studio also supports Vibe Coding for building applications—a feature that allows users to rapidly generate application prototypes through natural language descriptions, significantly lowering the programming barrier. Most importantly, you can generate API keys here for Gemini CLI authentication. Compared to using the Google Cloud Console directly, AI Studio's interface is more user-friendly and particularly suited for individual developers and small teams getting started quickly with the Gemini model family.
Create a Project and Associate a Key
Before generating an API key, you need to create a project so the key can be associated with a specific project for billing management. Follow these steps:
- Click the Get API Key link in the left navigation bar to access the API key management page
- Click the Projects link
- Click the Create New Project button in the top right corner
- Name your project (e.g., "Gemini CLI Course"), then click Create
Once the project is created, you'll see it's been assigned to the Free Tier by default. The Free Tier functionality is similar to what you've experienced in Gemini CLI—you can use Gemini 2.5, but with usage limitations.
Set Up a Billing Account and Claim $300 in Free Credits
To use the Gemini 3 model via API key, you must set up a paid plan for your project. Click the Setup Billing link next to your project, and the system will redirect you to the Google Cloud Console, where you can associate a billing account.
Google Cloud Platform (GCP) uses a pay-as-you-go billing model, where all resource consumption is settled through a Billing Account. The billing account requires a credit card or other payment method, but linking one doesn't mean you'll be charged immediately.
Good news: When creating a Google Cloud billing account for the first time, you'll typically receive $300 in free credits valid for approximately three months. This credit is a key part of Google's customer acquisition strategy, covering nearly all services on GCP, including Compute Engine, Cloud Storage, and AI/ML-related API calls. After the trial period ends, the system won't automatically start charging you—users must manually upgrade to a paid account. So during this period, you won't pay any actual fees.
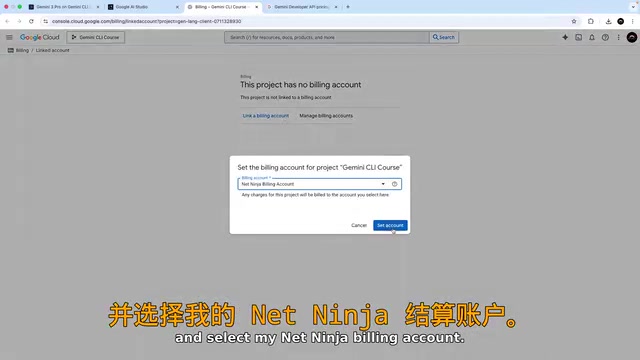
After associating the billing account, refresh the AI Studio page and you should see your project has been upgraded to Tier 1 (paid plan). Actual costs depend on how frequently you call Gemini CLI through your API key. It's recommended to set up Budget Alerts in the Cloud Console to automatically send notifications when spending reaches preset thresholds, effectively preventing unexpected overcharges.
Gemini 3 API Pricing
Gemini 3 uses a pay-per-use billing model, with separate charges for input and output:
- Input: The prompts and context you send
- Output: The responses returned by the model, including its internal thinking and reasoning processes
Fees are calculated per 1 million tokens. In the Large Language Model (LLM) space, a token is the basic unit of text processing, but one token doesn't equate to one word or character. For English text, one token corresponds to roughly 4 characters or 0.75 words; for Chinese text, one character is typically encoded as 1-2 tokens. Output token pricing is usually higher than input tokens because generating text requires more computational resources than processing it.
Notably, Gemini 3's deep reasoning process (Chain-of-Thought) also generates output tokens—the model's thinking steps before arriving at a final answer also count toward output volume. This means the model's deep reasoning capability improves answer quality but also increases token consumption accordingly. For typical CLI development, a moderately complex code analysis request might consume thousands to tens of thousands of tokens, still far from the 1 million token billing unit. Regular users shouldn't be overly concerned about costs.
Generate a Gemini API Key
Return to the API Keys page and click the Create button:
- Name your key (e.g., "Gemini CLI")
- Associate it with the project you just created
- Click the create button and wait a few seconds
- Once created, click the copy icon to save your API key
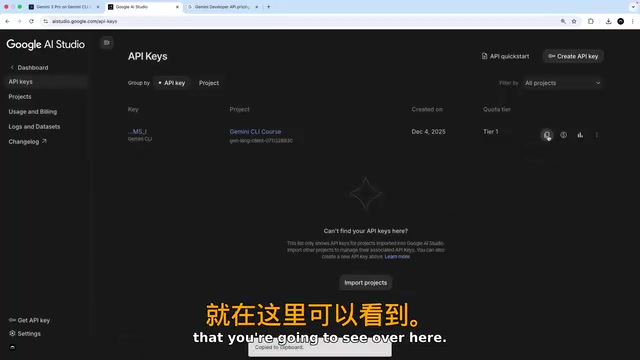
⚠️ Security Reminder: Keep your API key secure—never share it with anyone or commit it to public code repositories. If leaked, others can incur charges on your account. Store keys in environment variables or dedicated key management tools (such as a
.envfile paired with.gitignore), rather than hardcoding them in source code.
Configuring API Key Authentication in Gemini CLI
Switch to API Key Authentication
Return to your Gemini CLI chat session and follow these steps to switch authentication:
- Run the
/authcommand - Select the second option: Use a Gemini API key
- Paste the API key you copied earlier and press Enter to confirm
Once complete, Gemini CLI will send requests and receive responses through your API key, no longer relying on Google account authentication. This means all API calls will be billed through the project associated with your key, and you can view usage and cost details in real time in the Google Cloud Console.
Enable Gemini 3 Preview Features
By default, the Gemini 3 model is not enabled in the CLI. Running the /model command will confirm this—you'll find Gemini 3 isn't listed among the options, and there will be a note at the top indicating that preview features need to be enabled in settings.
Here's how to enable it:
- Run the
/settingscommand - Switch to the Workspace level (this enables preview features only for the current project)
- Set the Preview Features option to
true
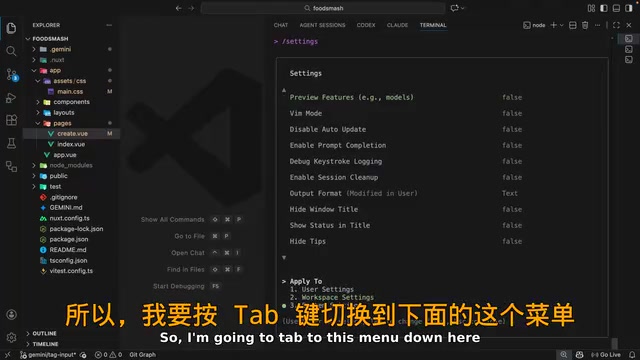
Limiting the setting to Workspace level rather than global level is a good practice—this way you can use different model configurations for different projects, avoiding unexpected charges in projects that don't need Gemini 3.
Run the /model command again, and you'll see Gemini 3 now appears in the available model list.
Choose the Right Model Mode
After enabling Gemini 3, you have two usage modes to choose from:
| Mode | Behavior |
|---|---|
| Auto | The system automatically selects a model based on task complexity: Flash for simple tasks, Gemini 3 for complex tasks (within daily limits), falling back to 2.5 Pro when limits are exceeded |
| Pro | Skips the Flash model; all tasks go directly to Gemini 3 |
The Gemini model family uses a tiered architecture: Flash models (like Gemini 2.0 Flash) focus on low latency and high throughput, suited for lightweight tasks like simple text completion and format conversion; Pro models (like Gemini 2.5 Pro) offer stronger reasoning capabilities and context understanding; and Gemini 3 represents the current highest level of reasoning ability. The routing mechanism behind Auto mode is similar to OpenAI's GPT-4o automatic selection strategy—the system dynamically decides which model to route requests to based on signals like input complexity, context length, and task type. This design ensures complex tasks get the best reasoning quality while preventing simple tasks from wasting high-end model compute resources.
It's recommended to select Auto mode for a good balance between performance and cost.
Verifying Gemini 3 Configuration
After configuration, test with a simple prompt:
Can you examine the code base and explain this project to me?
If everything is working correctly, you'll notice two obvious changes:
- Slightly increased response time—because Gemini 3 performs deeper reasoning and thinking (Chain-of-Thought reasoning). The model generates a series of intermediate reasoning steps before outputting the final answer. While these steps add latency, they significantly improve the accuracy and depth of responses
- "Gemini 3 Pro Preview" label displayed at the top of the response, confirming you're using the new model
From a practical experience standpoint, Gemini 3 shows notable improvements over 2.5 in code analysis and project understanding, with greater depth and accuracy in its responses.
FAQ
Q: Can I switch back to Google account authentication after configuring an API key?
Yes. Run the /auth command and select Google account login to switch back. You can toggle between the two authentication methods at any time. After switching back to Google account authentication, API calls will no longer be billed through your billing project but will use the free quota associated with your Google account.
Q: What happens after the $300 free credits run out?
Once the free credits are exhausted, Google Cloud will charge your linked payment method based on actual usage. You can set up budget alerts in the Google Cloud Console to avoid unexpected overcharges. The specific path is: Cloud Console → Billing → Budgets & Alerts → Create Budget. You can set multiple thresholds (e.g., 50%, 80%, 100%), and the system will send email notifications when spending reaches the corresponding percentages.
Q: What if my API key is leaked?
Immediately go to the API Keys page in Google AI Studio, delete the compromised key, and generate a new one. Also check the Google Cloud Console for any abnormal usage. If you find unauthorized charges, you can contact the Google Cloud support team to request a billing review. To prevent similar incidents in the future, consider using Git pre-commit hooks or tools (such as git-secrets or truffleHog) to automatically scan code commits for key information.
Summary
After completing the Gemini CLI API key configuration above, you have:
- ✅ Created a project in Google AI Studio and associated a billing account
- ✅ Generated a dedicated Gemini API key
- ✅ Completed API key authentication in Gemini CLI
- ✅ Enabled preview features and started using the Gemini 3 model
The entire process isn't complex, but the capability upgrade it brings is significant. The API key not only unlocks Gemini 3 but also lays the foundation for using advanced features like image generation in the future. For users seriously using Gemini CLI for development, this is a worthwhile configuration investment.
Key Takeaways
- Gemini 3 is currently only available to AI Ultra subscribers and API key users; configuring an API key removes free tier limitations
- You need to create a project and associate a billing account in Google AI Studio before generating an API key; first-time registration grants $300 in free credits
- In the CLI, use the /auth command to switch to API key authentication, and enable Preview Features via /settings to access Gemini 3
- Auto mode is recommended for model selection—the system automatically switches between Flash, Gemini 3, and 2.5 Pro based on task complexity
- Gemini 3 bills separately for input and output (per million tokens); daily CLI usage costs are typically manageable
Related articles
 Tutorials
ChatGPT Plus Subscription Guide: Are GPT-5.5, image-2, and Codex Worth the Upgrade?
A detailed look at ChatGPT Plus features — GPT-5.5, image-2, and Codex — with a Plus vs Pro comparison and a complete step-by-step subscription guide for users outside the US.
 Tutorials
Harness AI Engineering in Practice: Using Claude Code to Master Enterprise-Level E-Commerce Development
Deep dive into Harness AI Engineering: master enterprise e-commerce development with Claude Code using the Rules, Skills, Wiki, and Changes framework.
 Tutorials
Cursor + Codex Dual-IDE Collaboration: A Practical Methodology for Open-Source Project Customization
A complete methodology for open-source project customization based on real-world experience, detailing the Cursor+Codex dual-IDE workflow, seven-stage process, MVP validation, and AI source code reading techniques.