Gemini CLI Custom Commands Tutorial: Complete Workflow from Creation to Practice

Tutorial on creating and using Gemini CLI custom commands with a practical UI component generation example.
This article details how to create Gemini CLI custom commands by writing .toml files in the .gemini/commands/ directory, defining command names and prompts with {{args}} parameter support. Using a UI component generation command as a practical example, it demonstrates a complete 7-step workflow including Git safety checks, automatic branch management, TDD test-driven development, and preview display, concluding with 6 best practices for writing high-quality commands.
Beyond built-in commands like /model, /settings, and /init, Gemini CLI also supports user-created custom commands. You can encapsulate complex multi-step development tasks into a simple slash command, letting AI automatically execute according to predefined prompts. This article walks through a complete UI component generation command example, demonstrating the entire process of creating and using custom commands from start to finish.
What Are Gemini CLI Custom Commands
A custom command is essentially a predefined detailed prompt. It can accept user-input parameters and guide the model to complete specific tasks following an established workflow. The invocation method is the same as built-in commands — simply type /command-name to trigger it.
Gemini CLI is a command-line interaction tool built on Google's Gemini large language model, allowing developers to chat with AI, perform code analysis, and generate tasks directly in the terminal. It belongs to the emerging category of AI Coding Assistants, similar to GitHub Copilot CLI, Cursor, Aider, and other tools, but its unique strength lies in deep integration with Google's Gemini model capabilities and an extensible command system. The core philosophy of these tools is embedding AI capabilities into the developer's most familiar environment — the terminal — reducing the cost of context switching. Custom commands are the core manifestation of this extensibility.
Common use cases include:
- Bug fix commands: Have the model scan code for bugs and provide fix suggestions
- Git automation commands: Execute a series of git operations and push to remote repositories
- Component generation commands: Automatically create UI components, test files, and preview pages based on descriptions
The core value of this mechanism is: solidifying your best practices and workflows into reusable commands that maintain consistent quality standards with every execution.
Complete Steps to Create Custom Commands
Preparing the Directory Structure
First, confirm that a .gemini folder exists in your project root directory — create it manually if it doesn't exist. Then create a commands subfolder inside the .gemini folder. All custom commands go here.
Registering a new command is straightforward: create a .toml file in the commands folder, and the filename becomes the command name. For example, creating component.toml means you can invoke it by typing /component in the CLI.
Basic Structure of a TOML File
Each command file needs two key fields:
- description: A brief description of the command, displayed in the CLI when the command is entered
- prompt: The complete prompt sent to the model when the command executes
TOML (Tom's Obvious, Minimal Language) is a semantically clear, easy-to-read configuration file format created by GitHub co-founder Tom Preston-Werner in 2013. It's widely used in project configurations like Rust's Cargo.toml and Python's pyproject.toml. Compared to JSON which doesn't support comments, and YAML which is sensitive to indentation and error-prone, TOML strikes a good balance between readability and rigor. Gemini CLI's choice of TOML as the command definition format means command files can contain multi-line prompt text (using triple-quote syntax) while maintaining clear structure — perfect for hosting complex prompt content.
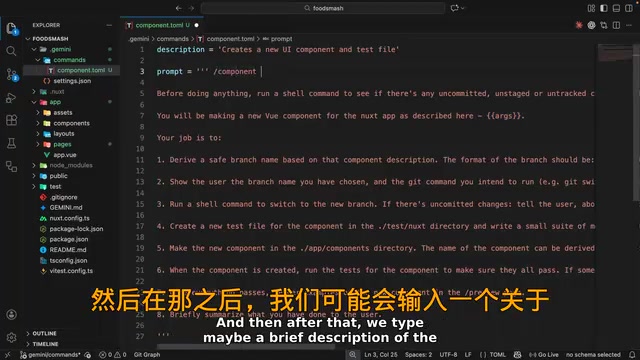
There's an important syntax here: you can use {{args}} with double curly braces in the prompt to reference all parameters the user enters after the command name. For example, when a user types /component a circular avatar component, the text "a circular avatar component" automatically fills in at the {{args}} position. This template variable mechanism is very common in prompt engineering — it allows the same command template to adapt to different specific needs, achieving a "write once, reuse many times" effect.
Hands-On: Writing a UI Component Generation Command
Below is the complete prompt logic for component.toml, containing 7 carefully designed steps. The arrangement of these steps is itself a Prompt Engineering practice — using Step-by-step Instructions to break complex tasks into ordered steps, reducing the probability of the model missing key steps; using Constraint Reinforcement to repeatedly emphasize key constraints to improve the model's reliability in following rules. The combined use of these techniques is key to custom commands consistently producing high-quality results.
Step 1: Git Safety Check
The prompt first requires the model to run a shell command checking whether the current branch has uncommitted, unstaged, or untracked changes. Once detected, immediately abort the process and notify the user. This step is crucial — subsequent steps require switching to a new branch, and if there are unhandled changes, it could lead to code loss.
Steps 2-3: Automatic Branch Creation
The model automatically derives a branch name from the component description, formatted as component/slug (lowercase, kebab-case). It then shows the user the git command about to be executed (e.g., git switch -c component/avatar) and switches to the new branch.
kebab-case is a naming convention using hyphens to separate words, all in lowercase (e.g., circular-avatar, user-profile), named because it resembles food items on a kebab skewer. It's widely used in URL paths, CSS class names, Git branch names, and npm package names because hyphens are legal and readable separators in these contexts. Other common conventions include camelCase (e.g., circularAvatar, common for JavaScript variables and function names), PascalCase (e.g., CircularAvatar, common for component names and class names), and snake_case (e.g., circular_avatar, common in Python and database fields). In this tutorial's command, branch names use kebab-case while component filenames use camelCase, reflecting respect for different contextual naming conventions.
The command uses git switch -c rather than the traditional git checkout -b because Git 2.23 (released in 2019) introduced the switch command specifically for branch operations with clearer semantics. The traditional checkout command serves multiple purposes (switching branches, restoring files, etc.) which can cause confusion, while the separation of switch and restore gives each command a more single, clear responsibility. In team collaboration, common branch prefixes include feature/ (new features), bugfix/ (defect fixes), hotfix/ (emergency fixes), release/ (release preparation), etc. This naming convention not only improves branch list readability but can also work with Git hooks and CI/CD pipelines for automation — for example, branches starting with component/ can automatically trigger component library builds and visual regression tests.
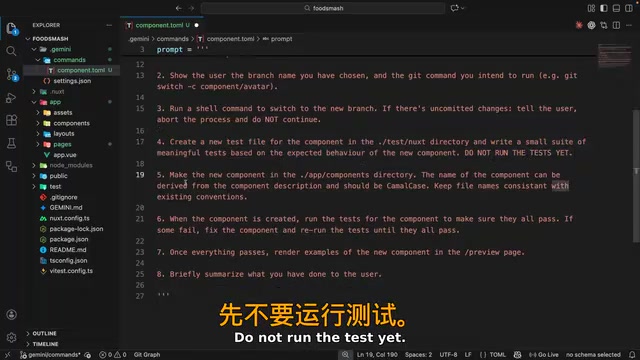
Steps 4-6: TDD Test-Driven Development Workflow
This section embodies the core philosophy of TDD (Test-Driven Development):
- Write tests first: Write a set of meaningful test cases in the test directory, but don't run them yet
- Then write the component: Create the component file in the components directory, using camelCase naming consistent with existing project conventions
- Run tests to verify: Execute tests to ensure all pass; if any test cases fail, fix the component and re-run until all pass
TDD (Test-Driven Development) is a software development methodology systematized by Kent Beck in 2003. Its core cycle is "Red-Green-Refactor": first write a test that must fail (red), then write the minimum amount of code to make the test pass (green), and finally refactor to eliminate duplication and improve design. TDD's value lies not only in improving code coverage but in forcing developers to think about interface design and expected behavior before coding. In AI-assisted programming scenarios, having the model follow a TDD workflow is particularly important — test cases serve as an automated verification mechanism for generated code, effectively preventing AI from producing code that seems reasonable but actually has defects. When the model writes tests before implementation, the tests themselves define the standard for "correct," and the model's generated code must pass these tests to be considered complete — this is far more reliable than simply relying on the model's "confidence."
Step 7: Preview and Summary
After all tests pass, render the component example on a preview page for direct viewing in the browser. Finally, provide the user with a brief summary of the completed work.
Command Execution Demo and Result Verification
Verifying the Safety Check
After creating the command, you need to exit the current Gemini session (using /quit) and restart for the new command to be loaded.
To test the safety check mechanism, first create an uncommitted change in the project (such as modifying the README file), then execute the command:
/component a circular avatar component which takes in an initial prop and a bg color prop which should be limited to a few color choices
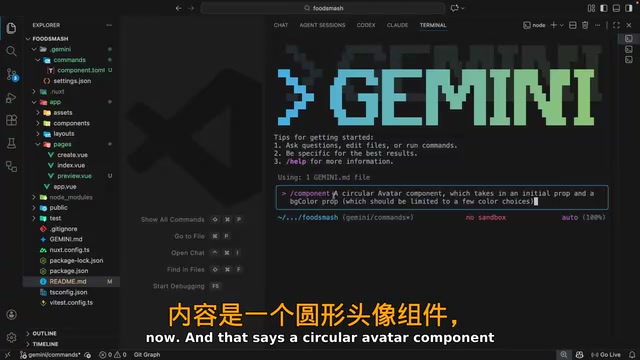
Gemini first requests to run git status, detects uncommitted changes, immediately aborts the process, and prompts the user to commit or stash changes first. This is exactly the expected behavior defined in the prompt.
Complete Execution Flow
After committing the changes and executing the command again (you can use the up/down arrow keys to quickly recall command history), Gemini completes all steps in sequence:
- Runs
git statusto confirm a clean working directory - Creates and switches to the
component/avatarbranch - Creates a test file with multiple test cases
- Creates the Avatar component code
- Runs tests to ensure all pass
- Renders component examples on the preview page
- Outputs a work summary
Quality of Auto-Generated Code
Let's look at the code Gemini generated:
The test file contains four test cases: correctly renders initials, applies the correct background color, uses default value when no color is provided, and validates the allowed color list.
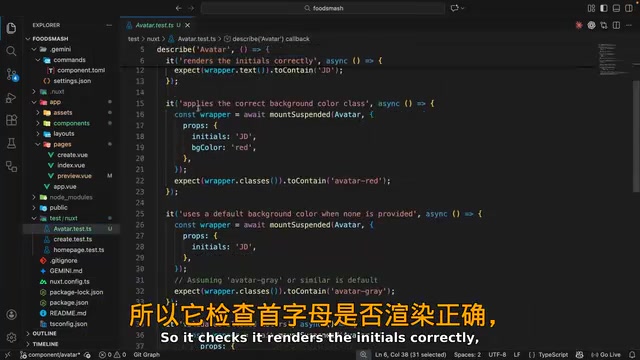
The component file defines two props: initials (string type) and bgColor (limited to red, blue, green, yellow, gray, or purple, defaulting to gray). The component uses a computed function to generate the background color class and validates the incoming color value.
The style file automatically adds the .avatar base class and each color variant class.
The preview page showcases avatar components in multiple color variants, covering both single-letter and double-letter initials, as well as the default behavior when bgColor is not provided.
6 Best Practices for Writing High-Quality Custom Commands
From this hands-on example, we can summarize the following key points:
- Include safety guards: Check environment state before executing destructive operations to avoid accidental loss. This principle is known as "Defensive Programming" in the DevOps field and applies equally to prompt design — always assume the execution environment may be in an unexpected state.
- Make steps clear and explicit: Organize instructions with numbered lists, clearly specifying the expected behavior of each step. Large language models show much higher compliance with structured instructions than vague natural language descriptions. Numbered lists also help the model maintain execution order, avoiding skipped or out-of-order steps.
- Leverage
{{args}}parameters: Give commands flexibility by adapting to different use cases through parameters. - Emphasize boundary conditions: Important constraints can be emphasized multiple times (as in this example, repeatedly mentioning "abort if uncommitted changes are detected"). Research shows that repeating key constraints in prompts significantly reduces the probability of the model ignoring them, which is especially important in long prompts.
- Include verification steps: Have the model verify its own output quality (such as running tests) rather than blindly generating code. This "generate-verify-fix" closed-loop pattern is the core strategy for current AI programming tools to improve reliability, and is also a key characteristic distinguishing Agentic AI from simple Q&A-style AI.
- Require summary feedback: Have the model report on completed work afterward, making it easy for users to confirm results.
Custom commands codify development experience and best practices, ensuring consistent processes and quality standards with every execution. Whether it's component generation, code review, or deployment processes, automation can be achieved through this approach, genuinely improving daily development efficiency. From a broader perspective, this practice of encapsulating domain knowledge into executable prompts represents the trend of AI tools evolving from "general assistants" to "domain experts" — by accumulating and reusing high-quality prompt templates, teams can gradually build their own AI automation knowledge base.
Key Takeaways
- Gemini CLI supports creating custom slash commands through .toml files in the .gemini/commands/ directory, where the filename becomes the command name
- Custom command prompts can use
{{args}}syntax to capture user-input parameters, enabling flexible command customization - The component generation command demonstrated in this tutorial includes a complete TDD workflow: safety check → branch management → write tests → create component → run verification → preview display
- Keys to writing high-quality custom commands: include safety guards, make steps clear and explicit, include automated verification steps, and require summary feedback upon completion
- Custom commands solidify development best practices into reusable automated workflows, maintaining consistent quality standards with every execution
Related articles
 Tutorials
ChatGPT Plus Subscription Guide: Are GPT-5.5, image-2, and Codex Worth the Upgrade?
A detailed look at ChatGPT Plus features — GPT-5.5, image-2, and Codex — with a Plus vs Pro comparison and a complete step-by-step subscription guide for users outside the US.
 Tutorials
Harness AI Engineering in Practice: Using Claude Code to Master Enterprise-Level E-Commerce Development
Deep dive into Harness AI Engineering: master enterprise e-commerce development with Claude Code using the Rules, Skills, Wiki, and Changes framework.
 Tutorials
Cursor + Codex Dual-IDE Collaboration: A Practical Methodology for Open-Source Project Customization
A complete methodology for open-source project customization based on real-world experience, detailing the Cursor+Codex dual-IDE workflow, seven-stage process, MVP validation, and AI source code reading techniques.