Gemini CLI Installation & Configuration Guide: Getting Started with Google's AI Terminal Programming Assistant from Scratch

A beginner's guide to installing, configuring, and using Google's Gemini CLI terminal AI programming assistant.
Gemini CLI is Google's terminal AI programming assistant powered by the Gemini 2.5 Pro model, supporting code analysis, documentation generation, bug fixing, and more. Installation requires Node.js v20+, a global npm install, and Google account authentication for free usage. Its core advantage lies in project-aware capabilities enabled by an ultra-long context window, allowing deep understanding of codebases—ideal for heavy terminal users.
Google's Gemini CLI is an AI-powered terminal programming assistant that helps developers perform code analysis, documentation generation, bug fixing, and other tasks directly from the command line. Based on a Real Python video tutorial, this article provides a detailed walkthrough of installing, configuring, and using Gemini CLI for the first time, helping you quickly integrate this tool into your daily coding workflow.
What is Gemini CLI
Gemini CLI is an AI programming assistant from Google designed for developers, running directly in the terminal environment. Unlike traditional IDE plugins, it works in the command line, analyzing project structures, understanding code context, and answering developer questions in a conversational manner.
It's worth noting that "Gemini" strictly refers to the underlying AI model, while "Gemini CLI" is the official name of this command-line programming assistant. However, in everyday usage, many people simply refer to it as Gemini. Gemini is a multimodal large language model family launched by Google DeepMind in late 2023, unifying several of Google's AI product lines—including the consumer-facing Bard chatbot and the underlying PaLM 2 model. The Gemini model family includes multiple versions: Ultra targets the most complex reasoning tasks, Pro provides a balance between performance and efficiency, Flash focuses on low-latency high-throughput scenarios, and Nano is optimized for on-device applications. Gemini CLI defaults to the Gemini 2.5 Pro model, one of Google's strongest performers in code understanding and generation, featuring an ultra-long context window (supporting up to 1 million tokens)—the technical foundation that enables it to analyze large project codebases.
Gemini CLI offers free model usage options, but you must have a Google account to use it. Since AI tools update frequently, it's recommended to consult the official documentation at geminicli.com for the latest information.

Installing Gemini CLI
Prerequisites: Installing Node.js
Gemini CLI is developed in TypeScript, so running it requires a Node.js environment. TypeScript is a superset of JavaScript developed by Microsoft that adds a static type system and richer object-oriented features on top of JavaScript. In recent years, more and more command-line tools have chosen TypeScript for development, as it combines the richness of the JavaScript ecosystem with the maintainability of strongly-typed languages. Node.js is the runtime engine that allows JavaScript to run outside the browser in server-side and local environments. Built on Chrome's V8 engine, it provides operating system-level capabilities such as file system access and network communication. Gemini CLI leverages the Node.js runtime to implement core functionalities like terminal interaction, file reading, and network requests.
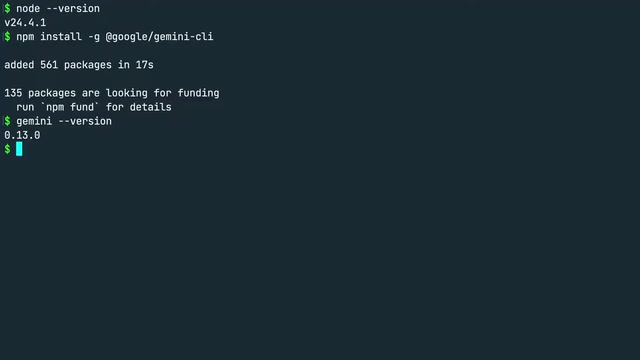
Before installing, check your Node.js version in the terminal:
node --version
Make sure the version is higher than v20. If Node.js isn't installed yet, macOS or Linux users can install it via Homebrew or download the installer from the official Node.js download page. For developers who need to manage multiple Node.js versions, nvm (Node Version Manager) is recommended—it's similar to pyenv in the Python ecosystem, allowing you to easily switch between different versions.
Installing Gemini CLI Globally via npm
Once Node.js is confirmed ready, install Gemini CLI globally with the following command:
npm install -g @google/gemini-cli
Here, npm (Node Package Manager) is similar to pip/PyPI in the Python ecosystem—it's the package manager for the JavaScript world. The npm registry hosts over 2 million open-source packages, making it one of the largest software registries globally. The @google/ prefix in the command indicates this is an official package under the Google organization. This namespace mechanism (called scoped packages) effectively prevents package name conflicts while also making it easy for users to identify the source and trustworthiness of a package. The -g flag indicates a global installation, meaning the executable is placed in the system PATH, allowing you to use the gemini command from any directory on your system after installation.
After installation, verify it was successful:
gemini --version
The version at the time of the tutorial recording was 0.13.0, but since AI tools iterate rapidly, you may see a higher version number. Core functionality won't change significantly, so consult the official documentation if you encounter issues.

Account Authentication & Login
After installation, type gemini in the terminal to launch the program. On first run, you'll see a welcome screen offering three authentication methods:
- Log in with Google — Sign in with your Google account (recommended)
- Use Gemini API Key — Use an API key
- Vertex AI — Use Google Cloud's Vertex AI
For most users, the first option is the most convenient. Select it and press Enter, and the system will automatically open your default browser to guide you through Google account login. Behind the scenes, this uses the Device Authorization Flow from the OAuth 2.0 protocol. Since command-line tools don't have a graphical interface and can't directly display login forms, the authentication process is delegated to the browser. The specific flow works like this: the CLI requests a device code from Google's authorization server, then guides the user to visit an authorization page in the browser to confirm access. Once authorized, the CLI automatically obtains an Access Token. The security advantage of this approach is that your Google password is only ever entered in the browser and never passes through the CLI tool itself, significantly reducing the risk of credential exposure. The second API Key method is better suited for automation scripts and CI/CD pipeline scenarios, while Vertex AI targets enterprise users already using Google Cloud Platform, supporting more granular access control and enterprise-grade security policies.
After successful login, the browser will display an "Authentication successful" message. Switch back to the terminal and you'll see an interactive prompt, indicating everything is ready.
How to Exit Gemini CLI
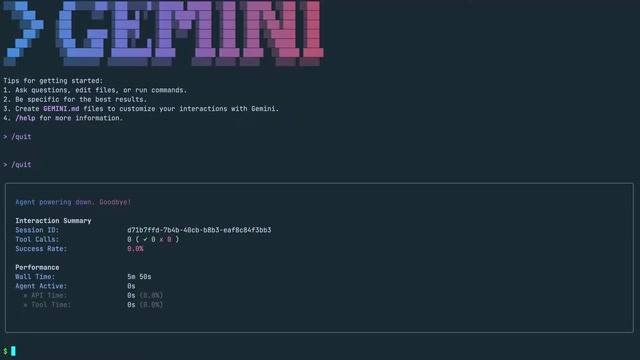
There are two ways to exit Gemini CLI:
- Type the
/quitcommand - Press
Ctrl + Ctwice in succession
When exiting, Gemini CLI displays statistics including the current session ID, number of API calls, success rate, and other data. This is very useful for developers who care about usage and costs. It's worth mentioning that Gemini CLI's free quota is calculated based on requests per minute (RPM) and daily request counts, rather than a simple total token limit. Understanding your call frequency helps you avoid hitting rate limits.
Testing Your First Prompt
Preparing the Project Environment
To make the learning experience closer to real development scenarios, the tutorial provides a To-Do List project as practice material. Before launching Gemini CLI, make sure your terminal has navigated to the project directory:
cd path/to/gemini-todo-list
gemini
Each time you launch Gemini CLI in a new directory, it first analyzes the project structure and indexes files to establish context. This process involves multiple technical steps: first, the CLI recursively scans the project directory, identifying key files such as source code files, configuration files, and dependency declaration files; then it reads the contents of these files and builds a "knowledge graph" of the project, including reference relationships between files, module structure, frameworks and libraries in use, and other information. This information is organized into structured context, which is sent to the Gemini model as part of the prompt in each subsequent conversation. It's precisely this context injection mechanism that enables the AI to provide answers highly relevant to your specific project, rather than generic advice. The larger the project and the more files to index, the longer the initial startup takes. You can confirm whether the current working directory is correct by checking the path information displayed below the prompt.
Sending Your First Prompt to Gemini CLI
A good starting question should both verify that the connection is working and help you quickly understand the project overview. For example:
What programming language is this project written in?
Gemini CLI will quickly analyze the project files and respond:
This project appears to be written in Python, indicated by the .py file extension and the pyproject.toml file.
This response is not only accurate but also explains the reasoning—the .py file extension and the pyproject.toml configuration file. pyproject.toml is the standardized project configuration file format introduced by the Python community in PEP 518 (2016) and PEP 621 (2020). Before this, Python project metadata and build configuration was scattered across multiple files like setup.py, setup.cfg, and requirements.txt, lacking a unified standard. pyproject.toml uses the TOML (Tom's Obvious Minimal Language) format to centralize project name, version, dependencies, build system, and other information in a single file. Modern Python build tools like Poetry, Hatch, PDM, and the latest versions of pip and setuptools all fully support this format. The fact that Gemini CLI can recognize pyproject.toml and use it to determine the project language demonstrates its accurate understanding of modern Python project toolchains.
This simple test proves two things:
- Communication between Gemini CLI and the Google AI model is working properly
- It can effectively analyze and understand project file structures
Practical Tips & Considerations
Free Quota & Usage Limits
Gemini CLI provides free usage quotas for certain models, but specific limits may change at any time. As of now, when logging in with a personal Google account, Gemini CLI offers 60 requests per minute and 1,000 requests per day for free—quite generous for individual developers' daily use. If you need higher quotas or enterprise features, you can connect through Vertex AI and use a paid plan. It's recommended to monitor the call statistics displayed on exit and plan your usage accordingly.
Project Context Awareness
One of Gemini CLI's major advantages is its project context awareness. It's not just a generic AI chat tool—it can deeply understand the structure, dependencies, and code logic of your current project. The core of this capability lies in the large language model's long context window technology—Gemini 2.5 Pro supports a context window of up to 1 million tokens, meaning it can "read" hundreds of thousands of lines of code at once while maintaining understanding of the entire codebase. In comparison, the early GPT-3.5 only supported a 4,096-token context window, making it fundamentally incapable of handling medium-sized or larger projects. This makes Gemini CLI particularly useful in the following scenarios:
- Codebase exploration: Quickly understand an unfamiliar project's tech stack and architecture—especially useful for developers joining new teams or taking over legacy projects
- Documentation generation: Automatically generate project documentation based on code, including API docs, READMEs, architecture descriptions, etc.
- Bug investigation: Locate and fix code defects using context—it can understand cross-file call chains and data flows, providing more precise fix suggestions
- Code refactoring: Analyze existing code structure and propose refactoring strategies to help improve code quality
- Test generation: Automatically generate unit test cases based on existing code logic
How Gemini CLI Differs from Other AI Programming Tools
Compared to IDE-embedded AI assistants like GitHub Copilot, Gemini CLI is better suited for developers who prefer working in the terminal. It doesn't require specific editor support, runs in any terminal environment, and is especially convenient for remote server development and DevOps scenarios.
The terminal AI programming assistant market is evolving rapidly. Beyond Gemini CLI, there are several other notable competitors. Claude Code is Anthropic's terminal programming assistant, based on the Claude model, known for excellent code understanding and long-text processing capabilities. Aider is an open-source terminal AI programming tool that supports connecting to multiple models (including GPT-4, Claude, local models, etc.), with the distinctive feature of directly editing files in Git repositories and automatically generating commits. GitHub Copilot CLI is the command-line extension of GitHub Copilot, focused on helping users generate and explain shell commands. Cursor, while an IDE rather than a pure terminal tool, deeply integrates AI capabilities and represents another direction of "AI-native editor" development.
Compared to these tools, Gemini CLI's core advantages are: generous free quotas, backing by Google's Gemini model (especially the ultra-long context window), and natural integration capabilities with the Google ecosystem (such as Google Cloud and Firebase). Its main limitation is that it currently only supports the Gemini model, unlike Aider which can flexibly switch between different AI backends. Which tool to choose ultimately depends on your specific needs, workflow preferences, and technology stack.
Summary
Gemini CLI provides terminal developers with a lightweight yet powerful AI programming assistant. From installation to first use, the entire process is straightforward: you only need a Node.js environment and a Google account, and you can start using it within minutes. Its project context analysis capability makes it more than just a Q&A tool—it's an intelligent companion that can deeply understand your code. If you're a heavy terminal user, Gemini CLI is worth trying.
Key Takeaways
- Gemini CLI is Google's AI-powered terminal programming assistant, using the Gemini 2.5 Pro model under the hood, offering free usage for certain models but requiring Google account authentication
- Installation requires Node.js v20+ and is done globally via npm install -g @google/gemini-cli
- On first launch in a project directory, it automatically analyzes the project structure and builds a context index, leveraging Gemini's ultra-long context window for project awareness
- Supports three authentication methods (Google account, API Key, Vertex AI), with Google account login being the most convenient via OAuth 2.0, and displays usage statistics upon exit
- Ideal for heavy terminal users, applicable to codebase exploration, documentation generation, and bug fixing, forming a complementary terminal AI tool ecosystem alongside Claude Code, Aider, and other tools
Related articles
 Tutorials
ChatGPT Plus Subscription Guide: Are GPT-5.5, image-2, and Codex Worth the Upgrade?
A detailed look at ChatGPT Plus features — GPT-5.5, image-2, and Codex — with a Plus vs Pro comparison and a complete step-by-step subscription guide for users outside the US.
 Tutorials
Harness AI Engineering in Practice: Using Claude Code to Master Enterprise-Level E-Commerce Development
Deep dive into Harness AI Engineering: master enterprise e-commerce development with Claude Code using the Rules, Skills, Wiki, and Changes framework.
 Tutorials
Cursor + Codex Dual-IDE Collaboration: A Practical Methodology for Open-Source Project Customization
A complete methodology for open-source project customization based on real-world experience, detailing the Cursor+Codex dual-IDE workflow, seven-stage process, MVP validation, and AI source code reading techniques.