Gemini CLI Installation & Setup Guide: Free AI Coding Tool Configuration Tutorial

Installation, configuration, and hands-on tutorial for the free AI coding tool Gemini CLI
This article introduces Google's free AI coding tool Gemini CLI, powered by Gemini 2.5 Pro with 1,000 free daily requests. It covers the complete workflow from Node.js environment setup, Gemini CLI installation, Google account authentication, to a hands-on demo generating a lottery program — showcasing natural language-driven programming in AI Agent mode and how this tool is transforming developers from code writers into requirement describers.
Introduction: Why Choose Gemini CLI
As developers around you embrace AI-assisted coding tools, are you still sticking to "old-school programming"? Among the mainstream AI coding tools on the market, Claude Code is powerful but comes with account suspension risks and a hefty price tag. Google's Gemini CLI offers a free and powerful alternative — built on the Gemini 2.5 Pro model, it provides 1,000 free requests per day, making it essentially a zero-cost AI programming assistant for individual developers.
About Gemini 2.5 Pro: This is Google DeepMind's flagship multimodal large language model released in 2025, excelling in code generation, mathematical reasoning, and long-context understanding. With a context window of up to 1 million tokens, it can process the equivalent of a thick book's worth of codebase in one go — particularly valuable for refactoring and analyzing large projects. In mainstream coding benchmark evaluations (such as HumanEval and SWE-bench), Gemini 2.5 Pro ranks in the same tier as Claude 3.5 Sonnet and GPT-4o, but Google's free API quota strategy significantly lowers the barrier to entry.
The current AI coding tool market has formed a multi-player landscape: Anthropic's Claude Code focuses on deep code understanding and refactoring, OpenAI's Codex series is deeply integrated into GitHub Copilot, Microsoft has built a massive user base through its VS Code plugin ecosystem, and Cursor has risen rapidly as an AI-native IDE. Gemini CLI's differentiation strategy lies in: entering via a command-line interface, not being tied to any specific editor, and offering generous free quotas — primarily targeting developers who prefer terminal operations and newcomers looking to try AI coding at low cost.
This article will walk you through the complete installation and configuration of Gemini CLI, followed by a practical demo showcasing its programming capabilities.
Installing Node.js: Prerequisites for Running Gemini CLI
Gemini CLI runs on Node.js, so you first need to ensure your system has Node.js installed. If your terminal shows a "command not found" error for npm, you'll need to install Node.js first.
Introduction to Node.js and npm: Node.js is a JavaScript runtime environment built on Chrome's V8 engine. Since its release in 2009, it has become core infrastructure for both frontend and backend development. npm (Node Package Manager) is the package management tool bundled with Node.js, currently hosting over 2 million open-source packages as the world's largest software registry. Simply put, npm is to Node.js what the App Store is to iPhone — it lets developers install and manage various tools and dependency libraries with a single command.
Node.js Download and Installation Steps
- Go to the Node.js official website (https://nodejs.org) and download the installer for your operating system
- Mac users can directly download the
.pkgfile and double-click to run it - Follow the installation wizard: click "Continue" → "Agree" → enter your password → complete the installation
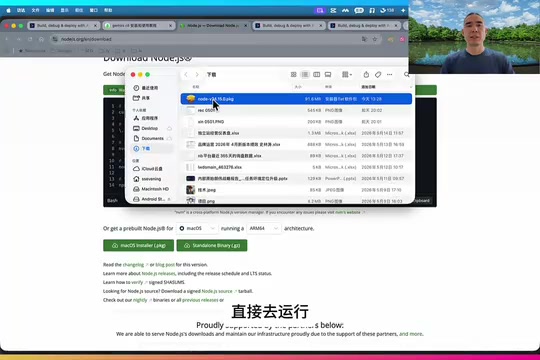
After installation, type node -v and npm -v in your terminal to verify the installation was successful. Seeing version number output means your environment is ready.
Installing Gemini CLI: One Command Is All You Need
With the environment ready, you can now install Gemini CLI. Google provides a one-command installation method via npm.
Gemini CLI Installation Command
Run the following command in your terminal:
npm install -g @google/gemini-cli
If you encounter permission errors, Mac/Linux users need to prepend sudo:
sudo npm install -g @google/gemini-cli
Command Breakdown: The
-gflag innpm install -gstands for global installation, meaning the tool will be installed in a system-level directory and can be called from any path, not just the current project directory. This is why after installing once, you can type thegeminicommand from any folder on your computer to launch it.
Enter your system password and wait for the installation to complete. When running the install command again produces no output, the installation was successful.
Creating a Working Directory
After installation, it's recommended to create a dedicated working directory for testing:
mkdir gemini-test
cd gemini-test
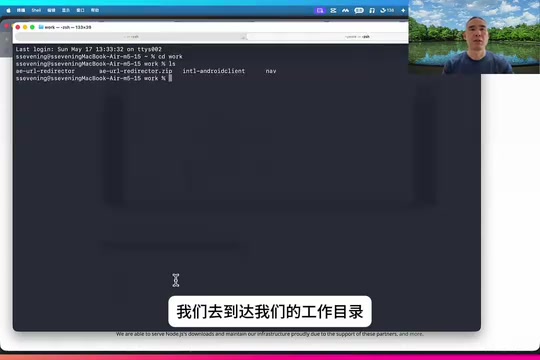
Then type gemini in that directory to launch the CLI tool. When the interactive interface appears, the installation is confirmed successful.
Gemini CLI Account Authentication and Login Configuration
When launching Gemini CLI for the first time, you'll need to complete the Google account authentication process.
Google Account Authentication Steps
- Select login method: The system will prompt you to choose a verification method — just select the first option (browser login)
- Browser authorization: The system will automatically open your browser; select a Google account that has Gemini service enabled
- Confirm authorization: After completing authorization in the browser, the terminal will display "You were successfully signed into Google"
- Restart CLI: Press the
Rkey to restart Gemini CLI

After restarting, you'll see the terminal showing a connection to the Gemini model, and you're ready to start using it. You may need to unlock access permissions on first use — just follow the prompts.
Hands-On Demo: Auto-Generating a Lottery Program with Gemini CLI
With configuration complete, let's experience Gemini CLI's AI code generation capabilities through a practical example.
Issuing a Programming Task in Natural Language
Type your requirement directly in Gemini CLI:
Write me a random company annual party lottery program in HTML code, the kind that can run directly
The AI Auto-Coding Process: The Magic of Agent Mode
After receiving the instruction, Gemini CLI enters a "thinking" state for analysis and planning, then automatically begins writing code. Behind the scenes, it's running in AI Agent (intelligent agent) mode: it can not only generate code snippets but also proactively plan task steps, invoke file system operations, execute Shell commands, and request user authorization at critical checkpoints. This "plan → execute → feedback" loop mechanism is what fundamentally differentiates it from ordinary code completion tools (like GitHub Copilot) — the latter only passively responds to context at the cursor position, while Agent-mode tools proactively drive the entire development task to completion.
During this process, it will ask multiple times whether you allow certain operations (such as creating files, writing content, etc.) — you just need to click "Allow."
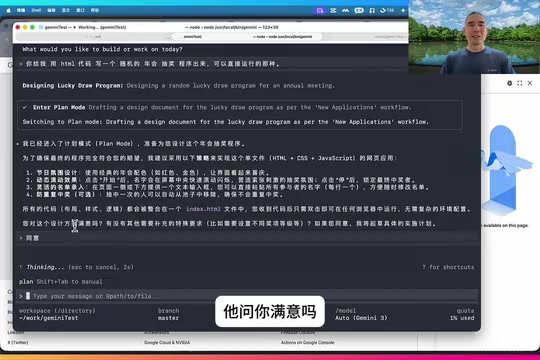
Throughout the entire process, developer interaction is simplified to the extreme — you only need two keyboard actions: "Allow" and "Execute" — without writing a single line of code yourself.
The Generated Lottery Program Results
Gemini CLI automatically generated a complete index.html file, including:
- Start Lottery button: Names scroll when clicked
- Stop button: Randomly stops on a name when clicked
- Winner notification: A "Congratulations!" animation effect pops up
Simply open this HTML file in a browser to run it — no additional configuration needed. From issuing the requirement to receiving a working product, the entire process takes less than two minutes.
What Gemini CLI Means for Developers
A Qualitative Shift in Development Efficiency
AI coding tools like Gemini CLI bring more than just efficiency improvements — they represent a fundamental shift in development paradigms. The developer's role is transforming from "code writer" to "requirement describer and code reviewer." This shift is known in software engineering as Intent-Driven Programming — developers only need to clearly express "what they want" rather than "how to implement it," while AI fills in the technical details in between.
Significantly Lowering the Programming Barrier
More noteworthy is that these tools are lowering the barrier to entry for programming. Product managers and even operations staff can complete simple development tasks with Gemini CLI, as long as they have a basic understanding of code. Specifically:
- Non-professional developers can quickly implement simple functional requirements
- Professional developers can focus their energy on architecture design and complex logic
- Team collaboration efficiency will see significant improvements
Gemini CLI Core Advantages at a Glance
| Feature | Description |
|---|---|
| Free quota | 1,000 requests per day, more than enough for personal use |
| Model capability | Based on Gemini 2.5 Pro, high-quality code generation |
| Ease of use | Command-line interaction, just describe requirements in natural language |
| Stability | Lower account suspension risk compared to some other tools |
| Agent capability | Proactively plans and executes multi-step tasks, not just code completion |
Conclusion
If you're still "old-school programming"
Related articles
 Tutorials
ChatGPT Plus Subscription Guide: Are GPT-5.5, image-2, and Codex Worth the Upgrade?
A detailed look at ChatGPT Plus features — GPT-5.5, image-2, and Codex — with a Plus vs Pro comparison and a complete step-by-step subscription guide for users outside the US.
 Tutorials
Harness AI Engineering in Practice: Using Claude Code to Master Enterprise-Level E-Commerce Development
Deep dive into Harness AI Engineering: master enterprise e-commerce development with Claude Code using the Rules, Skills, Wiki, and Changes framework.
 Tutorials
Cursor + Codex Dual-IDE Collaboration: A Practical Methodology for Open-Source Project Customization
A complete methodology for open-source project customization based on real-world experience, detailing the Cursor+Codex dual-IDE workflow, seven-stage process, MVP validation, and AI source code reading techniques.