GEMINI.md Configuration Guide: Customize Your AI Coding Assistant with Three-Level Scoping

GEMINI.md is Gemini CLI's core config file that guides AI to generate code matching your expectations.
GEMINI.md is Gemini CLI's project instruction file that serves as an engineering extension of system prompts, automatically injecting context into every session. It can be auto-generated by scanning your codebase with the /init command, then manually supplemented with coding preferences. The file supports project-level, directory-level, and global-level three-tier scoping with configuration inheritance. After modifications, run /memory refresh to reload, and maintain the file as your project evolves to ensure consistent, high-quality AI code generation.
In the previous tutorial, we completed the installation and project initialization of Gemini CLI. Now, before we officially let AI help us write code, there's a crucial step that shouldn't be overlooked—creating the GEMINI.md file. This file serves as a "project specification" for the AI model, enabling Gemini to understand your project architecture, technology stack choices, and personal coding preferences, resulting in code that better matches your expectations.
What is a GEMINI.md File?
GEMINI.md is a Markdown-formatted instruction file whose contents are automatically injected as context into the model during every Gemini CLI session. The choice of Markdown as the instruction file format is no coincidence—in the AI coding tool ecosystem, this pattern of "document-driven AI behavior" is becoming an industry standard. Cursor uses .cursorrules files, GitHub Copilot uses .github/copilot-instructions.md, and Claude Code uses CLAUDE.md. Markdown's advantage lies in being both a human-readable document format and one that can be efficiently parsed by large language models as structured instructions. This design is essentially an engineering extension of the System Prompt: contextual information that would otherwise need to be repeatedly declared in every conversation is solidified into version-controllable project files.
You can define the following within it:
- Project architecture: Frameworks used, directory structure, key dependencies
- Development standards: CSS solutions, testing frameworks, build tools
- Coding preferences: Whether to use semicolons, component granularity, import path styles, etc.
For example, if you dislike cramming Tailwind class names into template files, or prefer not using JavaScript semicolons, you can write these into GEMINI.md, and the AI will automatically follow these rules when generating code.
It's worth noting that GEMINI.md content consumes the model's Context Window capacity. Although Gemini 2.5 Pro boasts a massive 1-million-token context window, providing ample space for injecting extensive project information, file content should still remain concise and information-dense. Redundant descriptions not only waste token budget but may also dilute the weight of critical instructions, causing the model to decrease adherence to certain rules when generating code. This is why auto-generated content tends to be structured bullet-point lists rather than lengthy prose descriptions.
Auto-Generating the GEMINI.md File
For projects with existing code, Gemini CLI provides a very convenient way to auto-generate this configuration file.
Using the /init Command to Scan the Codebase
In the Gemini CLI chat window, type the /init command and press Enter. This is a special slash command that instructs Gemini to scan the entire codebase, identify patterns and information within it—including frameworks used, CSS libraries, application structure, data flow, etc.—then consolidate this information into the GEMINI.md file.
Slash commands are an interaction paradigm originating from instant messaging tools like IRC and Slack, where the / prefix indicates a system instruction rather than ordinary conversation content. In Gemini CLI, slash commands directly trigger predefined workflows within the CLI rather than sending text to the LLM for free-form reasoning. This means the codebase scanning logic of /init is deterministic program behavior, not probabilistic model output, thereby ensuring the reliability and consistency of analysis results.
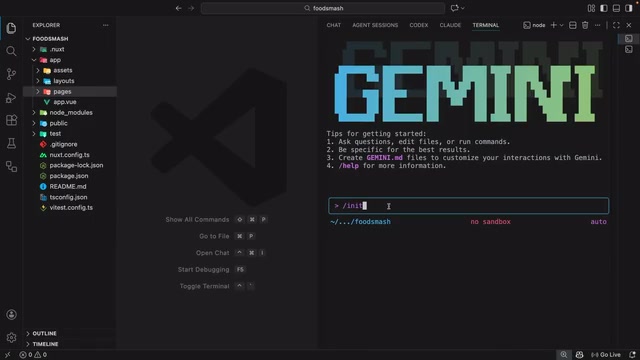
After executing the command, Gemini will first create an empty GEMINI.md file in the project root directory, then begin analyzing the codebase. Once analysis is complete, it won't write content directly—instead, it first displays a diff (difference comparison), showing what it intends to write, and requests your permission.
Permission Control Mechanism
This involves an important security design in Gemini CLI: whenever the CLI wants to modify files or execute commands, it first asks for your consent. The "show diff first, then request permission" interaction pattern adopted by Gemini CLI draws from the difference comparison concept in Git version control—diffs use red and green colors to mark deletions and additions, allowing developers to fully review any file changes before they take effect.
This Human-in-the-Loop design is one of the core principles of current AI Agent safety frameworks: AI can propose suggestions and generate solutions, but ultimate execution authority always remains with humans. This is especially important in AI coding tools, as uncontrolled file writes could break existing code, introduce security vulnerabilities, or even execute dangerous system commands.
You typically have three options:
- Yes, allow once: Only allows this operation; will ask again for the next modification
- Yes, always allow: Won't ask about write permissions for the rest of the current session
- Reject and suggest modifications: You can propose changes to the content
After selecting the second option, an "accepting edits" prompt appears above the chat input box, indicating that Gemini will automatically execute code changes during the current session. If you need to switch back to manual confirmation mode, press Shift + Tab.
Viewing the Auto-Generated Content
Open the generated GEMINI.md file, and you can see the project information Gemini automatically identified:
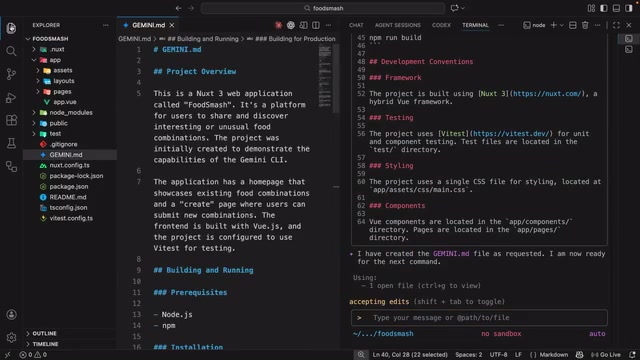
In this tutorial's example project (a Nuxt 3 application), Gemini identified the following:
- Project overview: This is a Nuxt 3 web application for users to share and discover interesting food pairings
- Development environment: Including installation guide (npm install), development server startup method
- Tech stack: Framework is Nuxt 3, testing uses VTest
- Project structure: Components located in
app/components, pages in the corresponding pages directory - Styling solution: Currently using a single CSS file
Since the example project is relatively simple (only two pages, no additional components), the generated content is also fairly concise.
Adding Personal Coding Preferences
The auto-generated content is just a starting point—you can freely edit the GEMINI.md file to add more instructions. For example, add "additional coding preferences" at the bottom of the file:
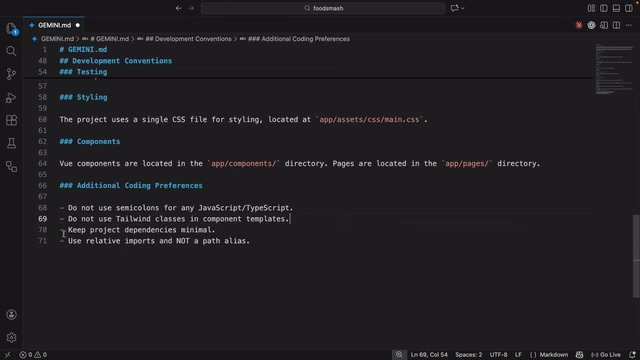
Common preference settings include:
- No semicolons: Omit trailing semicolons in JavaScript/TypeScript code
- No Tailwind class names in templates: Even if the project uses Tailwind CSS, prefer extracting styles
- Keep components small and modular: Follow the single responsibility principle
- Use relative import paths: Rather than path aliases
- Minimize project dependencies: Avoid introducing unnecessary packages
These preferences vary from person to person—the key is explicitly communicating your coding habits to the AI so its generated code style remains consistent with yours.
Refreshing Memory: Making Gemini Recognize File Changes
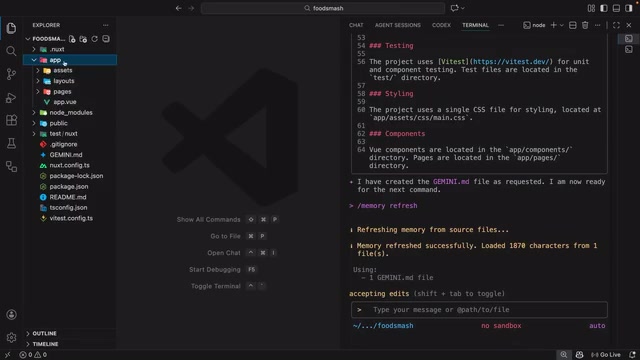
After editing and saving GEMINI.md, there's one more critical step: run the /memory refresh command in Gemini CLI. This command tells the CLI to rescan all GEMINI.md files, ensuring the latest instructions are loaded into the current session.
After execution, you'll see a "memory was refreshed" confirmation message and a "using 1 Gemini md file" prompt, confirming the file has been successfully recognized and is being used as context.
The Three-Level Scope of GEMINI.md
GEMINI.md files support three levels of scope—a highly flexible design that meets configuration needs at different granularities. This multi-level scoping follows the classic "configuration inheritance" pattern in software engineering, similar to the multi-level configuration mechanisms of tools like .gitignore and .eslintrc. When GEMINI.md files exist at multiple levels simultaneously, their contents are merged and injected into the context, with subdirectory-level instructions supplementing or refining global or project-level rules.
1. Project Level (Root Directory)
A GEMINI.md placed in the project root directory applies to the entire project—this is the most common approach. It's suitable for defining global tech stack, architecture standards, and universal coding styles.
2. Directory Level (Subdirectories)
You can create additional GEMINI.md files in subdirectories to provide instructions specific to certain modules. For example:
- Create one in the
pages/directory to specifically guide page component generation standards - Create one in the
tests/directory to provide specific requirements for test writing and assertion styles
This design is especially valuable in Monorepo architectures—the root directory defines universal TypeScript standards and Git commit conventions, while individual sub-package directories declare their own framework specifics (e.g., frontend packages using React, backend packages using Express) and testing strategies.
3. Global Level (User Directory)
In the hidden .gemini folder within the user's home directory (Home directory on Mac, user profile directory on Windows), you can create a global GEMINI.md file. This folder is automatically created during Gemini CLI installation and is used to manage global settings, MCP servers, extensions, and chat sessions.
Here, MCP (Model Context Protocol) is an open protocol proposed by Anthropic and gradually being adopted by the industry. It defines standardized communication methods between AI models and external tools and data sources. Through MCP, Gemini CLI can connect to database query tools, API testing services, document retrieval systems, and other external capabilities, extending AI's scope from pure code generation to complete development workflows. The global .gemini folder serves as the unified management entry point for these configurations, reflecting Gemini CLI's product positioning as a developer AI hub.
Instructions in the global file apply to all your projects, making it ideal for cross-project universal coding styles and interaction preferences. Note that you need to enable showing hidden files to see the .gemini folder.
Regardless of which level you add a new GEMINI.md file at, it's recommended to run /memory refresh to ensure the CLI correctly recognizes it.
The Importance of Ongoing Maintenance
GEMINI.md is not a "create and forget" file. As your project evolves—introducing new services, adjusting architecture, switching tech stacks, or changing coding styles—you should update this file accordingly. Otherwise, the AI model will make decisions based on outdated information, and the generated code may not match the current project state.
For brand new projects, even though there's no existing code for Gemini to analyze, you can still manually write in basic preferences and expected tech stack first, then gradually refine it during development.
Summary
GEMINI.md is the core configuration file in the Gemini CLI workflow, establishing a "coding contract" between you and the AI. By auto-generating a base configuration with the /init command, then manually supplementing personal coding preferences, combined with the flexible three-level scoping design of project-level, directory-level, and global-level, you can significantly improve the quality and consistency of AI-generated code while reducing subsequent manual adjustments. In the next tutorial, we'll officially begin using the configured Gemini CLI for code changes and feature development.
Related articles
 Tutorials
ChatGPT Plus Subscription Guide: Are GPT-5.5, image-2, and Codex Worth the Upgrade?
A detailed look at ChatGPT Plus features — GPT-5.5, image-2, and Codex — with a Plus vs Pro comparison and a complete step-by-step subscription guide for users outside the US.
 Tutorials
Harness AI Engineering in Practice: Using Claude Code to Master Enterprise-Level E-Commerce Development
Deep dive into Harness AI Engineering: master enterprise e-commerce development with Claude Code using the Rules, Skills, Wiki, and Changes framework.
 Tutorials
Cursor + Codex Dual-IDE Collaboration: A Practical Methodology for Open-Source Project Customization
A complete methodology for open-source project customization based on real-world experience, detailing the Cursor+Codex dual-IDE workflow, seven-stage process, MVP validation, and AI source code reading techniques.