Godot Enemy AI Tutorial: Building a Patrol and Chase System from Scratch

Build an enemy patrol and chase AI system in Godot using AI programming tools
This article walks through the complete process of implementing a Zelda-style enemy AI module in the Godot engine using AI programming tools (no hand-written code required). It covers creating a slime scene (CharacterBody2D node configuration, ping-pong loop animation techniques) and designing effective prompts for AI to generate finite state machine-based patrol code, including patrol range, wait time, arrival threshold, and anti-wall-stuck parameter design.
Introduction
In game development, enemy AI is one of the core elements that elevates the gameplay experience. An enemy that can automatically patrol and actively chase the player upon detection makes the entire game world feel more alive. This article uses the Godot engine and AI programming tools (no hand-written code required) to fully implement a Zelda-style enemy AI module — complete with patrol and chase mechanics.
Building the Enemy Scene Foundation
Creating the Slime Scene
First, you need to establish a clear file structure in your project. Create an "Enemies" folder, then organize by enemy type (e.g., a Slime folder), and place your sprite assets inside.
When creating a new scene, choose CharacterBody2D as the root node (since enemies are also characters) and name it "Slime." CharacterBody2D is a physics node in the Godot engine designed specifically for controllable characters and is one of three types of rigid bodies in Godot's physics system. Unlike RigidBody2D (fully controlled by the physics engine with gravity, elasticity, and realistic physics simulation) and StaticBody2D (a completely static collision body, like walls and floors), CharacterBody2D offers a middle-ground approach — "manual movement control with engine-handled collisions." Developers precisely control character movement through move_and_slide() or move_and_collide() methods, while the engine handles collision responses with other objects. This design is extremely common in 2D action games — classic titles like Zelda, Hollow Knight, and similar 2D action games use similar underlying logic for their character systems. The configuration process from here is similar to the player character:
- Add a
Sprite2Dnode and import the slime sprite sheet (set the grid to 8x8) - Adjust the offset value so the character "stands on the ground"
- Add a
CollisionShape2Dto define the collision area - Add an
AnimationPlayerto configure animations
Animation Configuration Tips
The slime's idle animation has 3 frames, and here we use a loop mode different from the player — ping-pong loop (0→1→2→2→1→0), rather than a standard sequential loop. Ping-Pong Loop is a classic technique in animation, first widely used in GIF animations and sprite animations. A standard sequential loop (0→1→2→0→1→2) produces a noticeable jump when transitioning between the last and first frames, while ping-pong looping eliminates this abrupt change through reverse playback. For bouncy creatures like slimes, their physical characteristics of compression and expansion naturally match the ping-pong rhythm, making it visually consistent with "Squash and Stretch" — the first of Disney's Twelve Principles of Animation. In pixel games with limited frame counts, ping-pong looping achieves smoother animation with fewer frames, making it a common technique in indie game development for conserving art resources. Movement animations (Walk Down, Walk Side, Walk Up) are set up the same way.
Generating Patrol Code with AI
Key Prompt Design Considerations
Unlike configuring the player character, enemy AI prompts require special attention to the following points:
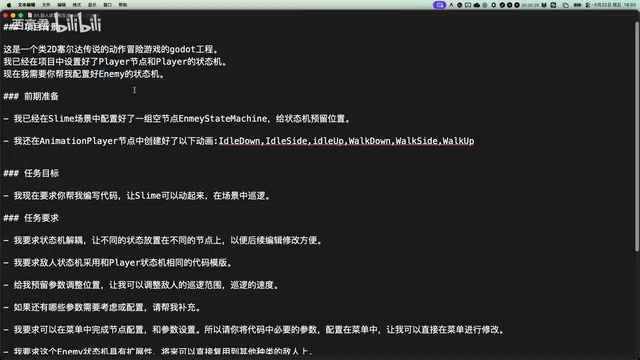
1. Project Context: Tell the AI that the Player node and Player state machine are already configured, so the AI can reference the existing code style when generating the enemy state machine, ensuring code consistency.
2. Task Objective Differences: The player uses "control mechanics," while the enemy needs "patrol mechanics" — autonomous movement without player input.
3. Specific Constraints:
- Use the same code template as the Player state machine
- Allow configurable patrol range and patrol speed (enemies shouldn't wander across the entire map)
- The state machine should be extensible, so it can be reused for other enemies (goblins, bosses, etc.) in the future
The "state machine" mentioned here, the Finite State Machine (FSM), is the most classic architectural pattern in game AI design. Its core concept is: an object can only be in one of a finite number of states at any given moment (e.g., "Patrol," "Chase," "Attack," "Death"), and transitions between states occur through clearly defined conditions. Compared to stacking logic with if-else statements, the advantage of FSM is that each state's behavioral logic is completely independently encapsulated, and adding new states won't affect existing ones. Godot's node tree is naturally suited for implementing FSM — each state corresponds to a child node, and the parent node handles state-switching logic. Games like The Legend of Zelda and Dark Souls use the same underlying approach for their enemy AI implementations.
Analyzing the AI-Generated Patrol Parameters
After the AI generates the code, it automatically configures a complete set of patrol parameters:

| Parameter | Default Value | Description |
|---|---|---|
| Patrol Range | 150 pixels | The radius within which the slime can move |
| Wait Time | 1-3 seconds | Random pause duration after each movement |
| Arrival Threshold | 8 pixels | Distance from the target point at which the slime is considered to have arrived |
| Anti-Wall-Stuck Timer | 1.5 seconds | If stuck against a wall for longer than this, automatically recalculates direction |
The "Arrival Threshold" design is particularly clever: if the slime needs to move 30 pixels to the right but hits an obstacle at 28 pixels, the system will determine it has reached its target, preventing the AI from endlessly bumping into the wall and getting stuck.
The "Anti-Wall-Stuck" mechanism solves a common game
Related articles
 Tutorials
ChatGPT Plus Subscription Guide: Are GPT-5.5, image-2, and Codex Worth the Upgrade?
A detailed look at ChatGPT Plus features — GPT-5.5, image-2, and Codex — with a Plus vs Pro comparison and a complete step-by-step subscription guide for users outside the US.
 Tutorials
Harness AI Engineering in Practice: Using Claude Code to Master Enterprise-Level E-Commerce Development
Deep dive into Harness AI Engineering: master enterprise e-commerce development with Claude Code using the Rules, Skills, Wiki, and Changes framework.
 Tutorials
Cursor + Codex Dual-IDE Collaboration: A Practical Methodology for Open-Source Project Customization
A complete methodology for open-source project customization based on real-world experience, detailing the Cursor+Codex dual-IDE workflow, seven-stage process, MVP validation, and AI source code reading techniques.