How to Buy a Cloud Server and Deploy Your Personal Website from Scratch (2024 Practical Guide)

A complete beginner's guide to purchasing a cloud server and deploying a personal website.
This beginner-friendly tutorial covers everything from cloud server basics and choosing among China's top four cloud providers, to five key purchasing tips, real pricing comparisons, free trial options, server initialization (password reset, port configuration, SSH login), and deploying a website using BT Panel.
Introduction
Owning your own server and deploying a webpage accessible to the entire world — it sounds cool, and it's actually not as hard as you might think. This tutorial will walk you through the complete process from scratch: selecting and purchasing a cloud server all the way to deploying your personal website. All you need is a cloud platform account and a bit of patience, and you'll walk away with two things: a cloud server of your own, and a publicly accessible webpage.
What Is a Cloud Server? Building a Basic Understanding
Before diving in, it's worth understanding what a cloud server actually is. A cloud server is essentially a virtual machine instance running on physical hardware in a large data center. Through virtualization technologies (such as KVM, Xen, or VMware), a single physical server can be partitioned into dozens of isolated virtual servers, each with its own dedicated CPU, memory, storage, and network resources. This model allows everyday users to rent computing resources on demand, without purchasing expensive physical hardware.
Compared to hosting a server at home, cloud servers offer three major advantages: a public IP address out of the box (home broadband typically uses a dynamic private IP that can't be accessed directly from the internet), 24/7 stable uptime (independent of whether your personal computer is on), and the network bandwidth and security guarantees of a professional data center. This is exactly why deploying a globally accessible webpage requires a cloud server.
Choosing a Cloud Platform: How to Pick Among the Top Four Domestic Providers
The four mainstream cloud server platforms in China are: Tencent Cloud, Alibaba Cloud, Volcengine (ByteDance), and Huawei Cloud. All four are very user-friendly for domestic users, with fully Chinese interfaces, solid documentation, and responsive customer support. AWS is the most feature-complete international option, but it's better suited for users with some prior experience — beginners are advised to start with a domestic platform.
Honestly, the choice between providers doesn't matter that much. What matters is following the five universal principles below.
Five Tips to Avoid Common Pitfalls When Buying a Server
Regardless of which cloud platform you choose, these five guidelines apply across the board. Read them before you place your order:
1. Look for the "Cloud Server" Category — Don't Buy the Wrong Product
Cloud platforms sell far more than just servers — they also offer LLM APIs, databases, CDN, object storage, and a wide range of other services. Don't click on anything just because it has "cloud" in the name. Make sure you find the "Cloud Server" or "Lightweight Application Server" category specifically. Buying the wrong product means wasted money.
A quick note on Lightweight Application Servers: these are simplified products offered by major cloud providers specifically for individual developers and small projects (Alibaba Cloud calls it "Lightweight Application Server"; Tencent Cloud calls it "Lighthouse Lightweight Application Server"). Compared to standard cloud servers (ECS/CVM), the lightweight version comes pre-installed with common runtime environments, simplifies network configuration, offers a more beginner-friendly console, and is priced lower. The trade-off is some limitations on network bandwidth and scalability — but for personal blogs, learning projects, and similar use cases, it's more than sufficient. Beginners should default to Lightweight Application Servers.
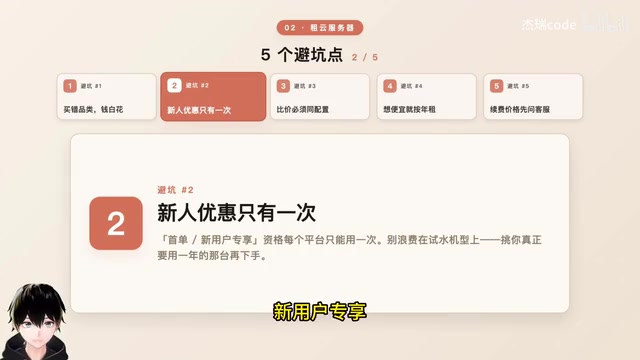
2. First-Order Discounts Are One-Time Only — Don't Waste Them
New-user promotions and first-order discounts on every platform are essentially a one-time opportunity. Don't burn it on the cheapest, smallest instance just to "try things out." Wait until you know what configuration you actually want to run for a year, then pull the trigger.
3. Compare Prices by Matching Specs — Don't Just Look at the Numbers
Align on CPU cores and RAM first, then compare prices. Seeing "¥38" vs. "¥99" without context is easy to misread — the cheaper option might have such a low-spec configuration that it can't actually run your project.
4. Annual Billing Is the Best Deal — Avoid Pay-As-You-Go
Discounted pricing almost always requires annual payment. Never choose pay-as-you-go (hourly billing) — even if your server sits idle, it keeps deducting from your balance, and you can drain it within days. Pay-as-you-go is designed for elastic scaling during traffic spikes, not for long-running personal websites.
5. Always Ask About Renewal Pricing Upfront
This is the most common trap: the first year might be ¥38, but the second year could jump to triple digits. Before placing your order, always ask customer support what the renewal price is in year two. Know what you're signing up for.
Real Price Comparisons and Free Trial Options
Alibaba Cloud Server Pricing
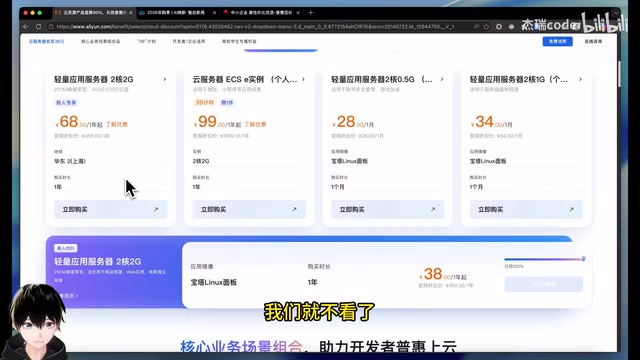
On Alibaba Cloud's "Affordable Cloud" promotions page, there are instances as low as ¥38/year (though these are hard to grab). A more realistic option is the ¥68/year new-user exclusive plan. If your account is newly registered, this is an excellent deal.
Tencent Cloud Server Pricing
On Tencent Cloud's latest promotions page, the cheapest Lighthouse Lightweight Application Server plan starts at around ¥99/year, also targeted at new users.
Free Cloud Server Trial Options
If you'd rather not spend money right now, Alibaba Cloud offers a free trial program: newly registered accounts can claim 1 to 3 months of a Lightweight Application Server at no cost. Go to the Alibaba Cloud website, find the "Free Trial" entry point, and claim it with the default configuration. This is more than enough for learning how to set up a website.
Server Initial Setup
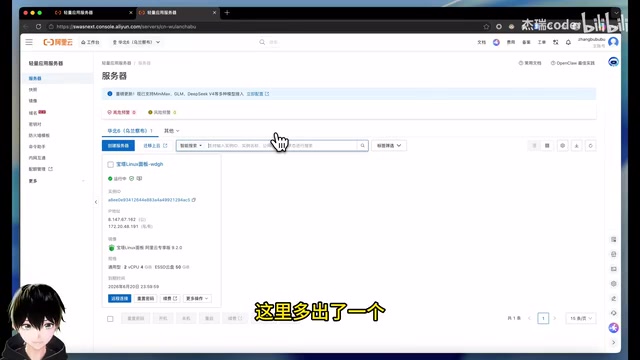
Once you've claimed or purchased your server, go to the console and find your Lightweight Application Server instance.
Reset the Root Password
The first thing to do after getting your server is reset the root password. Find the "Reset Password" button on the server details page, set a new password, and confirm it. You'll need this password for SSH login later — make sure you don't forget it.
Configure the Firewall to Open Required Ports
Click the "Firewall" tab at the top and confirm that the following two ports are open:
- Port 22: for SSH remote login
- Port 80: for HTTP web access
If they're not open, click "Add Rule" to add them manually, and leave the source IP as 0.0.0.0/0 (which allows access from all IPs).
Why manage ports manually? Cloud server firewalls (security groups) only open a small number of ports by default — this is a security measure. Every additional open port is a potential attack surface. Only opening necessary ports (22 for management, 80/443 for web access) is a basic principle of server security. In the future, if you deploy applications that require specific ports (such as port 3306 for a database), you'll need to add those rules here as well.
SSH into Your Server
SSH (Secure Shell) is an encrypted network protocol designed for securely operating remote servers over an untrusted network. It uses asymmetric encryption for authentication and symmetric encryption to protect data in transit, running on port 22 by default. Simply put: SSH is an encrypted tunnel between your computer and the cloud server — all commands and responses pass through this tunnel, and no one in the middle can eavesdrop or tamper with them.
Open a local terminal (PowerShell or CMD on Windows, Terminal on Mac) and enter the following command:
ssh root@your-server-public-ip
On the first connection, type yes to confirm the fingerprint, then enter the password you just reset. When you see the command prompt change, you're successfully logged in.
About the fingerprint confirmation: On your first SSH connection, the system will display the server's public key fingerprint and ask whether you trust it. This is SSH's mechanism for preventing man-in-the-middle attacks — once confirmed, the fingerprint is stored locally, and any future change will trigger a warning. For a brand-new server you just purchased, simply type
yes.
Deploying Your Website: One-Click Setup with BT Panel
This tutorial uses BT Panel to simplify the website deployment process. BT Panel (宝塔面板) is a widely used Linux server management panel in China. It's essentially a web application built on Python/PHP that wraps complex Linux operations — Nginx/Apache installation, site configuration, database management, file management, scheduled tasks, and more — into a visual interface. It transforms what would otherwise require memorizing dozens of command-line instructions into point-and-click operations, dramatically lowering the barrier to getting a site up and running. For beginners, BT Panel is an ideal tool for getting started with server management; once you're comfortable with the fundamentals, you can gradually transition to working purely from the command line.
Retrieve BT Panel Login Credentials
After logging in via SSH, enter the following command:
bt default
The system will output the external access URL, username, and password for BT Panel. Keep this information secure — if it leaks, others can take control of your server.
Install Nginx and Create a Site
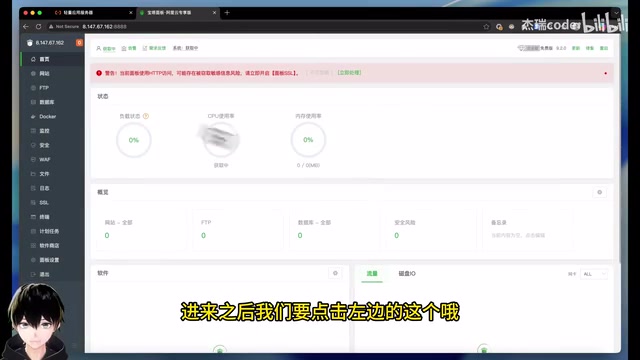
- Open the BT Panel URL in your browser and log in with the credentials
- Agree to the user agreement, then click "Websites" in the left menu
- When prompted to install Nginx, click confirm to proceed
- Click "Add Site", and in the domain field enter your server's public IP address (without the http:// prefix)
- Leave the root directory as default, and set the PHP version to "Static Only"
Related articles
 Tutorials
ChatGPT Plus Subscription Guide: Are GPT-5.5, image-2, and Codex Worth the Upgrade?
A detailed look at ChatGPT Plus features — GPT-5.5, image-2, and Codex — with a Plus vs Pro comparison and a complete step-by-step subscription guide for users outside the US.
 Tutorials
Harness AI Engineering in Practice: Using Claude Code to Master Enterprise-Level E-Commerce Development
Deep dive into Harness AI Engineering: master enterprise e-commerce development with Claude Code using the Rules, Skills, Wiki, and Changes framework.
 Tutorials
Cursor + Codex Dual-IDE Collaboration: A Practical Methodology for Open-Source Project Customization
A complete methodology for open-source project customization based on real-world experience, detailing the Cursor+Codex dual-IDE workflow, seven-stage process, MVP validation, and AI source code reading techniques.