How to Package and Publish an AI-Developed iOS App: A Complete Hands-On Tutorial

A step-by-step guide to packaging AI-generated iOS code with Xcode and distributing via TestFlight.
This article details the full workflow for deploying AI-generated iOS app code to real devices: open the project in Xcode and test in the simulator, configure version numbers, package via Archive and upload to App Store Connect, then create a TestFlight beta testing group to invite testers. It also covers common pitfalls like selecting Any iOS Device, saving version numbers, and ensuring tester emails match their Apple IDs.
Introduction
You've used AI coding tools like Cursor or Bolt to generate code for an iOS App — now how do you actually get it running on an iPhone?
Many developers (especially those without an iOS development background) get stuck at this step: How do you build in Xcode? How do you package and upload to App Store Connect? And how do you configure TestFlight so team members can install the beta version?
This article walks through the entire process from project files to phone installation, helping you quickly navigate iOS app packaging and beta distribution.
Opening the Project in Xcode and Running the Simulator
Opening the Project File
In the iOS project folder generated by AI tools, you'll typically find a file with a blue icon and a .xcodeproj extension. Double-click it to open the entire project in Xcode.
Prerequisites: You must have Xcode installed on your Mac. If not, search for it in the Mac App Store and download it (it's a large file, so make sure you have enough disk space).
About Xcode: Xcode is Apple's official Integrated Development Environment (IDE) and the only official toolchain for developing iOS, macOS, watchOS, and tvOS applications. It includes core components such as an LLVM/Clang-based compiler, Interface Builder, performance analysis tools (Instruments), and a simulator. For AI-generated iOS code, Xcode handles the complete compile-and-link pipeline from source code to runnable application — without it, none of the subsequent packaging and distribution steps are possible.
About
.xcodeprojfiles: It's actually a folder (Package) containing configuration files likeproject.pbxproj, which record the project's file references, build targets (Targets), build settings, and dependencies. If the AI-generated project uses CocoaPods or Swift Package Manager for third-party dependencies, you may also see a.xcworkspacefile — in that case, you should open the.xcworkspacefile instead of.xcodeproj, otherwise dependency libraries may not load correctly.
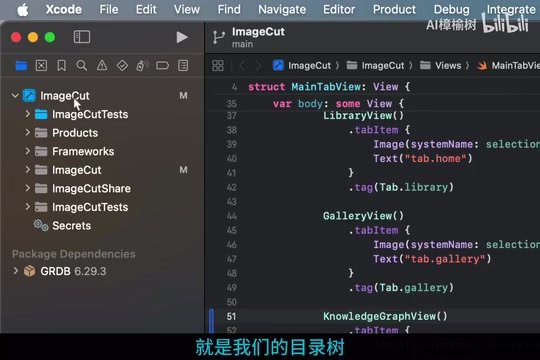
Running the Simulator for Testing
Xcode's interface is somewhat similar to VS Code, with a directory tree on the left. Here are the steps:
- Select the root directory file in the left directory tree
- Click the Play button (Run) in the top toolbar to start building
- Wait until the bottom status bar shows "Build Succeeded"
- The simulator will automatically launch and run the App
The first time you open the simulator, Xcode will prompt you to install the corresponding iOS firmware. After installation, you can select a specific simulator device model. The iOS simulator emulates the iPhone/iPad runtime environment through software, covering the vast majority of functional testing scenarios. However, for hardware-related features like the camera, NFC, or Bluetooth, you'll still need to verify on a real device.
Run through all pages, components, and features in the simulator to confirm everything works before moving to the next step.
Packaging and Uploading to App Store Connect
Configuring Version Numbers
After the simulator testing passes, prepare to upload to App Store Connect (ASC).
About App Store Connect: ASC is Apple's app management portal where developers can manage app metadata, version releases, sales data, TestFlight beta testing, and user reviews. Using ASC requires a valid Apple Developer Program membership (annual fee of $99), which is also a prerequisite for distributing apps to others. If you don't have a developer account yet, you'll need to register and pay at developer.apple.com — the approval process typically takes 1-2 business days.
Key settings:
- Switch the simulator selector at the top to "Any iOS Device" (you cannot select a specific simulator model)
- Modify the Version number and Build number
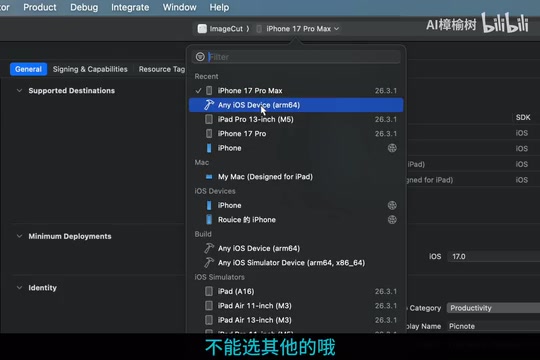
For example: if the previous version was 1.0 with Build 16, a major update could be set to 1.1 with Build 17.
⚠️ Important reminder: After changing the version number, you must press
Command + Sto save, otherwise the changes won't take effect! Many people get tripped up by this the first time.
The Version number (CFBundleShortVersionString) is the user-facing version identifier following semantic versioning (e.g., 1.0.0); the Build number (CFBundleVersion) is an internally incrementing integer that must be larger than the previous one each time you upload to ASC — even if the version number is the same, you cannot reuse a build number.
Executing the Archive Build
- Click the menu bar Product → Archive
- Wait for packaging to complete (a progress bar will show at the top)
- The Organizer window appearing means packaging was successful
- Confirm the version information is correct, then click the blue "Distribute App" button
- Wait for the upload progress bar to finish — a green success icon indicates the upload is complete
What Archive really does: Archive is the process where Xcode compiles the application into a distributable format (
.xcarchive). It's fundamentally different from a regular development Build — it applies Release build configuration (enabling code optimization, stripping debug symbols) and performs official code signing, while also generating dSYM symbol table files (used for symbolication of crash logs later). Only packages generated through the Archive process meet the distribution requirements of the App Store and TestFlight. This is also why you must switch the device to "Any iOS Device" first: when a real device or simulator is selected, Xcode signs with a development certificate, whereas Archive requires a Distribution Certificate.
Distributing Beta Versions via TestFlight
Configuring TestFlight in App Store Connect
After a successful upload, log in to App Store Connect, go to your App page, and switch to the TestFlight tab.
TestFlight background: TestFlight is Apple's official beta testing platform. After being acquired by Apple in 2014, it was deeply integrated into the iOS ecosystem and became the only official channel for iOS app beta distribution. It offers two testing modes: Internal Testing supports up to 100 testers who must be team members of the developer account, with no additional review required for immediate distribution; External Testing supports up to 10,000 testers for a broader audience, but the first submission requires Apple's Beta App review (typically 1-2 days). For team beta testing scenarios, Internal Testing is sufficient to get started quickly. Apps distributed via TestFlight are valid for 90 days — after expiration, you'll need to upload a new version to continue testing.
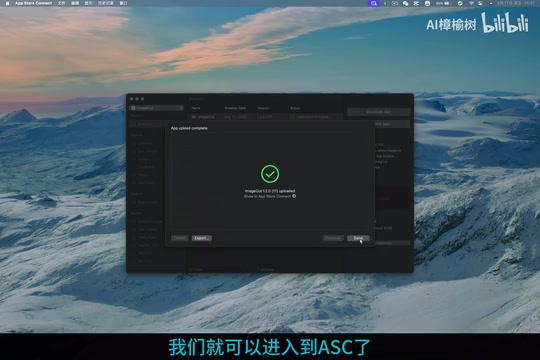
In the "Builds" area under the "Uploading" list, you'll see the version you just uploaded. It will initially show "Processing" and change to "Complete" after about 3-5 minutes. During the processing phase, Apple encrypts the package and performs basic compliance checks before it can be distributed to testers.
Creating a Beta Testing Group and Adding Testers
- In the "Internal Testing" area under "Testers," click the blue plus button
- Create a testing group (name it anything, e.g., "Dev Team")
- It's recommended to check "Automatic Distribution" so future uploads are automatically pushed to testers
- Click "Users and Access" and add test members via the plus button
⚠️ The email must be the person's Apple ID account, otherwise the invitation won't work.
How Testers Accept Invitations and Install the App
After clicking "Invite," the invitee will receive an invitation email.
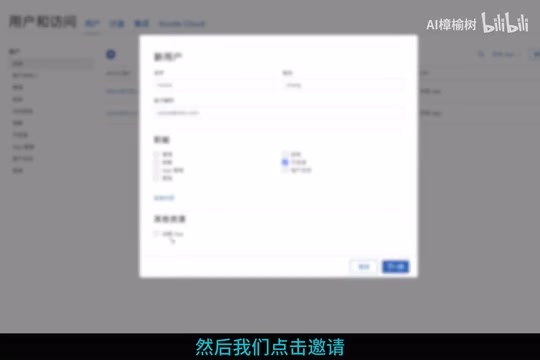
The invitee's workflow:
- Click "Accept Invitation" in the email and follow the steps to complete registration
- The system generates a redemption code — copy it for later
- Open the TestFlight App on iPhone (this is the only entry point for participating in Apple beta tests; it's free to download from the App Store)
- On first launch, paste the redemption code to redeem
- After that, you can install the App directly
For each subsequent version release, TestFlight will push update notifications, and testers can simply tap update. Note that apps installed via TestFlight are independent from official App Store versions — both can coexist on a device, but TestFlight versions display an orange "TEST" badge on the app icon for easy identification.
Summary and Common Issues
The entire process has four steps: Simulator Testing → Archive Packaging → Upload to ASC → TestFlight Distribution.
Common pitfalls:
- When packaging, the device must be set to "Any iOS Device" — selecting a specific simulator model will cause the Archive option to be grayed out
- Always
Cmd+Sto save after changing version numbers - Tester emails must match their Apple ID email
- Build numbers must increment with each upload and cannot duplicate historical versions
- TestFlight is the only official channel for iOS beta testing with no alternatives (enterprise certificate distribution is a separate system with strict usage restrictions)
For those developing apps with AI tools, mastering this packaging and publishing workflow allows you to quickly turn AI-generated code into a real, usable product and rapidly iterate on ideas within your team. Getting from "the code is done" to "it works on my phone" really is just these few steps.
Related articles
 Tutorials
ChatGPT Plus Subscription Guide: Are GPT-5.5, image-2, and Codex Worth the Upgrade?
A detailed look at ChatGPT Plus features — GPT-5.5, image-2, and Codex — with a Plus vs Pro comparison and a complete step-by-step subscription guide for users outside the US.
 Tutorials
Harness AI Engineering in Practice: Using Claude Code to Master Enterprise-Level E-Commerce Development
Deep dive into Harness AI Engineering: master enterprise e-commerce development with Claude Code using the Rules, Skills, Wiki, and Changes framework.
 Tutorials
Cursor + Codex Dual-IDE Collaboration: A Practical Methodology for Open-Source Project Customization
A complete methodology for open-source project customization based on real-world experience, detailing the Cursor+Codex dual-IDE workflow, seven-stage process, MVP validation, and AI source code reading techniques.