MoS-TTS-Nano Deployment Guide: Ultra-Lightweight 0.1B TTS Model That Runs on CPU

Complete deployment tutorial for MoS-TTS-Nano, a 0.1B parameter lightweight TTS model that runs on CPU only.
This article introduces MoS-TTS-Nano — an ultra-lightweight TTS model with only 0.1B parameters that runs on a regular quad-core CPU without any GPU. It provides a detailed walkthrough of the complete deployment process from environment setup, Conda virtual environment creation, critical dependency installation (including pynini), model download, to first-run verification, with solutions for common errors at each step. Real-world testing shows the model delivers unexpectedly good voice cloning results in both timbre reproduction and naturalness.
Why MoS-TTS-Nano Deserves Your Attention
From Spark TTS to Index TTS, the speech generation field has seen a surge of excellent models recently. But MoS-TTS-Nano, which I'm introducing today, takes a fundamentally different approach — extreme lightweight design.
With only 0.1B (100 million) parameters, its hardware requirements are surprisingly low: a regular computer with a quad-core CPU can run it smoothly, with absolutely no GPU needed. This is made possible by the ONNX (Open Neural Network Exchange) format — an open neural network interchange standard that frees models from GPU framework constraints and enables efficient CPU inference. While mainstream large models like VALL-E and SoundStorm require billions of parameters, MoS-TTS-Nano uses techniques like knowledge distillation and model quantization to compress capabilities into an extremely small footprint, representing an alternative solution to the "quality vs. resource consumption" trade-off in the TTS field.
For developers and speech technology enthusiasts without high-end GPUs, this is a very practical choice. Additionally, MoS-TTS-Nano supports multilingual speech generation including Chinese and English, and comes with a built-in Gradio WebUI interface, making it very easy to get started.
Below is a battle-tested complete deployment tutorial, documenting all the pitfalls encountered during deployment along with their solutions.
Environment Setup: Building the MoS-TTS-Nano Deployment Environment from Scratch
Clone the Project Repository
Open VS Code (or your preferred terminal tool) and run the following command to clone the project locally:
git clone <MoS-TTS-Nano project URL>
Once cloning is complete, you'll see the full project structure in the left-side file explorer.
Create a Conda Virtual Environment
MoS-TTS-Nano relies on Conda for environment management. The key difference between Conda and pip is that Conda manages not only Python packages but also underlying system-level dependencies (such as C libraries, CUDA toolchains, etc.), effectively solving "dependency hell" — where different projects conflict over different versions of the same library. First, confirm that Conda is installed:
conda --version
Once confirmed, create an isolated Python environment with Python 3.12:
conda create -n mos-tts-nano python=3.12
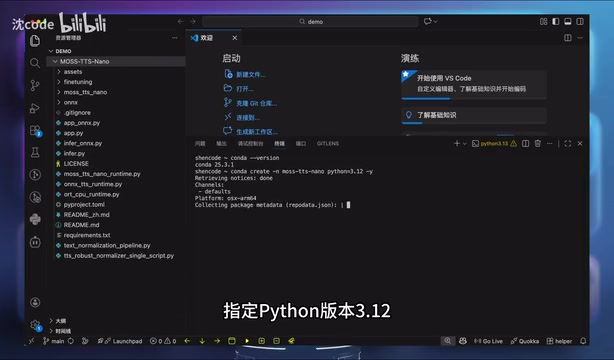
After creation, run conda env list to view all environments and confirm the new one is ready. Creating an independent environment for each project is a good practice that effectively prevents dependency conflicts between different projects.
Critical Prerequisite: Install pynini First
Before activating the environment, there's a crucial step that's easy to trip over — you must install pynini first:
conda install -c conda-forge pynini
Why install it separately beforehand? pynini is a Finite State Transducer (FST) library developed by Google, serving as a core tool for text normalization in TTS systems — it's responsible for converting raw inputs like "2024年" "¥100" "Dr." into pronounceable forms, directly affecting speech synthesis accuracy. Since pynini depends on underlying C++ compilation environments, installing it directly via pip frequently fails on Windows or certain Linux systems due to compilation errors. conda-forge is a community-maintained third-party package repository that provides pre-compiled binary packages, completely bypassing the compilation step, making it far more stable than pip installation. This is the most common first pitfall when deploying MoS-TTS-Nano.
After installing pynini, officially activate the environment:
conda activate mos-tts-nano
When the terminal prompt changes from (base) to (mos-tts-nano), the environment switch was successful.
Dependency Installation: Common Errors and Solutions
Standard Installation and Error Handling
Enter the project directory (don't forget cd mos-tts-nano), then attempt the standard dependency installation:
pip install -r requirements.txt
This step will most likely throw errors, typically still related to the pynini dependency chain.
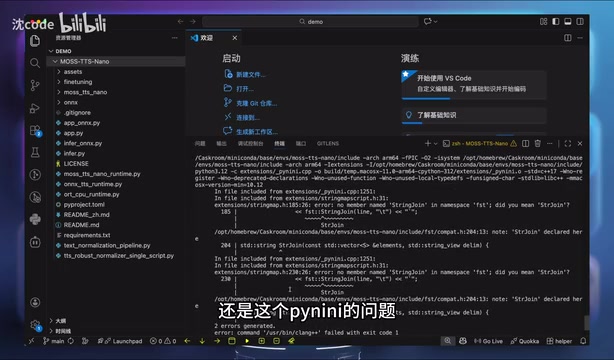
The solution approach: since pynini is already installed via conda, skip it and install the remaining dependencies and vtext-processing separately:
# Install dependencies excluding pynini (refer to project docs for specific commands)
pip install vtext-processing
Finally, register the current project in development mode to the environment:
pip install -e .
⚠️ Note: There's a period
.at the end of the command, representing the current directory — don't miss it. The-eflag means "editable mode" installation, which directly links the project source code to the Python environment, making it convenient to modify code later without reinstalling.
Model Download and First Run Verification
Generate Test Audio
With the environment set up, use the infer_onnx.py script to verify that MoS-TTS-Nano is deployed successfully:
python infer_onnx.py --prompt_audio_path assets/audio/zh-1.wav --text "本地部署验证"
On the first run, the program will automatically download two model files from Hugging Face. MoS-TTS-Nano itself is very lightweight with a small download size, but actual speed depends on your network environment. Hugging Face is currently the most mainstream AI model hosting platform, and access from certain regions can be unstable, which is the main reason downloads may stall.
If the download gets stuck with no progress for a long time, press Ctrl+C to interrupt, then delete the models folder in the project, and re-run the command:
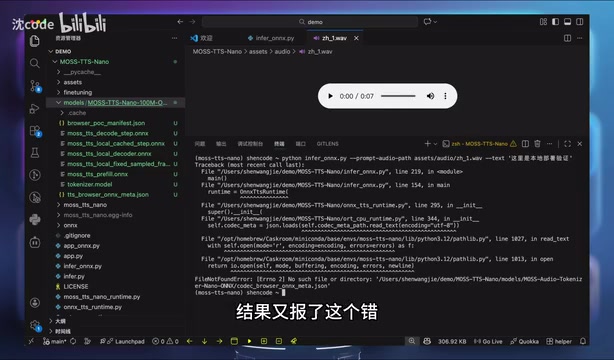
After deleting and re-running, you should typically see the download progress bar advancing normally.
Install Commonly Missed Dependencies
After model download completes, you may encounter two additional errors:
Error 1: Missing importlib-resources
pip install importlib-resources
Error 2: Missing audio processing libraries
conda install -c conda-forge pysoundfile libsndfile
libsndfile is a low-level C audio file I/O library, and pysoundfile is its Python wrapper — both need to be installed as pre-compiled versions via conda-forge for maximum stability. These two dependencies are easily overlooked, so it's recommended to install them in advance to avoid repeated troubleshooting.
Verify Speech Generation Results
With all dependencies in place, run the generation command again — this time it finally completes successfully. You can find the generated audio file in the project's generated_audio folder.
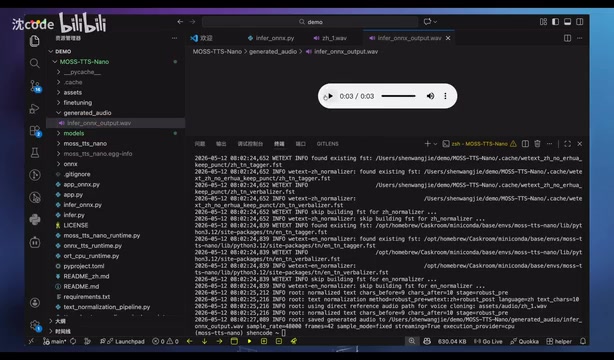
Real-world results: Using a Chinese reference audio for voice cloning, the generated audio performs quite well in both timbre reproduction and naturalness. The core principle of voice cloning is: the speaker encoder extracts voiceprint feature vectors from the reference audio, the synthesis network fuses text with voiceprint features, and finally the vocoder converts everything into playable audio waveforms. MoS-TTS-Nano achieves this pipeline at the 0.1B parameter scale, likely employing a non-autoregressive architecture to balance quality and inference speed. Considering the mere 0.1B parameters and pure CPU inference, the results genuinely exceed expectations.
Launching and Using the Gradio WebUI Visual Interface
For users who aren't comfortable with the command line, MoS-TTS-Nano includes a built-in Gradio-based WebUI interface. Gradio is an open-source Python library maintained by Hugging Face, designed specifically for quickly building interactive demos for machine learning models — developers can wrap a model into a web application with just a few lines of code, requiring no frontend development experience. It has become the de facto demo standard in the AI tool ecosystem.
Related articles
 Tutorials
ChatGPT Plus Subscription Guide: Are GPT-5.5, image-2, and Codex Worth the Upgrade?
A detailed look at ChatGPT Plus features — GPT-5.5, image-2, and Codex — with a Plus vs Pro comparison and a complete step-by-step subscription guide for users outside the US.
 Tutorials
Harness AI Engineering in Practice: Using Claude Code to Master Enterprise-Level E-Commerce Development
Deep dive into Harness AI Engineering: master enterprise e-commerce development with Claude Code using the Rules, Skills, Wiki, and Changes framework.
 Tutorials
Cursor + Codex Dual-IDE Collaboration: A Practical Methodology for Open-Source Project Customization
A complete methodology for open-source project customization based on real-world experience, detailing the Cursor+Codex dual-IDE workflow, seven-stage process, MVP validation, and AI source code reading techniques.