OpenAI Codex IDE Extension in Practice: A Complete Guide to VS Code Installation and Local Development

A complete guide to installing the OpenAI Codex IDE extension and using Agent mode for local development.
This guide covers the OpenAI Codex IDE extension for VS Code, Cursor, and Windsurf — from installation and authentication to its three working modes (Chat, Agent, and Agent with full access). It walks through a hands-on demo of building a modal component using Agent mode, and offers a practical model selection strategy to balance speed and capability.
OpenAI Codex Ecosystem: From a Single Model to a Complete Toolchain
OpenAI Codex was originally released in 2021 as a code generation model — built on the GPT-3 architecture and specifically trained for programming tasks. It was also the original engine powering GitHub Copilot. In 2025, OpenAI repositioned the Codex brand as a comprehensive AI coding assistant ecosystem for developers. It's no longer just a single model, but a full toolchain encompassing cloud execution, code review, local CLI, and IDE integration — reflecting the paradigm shift in AI coding tools from "code completion" to "autonomous coding agents."
The Codex ecosystem now consists of four major tools working in tandem: Codex Cloud for remote task execution, CodeReview for reviewing code changes in GitHub Pull Requests, Codex CLI for working with local projects, and the focus of this article — the Codex IDE Extension.
This extension integrates with VS Code, Cursor, Windsurf, and VS Code Insiders. It's worth noting that VS Code has become the most important integration platform for AI coding tools, thanks to its open Extension API and Language Server Protocol (LSP) standard. Cursor is a standalone editor built as a full fork of VS Code's source code, with deep AI capabilities baked in. Windsurf (originally a Codeium product) also offers a native AI coding experience. OpenAI's decision to support all three platforms simultaneously reflects a strategy of expanding market reach through ecosystem penetration rather than platform lock-in.
The extension's interface will feel familiar to anyone who has used the Copilot extension — it provides a visual chat interface and supports directly triggering code modifications. Under the hood, however, its capabilities are essentially on par with the CLI tool, allowing you to leverage Codex for development work within local projects.
Installation and Initial Setup
The first step is searching the extension marketplace. A small but useful tip: search for "OpenAI Codex" rather than just "Codex" — the latter will surface a bunch of unrelated extensions first, making it easy to install the wrong thing.
Once installed, an OpenAI logo icon will appear in the editor's sidebar. Click it to open the Codex panel.

Opening the panel for the first time requires signing into your ChatGPT account — the flow is identical to configuring the Codex CLI. Click the sign-in button, get redirected to the authentication page, and complete authorization. After logging in, a brief onboarding flow appears; just click "Next" through the steps to reach the chat interface.
One thing to be aware of: the extension is currently still marked as experimental on Windows. In practice, it works fine on both Mac and Windows. Windows users may occasionally experience minor lag and small issues related to MCP servers, but these don't affect core functionality.
MCP (Model Context Protocol) is an open protocol standard proposed and championed by Anthropic in late 2024, designed to standardize communication interfaces between AI models and external tools or data sources. Through MCP, AI assistants can call external capabilities — like file systems, databases, and API services — in a standardized way, without needing to write custom adapter code for each tool. OpenAI subsequently adopted this protocol, enabling tools like Codex to extend their operational scope via MCP servers. The occasional MCP server issues on Windows typically relate to differences in inter-process communication (IPC) mechanisms and path permissions, which is also why the experience tends to be smoother on Mac.
Interface Layout and Three Working Modes
Once you're in the chat interface, the layout is intuitive: a chat window in the center for entering prompts, several context control buttons below it, and a mode switcher at the bottom.
The Codex IDE extension offers the same three modes as the CLI:
- Agent mode: Makes actual edits to project files
- Chat mode: Conversational only — no code modifications
- Agent with full access: Full access, including network requests and files outside the project
Agent mode represents a class of AI system architecture capable of autonomously planning and executing multi-step tasks. Unlike traditional single-turn Q&A, a Coding Agent breaks complex tasks into a sequence of subtasks, dynamically invokes tools (such as file reads/writes, command-line execution, and test runs) during execution, and adjusts subsequent steps based on intermediate results. This is precisely the underlying logic that enables it to independently complete an entire workflow like "create component → wire up form → generate tests → run validation."
The top of the interface also displays a list of recently run tasks from Codex Cloud. Clicking on any task lets you view its details directly within the extension — a genuinely useful design touch.

There's an important behavioral distinction to understand: if you type a follow-up prompt under a cloud task and press Enter, the instruction is sent to Codex Cloud for remote execution. If you go back to the regular chat window, it runs locally. The execution location is completely different between the two — always pay attention to which context you're currently in when switching.
Getting Codex to Understand Your Project
As with other Codex tools, it's best to start by letting it familiarize itself with the project structure. Begin with a simple prompt like: "Can you give me a quick overview of this project?"
After pressing Enter, Codex will traverse the project and gather information. The UI design shines here — responses are presented as bullet points, and some items can be expanded to reveal the underlying operations or reasoning steps, making the process highly transparent.
In the example project, Codex accurately identified: the home route, the hero CTA button, the popular pairings list, the pairing creation page and its client-side form validation, shared layouts, Tailwind v4-based styling, and the test suite using vTest — hitting all the core aspects of the application.
Hands-On Demo: Creating a Modal Component with Agent Mode
Now it's time to put Codex to real work — creating a reusable modal component.
Following good development practice, start by creating a new branch to isolate the changes:
git switch -c feature/modal
Then head back to the Codex chat panel and enter a detailed prompt. The core requirements include: creating a reusable modal component with a semi-transparent backdrop overlay, a white component body, content passed in via slots, and a close button that triggers dismissal; then displaying a modal with a success message when the user submits the new pairing form without any validation errors.
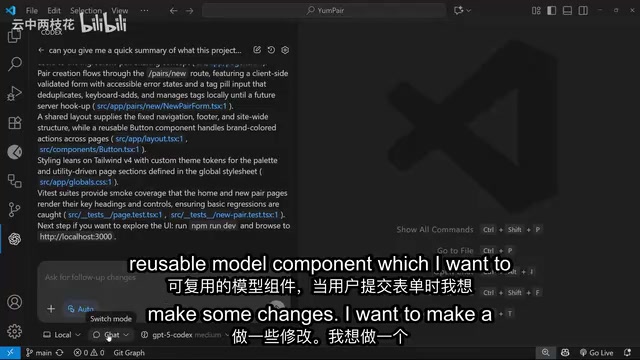
Key action: To have Codex actually modify the code, you must switch the mode at the bottom from Chat to Agent. After execution, Codex not only created the reusable modal component but also wired it into the new pairing form — and detailed all the newly created and modified files at the bottom of the interface. As a bonus, it automatically generated test files and ran the tests.
Model Selection: Balancing Speed and Capability
This task was the slowest execution seen so far when using Codex. The reason: the GPT-5 Codex (medium reasoning) model was in use — a version with greater reasoning depth.

Understanding this speed difference comes down to how "reasoning models" work: unlike standard models that directly generate output, reasoning models perform internal chain-of-thought processing before returning a final result. They consume a large number of tokens and significant compute time during the "thinking" phase, in exchange for deeper comprehension of code logic and lower error rates. These models shine when handling coding tasks involving multi-file dependencies, complex state logic, or architectural decisions — but they're overkill for simple single-file edits.
Here's a practical model selection strategy: switch to GPT-5 medium (standard) for simple tasks — it's much faster; while the GPT-5 Codex model is better suited for complex coding needs, offering stronger capability at the cost of longer processing time. In real-world development, flexibly switching based on task complexity helps you find a better balance between efficiency and quality.
Verifying the Results
Reviewing Codex's changes: in the components directory, you'll find the newly created modal component file with its template and a corresponding test file. The CSS styles and the new pairing form were also updated accordingly to support the modal trigger logic.
Verifying in the browser: fill in the form data and submit — the modal appears as expected. Click the close button — the modal dismisses cleanly. Testing edge cases further: submitting an incomplete form doesn't trigger the modal; filling it out completely and submitting shows the modal correctly. The entire feature behaves exactly as intended.
Summary
The Codex IDE extension packages the local development capabilities of the CLI into an intuitive visual interface, significantly lowering the barrier to entry for developers already working in VS Code, Cursor, or similar editors. Its transparent interactions (expandable to view reasoning steps), flexible multi-mode switching, and seamless integration with Codex Cloud tasks all reflect mature product design thinking.
Model selection strategy is key to improving real-world development efficiency: use GPT-5 medium for simple tasks when speed matters, and the GPT-5 Codex reasoning model for complex coding tasks when quality is the priority. The Windows platform is still experimental for now — users seeking the best experience may want to prioritize a Mac environment.
Key Takeaways
Related articles

Altman: Taking OpenAI Public This Year Would Be 'Ill-Advised'
OpenAI CEO Sam Altman says going public this year would be 'ill-advised,' even as the company has confidentially filed IPO paperwork. Here's what it means for AI.

An Open Letter to Dario: If AI Safety Is Real, Open the Model Weights
Developer Jacob's open letter to Anthropic CEO Dario Amodei went viral on Hacker News, challenging the contradiction between AI safety rhetoric and closed-source models: if safety truly matters, why not open the weights?
Ludwig: Building Custom LLMs and Neural Networks with Declarative Low-Code Configuration
Ludwig is an open-source low-code ML framework that builds custom LLMs and neural networks via declarative YAML config — no boilerplate training code required.