Pi Agent Configuration Guide: Building Your Own AI Coding Assistant

A hands-on guide to configuring Pi Agent and building your own controllable AI coding assistant.
Pi Agent follows a 'minimal core + free extension' philosophy, giving control back to developers. This guide covers installation, connecting to LLMs, choosing community plugins wisely, configuring MCP, Token-saving techniques, UI theming, and an advanced toolchain for building your own AI coding assistant.
What Is Pi Agent: An Agent That Goes Against the Grain
In today's environment where AI coding Agents are springing up everywhere, Pi Agent (Pi for short) takes a distinctly different path. Most Agents on the market pursue an "out-of-the-box" experience, packaging tons of functionality into a bundle that runs the moment you install it—but the price you pay is that it's very hard to know exactly which skills and extensions it has loaded. Everything is a black box.
Some industry context is worth adding here: over the past couple of years, AI coding assistants have rapidly evolved from simple code completion (like the early GitHub Copilot) into "Agents" capable of autonomous planning, tool invocation, and multi-step execution. Such Agents are typically driven by large language models (LLMs), completing complex tasks through paradigms like ReAct (Reasoning + Acting) in a loop of "think—act—observe." Mainstream products such as Claude Code, Cursor, and Aider each make their own trade-offs: some pursue heavy packaging and out-of-the-box readiness, while others emphasize customizability and transparency. This divide between "packaged vs. transparent" essentially reflects differences in tool design philosophy, and it is precisely the key context for understanding Pi Agent's positioning.
Pi's design philosophy is exactly the opposite: keep the core as simple as possible, and push the customizable parts into configuration and extensions. It is not a large, all-encompassing workflow framework, nor a finished product that gives you everything upon installation. Instead, it provides an Agent skeleton that you can understand and modify yourself.
If you're familiar with the open-source community, this idea is easy to relate to. The author draws an analogy to the style of certain "KX"-style projects—they give you a minimal config set and require you to customize things yourself; whereas the opposing "Omai" series is usually an out-of-the-box black-box finished product. Pi belongs to the former category, well suited to people who love tinkering and want to truly control their own toolchain.
Installing Pi Agent and Connecting to a Large Model
Installing Pi is very simple—just run the official installation command. If you already have old configs locally, you can first clean up the config files (keeping the binary), and the reinstall command will report a successful installation.
After installation, the key step is to connect to your large model provider. Pi supports two modes via the login command:
- Account login: In China, currently only Kimi supports this method
- API Key mode: Compatible with more providers, such as MiniMax and others
Copy and paste the corresponding credentials, and once the test passes, Pi Agent is ready to work. But note—at this point, Pi only has the most basic core functionality. Its real value lies in the extensions that follow.
Pi Agent Extension Ecosystem: Less Is More
Pi offers a very clean extension interface, letting you customize freely or find ready-made plugin packages in the community. However, there's a practical issue worth being cautious about.
The Quality Trap of Community Plugins
Because the barrier to writing Agent code with AI assistance is now extremely low, the community is flooded with plugins of wildly varying quality. You'll even find several different implementations of plugins for the same scenario, and figuring out which is better often requires you to try them yourself.
Take the SubAgent plugin as an example—the community offers two popular choices. The author prefers the one with simpler built-in logic; it only provides two basic SubAgents, Explore and "Build," and you can extend it yourself when needed. The other, despite having more downloads (possibly just because it registered its name earlier), comes with a pile of complex task-dispatch mechanisms that introduce extra complexity and are prone to errors.
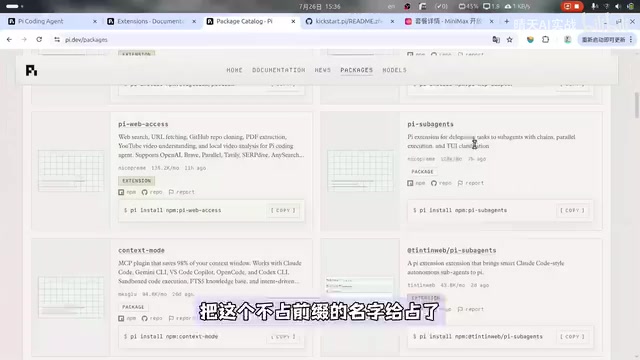
"Less is more" is the core principle running through the entire configuration process. Every additional layer of packaging adds complexity, and with it, a higher probability of errors.

Pi Agent's MCP Support and Configuration Tips
With a single prompt, you can add MCP (Model Context Protocol) support to Pi, along with three commonly used built-in MCPs: Context7, Source Code, and web search.
It's worth first explaining what MCP actually is. MCP (Model Context Protocol) is an open standard proposed by Anthropic in late 2024, aiming to provide a unified way to connect large models with external data sources and tools. You can think of it as the "USB-C port for AI applications"—in the past, connecting an Agent to a tool (such as a database, search engine, or file system) required writing separate adapter code for each. MCP, through a standardized Server/Client architecture, means a tool provider only needs to implement an MCP Server once, and any MCP-supporting Agent can invoke it directly. This also explains why the author below insists that MCP "can't be dropped yet."
Should You Actually Use MCP?
Pi's native design actually does not include MCP. The author advocates using CLI-wrapped Skills as a replacement. But the video's author offers a different view: in certain scenarios, CLI wrapping is reasonable, yet MCP's scope of application remains irreplaceable—it has now retreated more toward the data layer, and many excellent frameworks and Agents still rely on MCP for integration, so MCP "can't be dropped yet."
Regarding the community's widespread practice of re-wrapping MCPs into plugins, the author is reserved: "MCP is MCP." Only extensions to the Agent itself should be packaged as a Package. Wrapping MCPs—or even Skills—into Packages only introduces extra error risk, because everyone (or every model) wraps them at different levels of quality.
Lazy Loading vs. Eager Loading: Token-Saving Tips
To understand this technique, you first need to know about large models' billing and caching mechanisms. Large models are billed by Token (the smallest processing unit after text is split), and both input and output consume Tokens. To reduce cost and latency, mainstream vendors have introduced a "Prompt Caching" mechanism: for repeated prefix content (such as system prompts and tool definitions), the content is cached after first processing, and subsequent requests that hit the cache are priced far lower (usually only 10%~25% of the original). This is precisely the underlying logic of the trade-off below:
- Lazy loading: The total number of Tokens decreases, but the cache hit rate is affected, and the price difference between a cache hit and a miss is enormous
- Eager loading: Guarantees the prefix cache hit rate, suitable for frequently used MCPs
The practical advice is: use eager loading for frequently used MCPs, and lazy loading for infrequent or heavy ones. At the same time, don't forget to control quantity—neither Skills nor MCPs are better in greater numbers.
Pi Agent Interface Beautification and Theme Configuration
Once the tool is installed, the first thing people often do is prettify the interface. The author recommends first installing the OpenTUI plugin, which combines the strengths of several popular Pi UI plugins. After a reload, the bottom interface becomes noticeably more attractive.
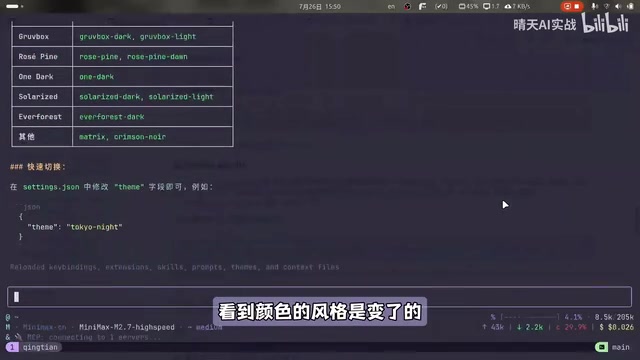
By default, Pi only has two color schemes, Dark and Light. You can install another theme plugin to supplement the color schemes. After installing and reloading, search for themes in Settings, and you'll see a large number of switchable color styles.
One lingering issue remains: Pi's tool invocations, output, and thinking content are all mixed together, with ugly borders that are hard to distinguish. The author says they haven't yet found a suitable extension and plans to write their own beautification plugin later to add rounded corners and borders to tool results.
Recommended Advanced Pi Agent Toolchain
Beyond basic configuration, the author also shares a set of advanced tool-selection recommendations:
The Token-Saving Trio
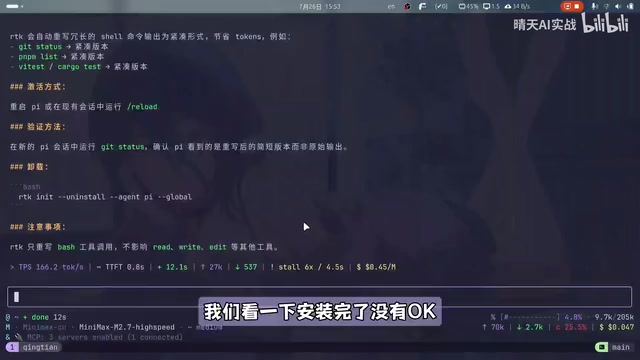
- RTK: Recommended for global installation—painless Token savings. It converts common commands into compact forms, saving input Tokens at the source. "Not installing it is a waste."
- Killman: Recommended for project-level installation, to make the Agent cut down on filler. But note that its output-Token savings may be lossy, making it suitable for Coding scenarios; it's not recommended for creative work
Choosing a Workflow Framework
- From 0 to 1: Recommend using Superpowers for rapid prototyping, then removing it afterward
- Heavy projects with multi-person team collaboration: Recommend OpenSpec, which is the foundation for collaborative development
- Solo development: The author suggests using no framework at all and maintaining your own workflow based on your application scenario. Since large models' capability boundaries are still expanding rapidly, the constraints you add now to "guarantee the floor" may end up limiting the model's ceiling later
Other Useful Extensions
- SubAgent: The author considers this an essential Agent capability. Pi doesn't include it by default, so just add it like a building block
- Agent Browser: Recommended for web projects. It uses the CDP protocol, which is more Token-efficient than traditional headless browser scripting approaches, and is a necessary part of a fully automated workflow that pulls the "human" out of the loop. A note here: CDP is the Chrome DevTools Protocol, which lets programs communicate directly with the browser kernel—reading the page DOM structure, executing JS, monitoring network requests, and so on. Compared with the traditional approach of having the Agent write and execute Puppeteer/Selenium scripts line by line, going through CDP lets the Agent operate the browser in a more structured way with less redundant text, significantly reducing Token consumption
- Remote Pi: Uses an ED networking solution to enable remote Agent control from a phone—just scan the code to connect
Conclusion: Returning Control to You
The true value of Pi Agent lies not in it being a coding agent, but in the fact that it returns the power of Agent configuration and extension to the user.
For developers who love tinkering and want to deeply understand their own tools, this "minimal core + free extension" philosophy is highly appealing. If you also want to build an Agent that truly belongs to you, the author's advice is: read through Pi's official documentation and config repository in full, then start from scratch and assemble, piece by piece, the finished product you ultimately need.
Key Takeaways
Related articles

Disaster and Glory of the Apollo Program: The History We Must Revisit Before Returning to the Moon
From the fatal Apollo 1 fire to Apollo 8's daring lunar orbit to Apollo 11's successful landing—revisiting the disasters, fears, and compromises of the Apollo program and their lessons for today's return to the Moon.

Netflix Trust Exercise Turns Into Firing Trap: Where Are the Boundaries of Corporate Trust?
A Netflix employee was fired after sharing private info in a trust exercise. We analyze the risks of corporate trust exercises and how employees can protect themselves.

AMD CDNA5 Architecture Deep Dive: Technical Evolution and the AI Computing Competition Landscape
Deep analysis of AMD's CDNA5 architecture covering Chiplet packaging upgrades, HBM memory evolution, and low-precision compute optimization, examining how AMD challenges NVIDIA's AI chip dominance.