Postman API Testing Beginner's Tutorial: A Practical Guide to Sending Requests and Interpreting Responses

A beginner's guide to Postman covering request construction and response interpretation for API testing.
This article systematically introduces Postman as an API testing entry-level tool, covering its pros and cons, core interface layout, request-sending mechanisms, and response interpretation methods. Despite drawbacks like no Chinese support, mandatory registration, and limited CI/CD capabilities, Postman's clean UI, comprehensive features, and multi-language code export make it ideal for beginners. The article details request methods, URLs, parameters, authentication, headers, request bodies, scripts, and HTTP status code interpretation.
Why Choose Postman as Your Entry Point for API Testing
As a classic tool in the API testing space, Postman has its share of drawbacks—no Chinese language support, mandatory registration to unlock full features, and difficult access to its overseas-hosted website. Despite all this, it remains one of the best choices for getting started with API testing. Its UI is clean and elegant, its features are comprehensive, and it has even become the "reference model" for many domestic API testing tools. More importantly, mastering Postman's workflow logic lays a solid foundation for learning automated testing later on.
This article systematically covers Postman's core interface layout, request-sending mechanisms, and response interpretation methods, helping complete beginners quickly build a comprehensive understanding of API testing.
Pros and Cons of Postman
Notable Drawbacks
- No Chinese interface, which isn't friendly to users with limited English proficiency
- Registration required to unlock full functionality, and since the website is hosted overseas, network connectivity can be unstable
- Immature CI/CD capabilities—the provided CLI tool (Newman) performs mediocrely in real-world projects
Newman is Postman's official command-line runner that allows you to export Postman Collections as JSON files and execute them in CI/CD pipelines. In theory, it can integrate with Jenkins, GitHub Actions, GitLab CI, and other platforms. However, in practice, Newman's limitations are quite apparent: report formats are limited, dynamic parameter handling is weak, and integration with code repository version control isn't elegant. This is why mature automation testing teams prefer code-based frameworks like pytest+requests or RestAssured—they naturally fit into development workflows and offer better maintainability.
That said, don't worry too much about these drawbacks. Postman is more of a learning springboard. As your testing skills grow, you'll naturally transition to more professional tools and frameworks.
Clear Advantages
- Clean, attractive UI with intuitive operations—unlike JMeter, which can overwhelm beginners
- Feature-complete for API functional testing
- Supports exporting automation code in multiple languages, including Python, Java, C#, PHP, and more, facilitating migration to automated testing
Sending Requests: The Starting Point and Focus of API Testing
Sending requests is the most core operation in Postman and accounts for roughly 70% of all API testing work. Once you understand how to construct and send requests, everything else falls into place naturally.
Before diving into operations, some background knowledge is helpful: the primary target of modern API testing is RESTful APIs based on the HTTP protocol. REST (Representational State Transfer) is an architectural style proposed by Roy Fielding in his 2000 doctoral dissertation. It abstracts network resources as URIs (Uniform Resource Identifiers) and manipulates them through HTTP methods. Understanding this background helps explain why GET corresponds to "retrieve," POST to "create," PUT to "update," and DELETE to "delete"—this set of semantic conventions is the core idea of RESTful design and the underlying logic of Postman's interface design.
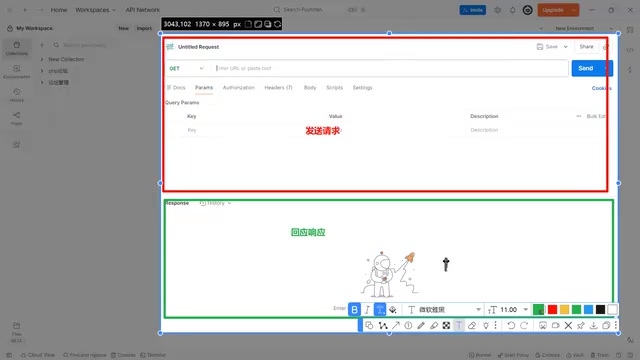
Postman's interface is clearly divided into two halves: the upper section is the request area (red zone), and the lower section is the response area (green zone). The vast majority of our work is concentrated in the upper half—constructing and sending requests. The lower half displays the results returned by the API, which is largely out of our control.
Required Fields: Essential Elements for Every Request
1. Request Method
The request method is the semantic expression of the HTTP protocol—a single word that describes what the request intends to do. Common HTTP request methods include:
- GET: Retrieve resources, download data
- POST: Submit data, upload files
- DELETE: Remove resources
- PUT: Update resources
Here's a detail worth noting: Postman not only supports preset methods but also allows you to type in custom method names. This shows that the number of HTTP methods is theoretically unlimited—you could even invent your own. However, in practical API testing work, mastering the common ones is more than sufficient.
2. Request URL
This is the access address of the API and is a required field. If left empty, clicking the Send button will trigger an error message saying it "cannot be empty." The URL determines where your request parameters are sent—different APIs naturally have different addresses.
Once both the method and URL are filled in, you can click the Send button to dispatch the request. Even if the response returns a 405 or other error status code, it confirms that the request was successfully sent.
Optional Fields: Configure as Needed Based on API Documentation
1. Query Parameters (Params)
Parameters appended to the URL in the format ?key=value. For example, entering Name=Beifan automatically transforms the URL to http://example.com?Name=Beifan. This parameter-passing method is intuitive and common, frequently used in GET requests for filtering, pagination, and search scenarios.
2. Authorization
Most APIs don't allow unrestricted access and require identity verification. Postman provides a dropdown with multiple authentication methods, including:
- Basic Auth: Username and password authentication, where credentials are Base64-encoded and placed in the request header—the simplest HTTP authentication method
- Bearer Token: Token-based authentication where the client holds a token issued by the server and includes it with each request to prove identity
- JWT (JSON Web Token): One of the most popular stateless authentication schemes today, consisting of three parts—Header, Payload, and Signature—concatenated with dots after Base64 encoding. The Header declares the algorithm type, the Payload carries user information and expiration time, and the Signature signs the first two parts with a secret key to prevent tampering. Unlike traditional Sessions, JWT requires no server-side state storage, making it naturally suited for distributed systems and microservice architectures
- API Key: Key-based authentication, typically a fixed key issued by a platform, suitable for service-to-service communication
It's worth noting that not all APIs require authentication. For example, the login endpoint itself doesn't need it—you can't very well require users to prove their identity before they've even logged in.
3. Headers
Used to attach supplementary information, such as User-Agent to identify the request source, Accept-Encoding to indicate compression support, and Connection to specify whether to maintain a persistent connection. Headers play an auxiliary and descriptive role in API testing.
4. Request Body
This is where formal parameters are transmitted and represents the most important content payload of a request. Postman's Body supports multiple formats, and understanding the Content-Type declarations behind them helps avoid common errors:
- form-data: Corresponds to
multipart/form-data, a multi-part format that supports file uploads - x-www-form-urlencoded: Corresponds to
application/x-www-form-urlencoded, the default format for traditional HTML forms, transmitting data as encoded key-value pairs - raw JSON: Corresponds to
application/json, the mainstream format for modern APIs—clear in structure and easy to parse
Content-Type is a MIME type declaration in the HTTP request header that tells the server how to parse the request body. Postman automatically syncs the Content-Type when you switch Body formats, precisely because the server relies on this field to select the appropriate parser—a mismatch between format and declaration directly causes 422 or 400 errors. This perfectly illustrates the tight coupling between "headers" and "body."
5. Scripts
Postman supports JavaScript scripts with two execution timings:
- Pre-request (before the request): Preparation work such as configuring requests, loading data, and encrypting data
- Post-response (after the response): Extracting variables, assertion validation, etc.
This is also a frequently asked interview question—"How do you perform assertions in Postman?" The answer is by writing assertion code in Post-response scripts.
6. Settings
Includes configurations like HTTP version, SSL certificate verification, redirect following, etc. In the vast majority of cases, keeping the defaults is perfectly fine.
Interpreting Responses: Understanding Every Piece of Information Returned by an API
After a request is sent, we need to be able to understand the response content—this is a fundamental skill in manual API testing.
HTTP Status Codes: Instantly Judging Request Results
The status code is the first piece of information to focus on in a response, semantically representing the result through numbers. HTTP status codes follow the RFC 7231 specification and are categorized into 5 classes by their first digit: 1xx for informational responses, 2xx for success, 3xx for redirection, 4xx for client errors, and 5xx for server errors. The design philosophy behind this classification system is "attribution of responsibility."
Related articles
 Tutorials
ChatGPT Plus Subscription Guide: Are GPT-5.5, image-2, and Codex Worth the Upgrade?
A detailed look at ChatGPT Plus features — GPT-5.5, image-2, and Codex — with a Plus vs Pro comparison and a complete step-by-step subscription guide for users outside the US.
 Tutorials
Harness AI Engineering in Practice: Using Claude Code to Master Enterprise-Level E-Commerce Development
Deep dive into Harness AI Engineering: master enterprise e-commerce development with Claude Code using the Rules, Skills, Wiki, and Changes framework.
 Tutorials
Cursor + Codex Dual-IDE Collaboration: A Practical Methodology for Open-Source Project Customization
A complete methodology for open-source project customization based on real-world experience, detailing the Cursor+Codex dual-IDE workflow, seven-stage process, MVP validation, and AI source code reading techniques.