Python Image Compression Tool: AI-Generated Code Achieves 60% Size Reduction with Virtually No Quality Loss

Compress images locally with Python for both privacy protection and quality preservation
This article explains why you should compress images locally with Python (to avoid privacy risks) and demonstrates how to use DeepSeek AI to generate compression code. Using the Pillow library, it covers three compression methods: default quality 85 (~20% reduction), quality 75 (~33% reduction), and smart auto-iteration to a target size—achieving 30%–60% file size reduction with virtually no visible quality loss.
Why Build Your Own Image Compression Tool
Online image compression tools are convenient, but they come with privacy risks—your photos need to be uploaded to third-party servers. Mainstream online compression services (like TinyPNG and Squoosh) transmit files via HTTPS to their servers for processing, then return the compressed results. Although most services claim to promptly delete uploaded files, potential risks remain during data transmission and processing: server logs may retain file metadata (including shooting location and device model from EXIF data), third-party CDN nodes may cache data, and service providers' privacy policies may allow data to be used for model training.
If you can compress images locally with Python, the entire processing workflow happens within your computer's memory—image data never leaves your machine, fundamentally eliminating these risks. This is especially important when handling images containing faces, location information, or trade secrets. Additionally, a local solution lets you flexibly adjust compression parameters to your needs while keeping data security fully under your control.
This article demonstrates how to use AI (DeepSeek) to quickly generate Python image compression code that reduces file size by 30%–60% while maintaining virtually no visible quality loss. Even if you have zero programming experience, you can follow along and complete this easily.
Project Setup: Environment Configuration and AI Code Generation
Create a Working Directory
First, create a new folder on your desktop named "Python Image Compression Project" to store your code and the images to be compressed.
Prepare a few test images—download some high-resolution images from any source as compression samples. In this example, three images with different subjects were prepared, with file sizes ranging from 500KB to 750KB.
Let AI Generate the Python Compression Code
Open DeepSeek and enter this prompt:
Write a short Python program that compresses an image file's size without noticeable quality loss
The AI quickly generates complete code with detailed parameter explanations:
- Quality 85–90: Virtually no visible difference, suitable for high-quality requirements
- Quality 75–85: Slight differences, suitable for web pages and blogs
- Quality below 75: May show visible compression artifacts
There's rigorous technical logic behind the quality parameter: JPEG images use lossy compression algorithms based on the Discrete Cosine Transform (DCT). Images are divided into 8×8 pixel blocks, and after frequency domain transformation, high-frequency detail information (parts the human eye is less sensitive to) is selectively discarded. The quality parameter essentially controls the quantization step size—lower values mean more high-frequency information is discarded, resulting in smaller files but greater detail loss. The widely recommended "golden value" of 85 works because the human visual system is more sensitive to luminance changes than color changes. At this parameter setting, JPEG retains the vast majority of luminance details while significantly reducing redundant color data.
Code in Action: Three Compression Methods Explained
Open the project folder in PyCharm, create a new Python file, and paste in the AI-generated code. The code contains a compress_image method with the entry point in the main function. The core tool used is the Pillow library—the de facto standard library for Python image processing and the actively maintained fork of the classic PIL (Python Imaging Library). After PIL ceased updates in 2011, the community took over and continued iterating under the Pillow name. It now supports reading and writing over 30 image formats, including JPEG, PNG, WebP, GIF, TIFF, and more. In image compression scenarios, Pillow's Image.save() method wraps the underlying codec calls, so developers only need to pass high-level parameters like quality without worrying about low-level details such as DCT transforms and Huffman encoding.

Method 1: Default Quality Compression (Quality=85)
Using the recommended default settings with the quality parameter at 85:
compress_image("image1.jpg", quality=85)
Results:
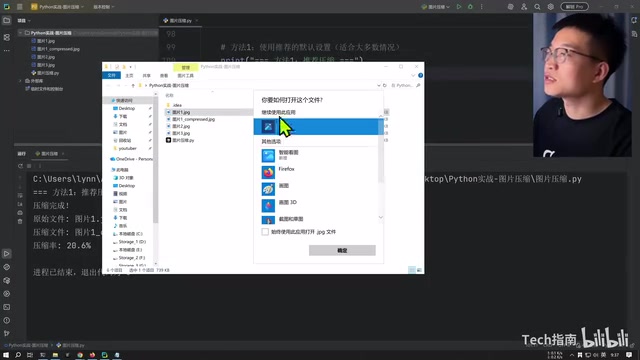
- Original file: 756,740 bytes (740KB)
- After compression: 601,168 bytes (588KB)
- Compression ratio: 20.6%
Comparing the images before and after compression, the difference is virtually imperceptible to the naked eye. This gentle compression approach is suitable for scenarios demanding extremely high image quality, such as archiving photography work.
Method 2: More Aggressive Compression (Quality=75)
Lowering the quality parameter to 75 achieves a higher compression ratio:
compress_image("image2.jpg", quality=75)
Results:
- Original file: 569,826 bytes (557KB)
- After compression: 376,630 bytes (368KB)
- Compression ratio: 33%
Even when zooming in, the differences between the two images are nearly impossible to detect with the naked eye. If you further reduce to quality=40, the compression ratio improves even more noticeably, but quality loss also increases.
Method 3: Auto-Compress to Target Size (Most Recommended)
This is the most intelligent approach—specify a target compression ratio, and the program automatically iterates and adjusts parameters until the target is reached:
compress_to_target("image3.jpg")
Related articles
 Tutorials
ChatGPT Plus Subscription Guide: Are GPT-5.5, image-2, and Codex Worth the Upgrade?
A detailed look at ChatGPT Plus features — GPT-5.5, image-2, and Codex — with a Plus vs Pro comparison and a complete step-by-step subscription guide for users outside the US.
 Tutorials
Harness AI Engineering in Practice: Using Claude Code to Master Enterprise-Level E-Commerce Development
Deep dive into Harness AI Engineering: master enterprise e-commerce development with Claude Code using the Rules, Skills, Wiki, and Changes framework.
 Tutorials
Cursor + Codex Dual-IDE Collaboration: A Practical Methodology for Open-Source Project Customization
A complete methodology for open-source project customization based on real-world experience, detailing the Cursor+Codex dual-IDE workflow, seven-stage process, MVP validation, and AI source code reading techniques.