Python OpenCV Beginner Tutorial: Complete Guide to Reading and Displaying Images

A beginner's guide to installing OpenCV in Python and performing basic image reading and display operations.
This article covers the fundamentals of using OpenCV in Python. OpenCV is a cross-platform computer vision library written in C++ and accessed via the cv2 module in Python. The guide walks through pip installation, imread() for reading images (which returns NumPy arrays in BGR channel order), imshow() for displaying images, waitKey() for driving the GUI event loop to keep windows open, and destroyAllWindows() for releasing C++ underlying resources.
Introduction
OpenCV (Open Source Computer Vision Library) is one of the most mainstream open-source libraries in the field of computer vision. The "CV" stands for Computer Vision, and it is a cross-platform computer vision library widely used in image processing, video analysis, computer vision, and pattern recognition. This article will guide you from scratch through installing and using OpenCV in Python to complete the most fundamental operations of reading and displaying images.
Introduction to OpenCV and Installation
What is OpenCV
OpenCV was initiated by Intel in 1999 and officially released as open source in 2000, with over 20 years of development history. Its original goal was to popularize computer vision research and lower the barrier to entry. Today, OpenCV has accumulated over 2,500 optimized algorithms, has more than 70,000 stars on GitHub, and has been downloaded over 18 million times worldwide. It is widely adopted by tech giants like Google, Microsoft, Intel, and IBM, making it the de facto industry-standard toolkit in the computer vision field.
OpenCV's core is written in C++, and Python accesses its functionality through C++ interface bindings. This binding mechanism is implemented via Cython and Python C Extensions, with underlying computations still performed by highly optimized C++ code that fully leverages SIMD instruction sets (such as SSE and AVX) and multi-threaded parallel acceleration. This means we can use Python's concise syntax while achieving near C++-level image processing performance — this is the core reason why OpenCV is so popular in the Python ecosystem. When importing OpenCV in Python, the module name is cv2, not opencv — a detail that beginners should pay special attention to.
Installation Method
Installing OpenCV requires just one pip command:
pip install opencv-python

Installation Notes:
- Ensure Python environment variables are properly configured before installation
- If you get a "pip is not recognized as an internal or external command" error, it means Python environment variables are not configured
- The opencv-python package is relatively large, so be patient during installation
Additional Note: The
opencv-pythonpackage installed via pip is a pre-compiled binary package (wheel format) that has been optimally compiled for mainstream platforms (Windows/macOS/Linux). If you need GPU acceleration (CUDA support) or certain proprietary algorithm modules, you'll need to installopencv-contrib-python, or manually compile OpenCV from source with the corresponding build options enabled.
OpenCV Basic Operations: Reading Images
imread() Method Explained
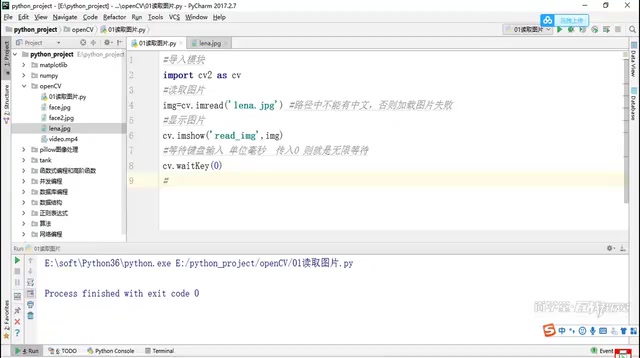
Reading images is the most basic operation in OpenCV, accomplished using the cv2.imread() method:
import cv2

# Read an image
img = cv2.imread('lina.jpg')
The img object returned by imread() is essentially a NumPy ndarray (multi-dimensional array). For color images, its shape is (height, width, 3), where the 3 channels are ordered as BGR (Blue-Green-Red), not the RGB order we're accustomed to in everyday use. This is a historical design decision that OpenCV has maintained to this day. Beginners need to pay special attention to channel order conversion when interacting with other libraries (such as Matplotlib or Pillow) — typically requiring a call to cv2.cvtColor(img, cv2.COLOR_BGR2RGB) for conversion.
Important Note: The image path cannot contain Chinese characters (or other non-ASCII characters), otherwise the image will fail to load and return None. You can use either relative or absolute paths, but make sure the path contains only English characters.
Image Display and Window Control
imshow() - Displaying Images
After reading an image, use the cv2.imshow() method to display it in a window:
cv2.imshow('read_img', img)
This method accepts two parameters:
- Window name: Specifies an identifier name for the display window
- Image object: The image data read by imread

waitKey() - Waiting for Keyboard Input
If you only call imshow(), the image window will flash and disappear immediately. To keep the image displayed, you need to use cv2.waitKey() in conjunction:
cv2.waitKey(0) # 0 means wait indefinitely until any key is pressed

waitKey() is not merely a simple delay function — it actually drives OpenCV's GUI event loop. During the waitKey() call, OpenCV continuously processes system messages such as window redraws, mouse events, and keyboard events. Without calling waitKey(), the window's message queue goes unprocessed, and the operating system considers the program unresponsive — this is the fundamental reason why the image flashes and disappears, rather than simply "the program executing too fast."
The parameter for waitKey() is in milliseconds, with different values corresponding to different behaviors:
- Passing
0: Wait indefinitely until the user presses any key - Passing
1000: Wait for 1 second then automatically close - Passing
3000: Wait for 3 seconds then automatically close
Advanced Tip: The return value of
waitKey()is the ASCII code of the key pressed, which can be used to implement interactive controls. For example,if cv2.waitKey(0) == ord('q'): breakcan be used in a video processing loop to implement a press-Q-to-quit feature.
destroyAllWindows() - Releasing Memory
Since OpenCV's underlying implementation is in C++, it's recommended to manually release memory when you're done:
cv2.destroyAllWindows()
Python's garbage collection mechanism (based on reference counting + cycle detection) manages the memory of Python objects, but OpenCV windows and certain underlying resources are managed directly by the C++ runtime and fall outside the jurisdiction of Python's GC. destroyAllWindows() explicitly notifies the C++ layer to destroy all GUI window handles and release associated system resources. This is especially important for long-running programs or scenarios that process large numbers of images in a loop — failing to release window resources promptly may exhaust system handles, causing hard-to-diagnose stability issues.
Complete Example Code
Combining all the steps above, here is a complete Python OpenCV image reading and display program:
import cv2

# 1. Read an image (path must not contain non-ASCII characters)
img = cv2.imread('lina.jpg')

# 2. Display the image
cv2.imshow('read_img', img)

# 3. Wait for keyboard input (0 means wait indefinitely)
cv2.waitKey(0)

# 4. Release memory
cv2.destroyAllWindows()
After running, the program will open a window named "read_img" displaying the image. Press any key to close the window and end the program.
Common Issues and Summary
| Issue | Cause | Solution |
|---|---|---|
| pip command not available | Environment variables not configured | Configure Python environment variables |
| Image fails to load | Path contains non-ASCII characters | Use a pure English path |
| Image flashes and disappears | Missing waitKey | Add cv2.waitKey(0) |
| Color mismatch with Matplotlib | BGR/RGB channel order difference | Use cv2.cvtColor to convert channels |
This article covered the most fundamental usage of OpenCV in Python, including installation, imread for reading images, imshow for displaying images, waitKey for window control, and destroyAllWindows for releasing resources. After mastering these basic operations, you can further explore more advanced computer vision techniques such as grayscale conversion, edge detection, face recognition, and feature extraction. OpenCV provides a complete toolchain from basic to advanced levels, making it an ideal choice for getting started with computer vision.
Key Takeaways
- OpenCV is a cross-platform computer vision library written in C++ at its core, called via the cv2 module in Python, with performance close to native C++
- Install using the
pip install opencv-pythoncommand; ensure Python environment variables are configured - imread() returns a NumPy array; color images use BGR channel order rather than RGB — conversion is needed when interacting with other libraries
- imread() cannot handle paths containing non-ASCII characters; loading will fail and return None
- imshow() must be used together with waitKey(); waitKey() essentially drives the GUI event loop rather than simply acting as a delay
- Using destroyAllWindows() to release C++ underlying window resources is good programming practice that prevents resource leaks in long-running applications
Related articles
 Tutorials
ChatGPT Plus Subscription Guide: Are GPT-5.5, image-2, and Codex Worth the Upgrade?
A detailed look at ChatGPT Plus features — GPT-5.5, image-2, and Codex — with a Plus vs Pro comparison and a complete step-by-step subscription guide for users outside the US.
 Tutorials
Harness AI Engineering in Practice: Using Claude Code to Master Enterprise-Level E-Commerce Development
Deep dive into Harness AI Engineering: master enterprise e-commerce development with Claude Code using the Rules, Skills, Wiki, and Changes framework.
 Tutorials
Cursor + Codex Dual-IDE Collaboration: A Practical Methodology for Open-Source Project Customization
A complete methodology for open-source project customization based on real-world experience, detailing the Cursor+Codex dual-IDE workflow, seven-stage process, MVP validation, and AI source code reading techniques.