Python Slack Bot Tutorial: A Complete Guide from Setup to GPT-4o Integration

A complete tutorial on building an intelligent Slack Bot with Python and GPT-4o integration from scratch.
This article demonstrates the full workflow of building a Slack Bot with Python: from creating a Slack app, enabling Socket Mode, and configuring permissions and event subscriptions, to implementing message responses and slash command handling with the slack-bolt library, and finally integrating OpenAI GPT-4o for intelligent conversations. The core code is under 50 lines yet produces a fully functional intelligent Bot prototype that can be extended to DevOps automation, data queries, AI Agents, and more.
Slack is a core tool for enterprise team collaboration, and building a custom Slack Bot with Python lets you embed automation capabilities directly into your daily workflows. This article walks you through the complete Slack Bot development process, from environment setup to integrating a large language model, based on a quick-start tutorial.
Why Build a Slack Bot
In day-to-day work, many repetitive tasks can be automated through Bots—from simple message responses and command execution to AI-powered intelligent Q&A. The core value of a Slack Bot lies in placing automation capabilities at the center of team communication, allowing you to trigger various workflows without switching tools.
This article focuses on building a minimum viable product (MVP) with three core capabilities:
- Responding to specific messages
- Executing slash commands
- Integrating OpenAI's GPT-4o model for intelligent conversations
Environment Setup and Slack App Configuration
Creating a Slack App
First, you need a Slack account and a workspace with admin permissions. Visit api.slack.com/apps, click "Create New App", and select "From scratch" to create from zero. Give your app a name (e.g., Tutorial Bot), select the target workspace, and click create.
Once created, the page will display credentials like Client ID and App ID, though you won't need these for the scenarios covered in this article.
Enabling Socket Mode
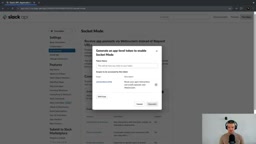
Find "Socket Mode" in the left navigation bar and enable it. This is the fundamental mode for Bot operation. The system will ask you to add the connections:write permission scope, then generate a Socket Token—make sure to save this Token.
Configuring Bot Permissions and Event Subscriptions
Go to the "OAuth & Permissions" page and add the chat:write permission under Bot Token Scopes, giving the Bot the ability to send messages.
Then go to "Event Subscriptions", enable event subscriptions, and add the message.channels event under Bot Events. This allows the Bot to listen to messages in channels and respond accordingly.
Adding Slash Commands
In "Slash Commands", create a new command /add with the description "add two numbers" and example parameters 1 2.

Finally, go back to "OAuth & Permissions", install the app to your workspace, and obtain the Bot User OAuth Token. Save both tokens to a .env file in your project directory:
SLACK_SOCKET_TOKEN=xapp-...
SLACK_BOT_TOKEN=xoxb-...
Writing the Bot Core Code
Project Initialization and Dependency Installation
Install the required Python dependencies:
pip install slack-bolt python-dotenv
Create main.py with the basic framework:
import os
from dotenv import load_dotenv
from slack_bolt import App
from slack_bolt.adapter.socket_mode import SocketModeHandler

load_dotenv()
app = App(token=os.getenv("SLACK_BOT_TOKEN"))
Responding to Specific Messages
Let's implement the most basic feature first—when a user sends "hello", the Bot replies with a greeting:
@app.message("hello")
def hello(message, say):
    say(f"Hello <@{message['user']}>")
The @app.message() decorator works similarly to Flask's routing mechanism, matching a specific string and triggering the corresponding function. The say function sends the reply, and the message object contains context information like the sender.

Implementing Slash Command Functionality
Add the actual logic for the previously configured /add command:
@app.command("/add")
def add(ack, respond, command):
    ack()
    try:
        a, b = map(float, command["text"].split())
        respond(str(a + b))
    except:
        respond("Usage: /add 1 2")
There are several key points to note in this code:
ack()must be called first: Slack requires acknowledgment within 3 seconds, otherwise it will show a timeout errorcommand["text"]: Retrieves the parameter text following the commandrespond: Used to return execution results to the user
Handling Generic Message Events
For messages that are neither "hello" nor slash commands, you can use event listeners as a catch-all:
@app.event("message")
def handle_message_events(body, say):
    say("What?")
Starting the Bot Service
Add the startup code at the end of the file:
SocketModeHandler(app, os.getenv("SLACK_SOCKET_TOKEN")).start()
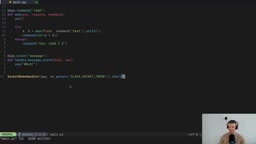
After running python main.py, the terminal will display "Bolt app is running". Don't forget to invite the Bot to your Slack channel (type /invite @Tutorial Bot), then you can start testing: sending "hello" will get a greeting reply, and using /add 20 30 will return 50.
Integrating the OpenAI Large Language Model
Once the basic features are working, here comes the most interesting part—connecting the Bot to GPT-4o to give it intelligent conversation capabilities.
Configuring the OpenAI API and Code Modifications
First, add your OpenAI API Key to the .env file:
OPENAI_API_KEY=sk-...
Install the OpenAI package and modify the code:
from openai import OpenAI

load_dotenv()
client = OpenAI()  # Automatically reads the OPENAI_API_KEY environment variable

@app.event("app_mention")
def mention_gpt_response(event, say):
    text = event.get("text", "")
    response = client.responses.create(
        model="gpt-4o",
        input=text
    )
    say(response.output_text)
Here we use the app_mention event instead of the generic message event, meaning the AI response is only triggered when the Bot is @mentioned. This design is important as it avoids calling the API for every message, reducing unnecessary costs.
Don't forget the critical step: You need to go back to the Slack API configuration page, add the app_mention event in Event Subscriptions, save, reinstall the app to your workspace, and update the Bot Token in your .env file.
Demo in Action
In Slack, @mention Tutorial Bot and ask a question like "How are you?"—the Bot will generate a natural language reply via GPT-4o. You can even ask it to generate code, such as "write a simple recursive Fibonacci function in Python", and the generated code will display directly in the chat window.
Advanced Ideas and Use Cases
With this foundational framework, you can extend it into many practical scenarios:
- DevOps Automation: Trigger deployments and check service status via Slack commands
- Data Queries: Connect to databases and query business data using natural language
- AI Agent Interface: Use the Bot as a control interface for AI Agents, managing complex workflows within Slack
- Code Review Assistant: Connect to code repositories, automatically analyze PRs, and provide feedback in Slack
- Server Monitoring: Control and monitor programs running on servers through Slack messages
The core idea is to use the Slack Bot as a bridge between team collaboration and automation, unifying various capabilities into a single communication interface.
Conclusion
This article demonstrated the complete workflow for building a Slack Bot with Python: from Slack API configuration, Socket Mode setup, and permission settings, to code implementation for message responses, slash commands, and event listeners, and finally integrating OpenAI GPT-4o for intelligent conversations.
The entire project depends on only three packages—slack-bolt, python-dotenv, and openai—with core code under 50 lines, yet it already forms a fully functional intelligent Bot prototype. Once you understand Slack's event-driven model and decorator routing mechanism, extending more complex features on top of this foundation becomes straightforward.
Related articles
 Tutorials
ChatGPT Plus Subscription Guide: Are GPT-5.5, image-2, and Codex Worth the Upgrade?
A detailed look at ChatGPT Plus features — GPT-5.5, image-2, and Codex — with a Plus vs Pro comparison and a complete step-by-step subscription guide for users outside the US.
 Tutorials
Harness AI Engineering in Practice: Using Claude Code to Master Enterprise-Level E-Commerce Development
Deep dive into Harness AI Engineering: master enterprise e-commerce development with Claude Code using the Rules, Skills, Wiki, and Changes framework.
 Tutorials
Cursor + Codex Dual-IDE Collaboration: A Practical Methodology for Open-Source Project Customization
A complete methodology for open-source project customization based on real-world experience, detailing the Cursor+Codex dual-IDE workflow, seven-stage process, MVP validation, and AI source code reading techniques.