Step-by-Step Guide: Power Codex with DeepSeek for Users Without ChatGPT Access

Bypass Codex's ChatGPT login requirement by connecting DeepSeek API via the Codex++ management tool.
This step-by-step guide shows how users without ChatGPT Plus accounts can use OpenAI's Codex by connecting DeepSeek as an alternative inference backend. Using the Codex++ management tool, you configure DeepSeek's OpenAI-compatible API as the model provider, bypassing the official login requirement. The entire setup takes five steps and costs as little as 10 RMB (~$1.40) to get started.
OpenAI's Codex is increasingly seen as an essential AI programming tool by developers, but it's not exactly accessible for everyone — native login requires a ChatGPT Plus account, and both the network requirements and subscription costs create significant barriers for many users, especially those in China. This article systematically walks you through how to bypass these official restrictions and use DeepSeek, a Chinese-developed large language model, as the underlying engine to power Codex — even if you've never written a line of code.
What Is Codex? Why Should You Care?
OpenAI Codex is an AI programming assistant fine-tuned specifically for code scenarios based on the GPT model series. It was originally launched in 2021 as the underlying engine for GitHub Copilot. The new-generation Codex client (the desktop application discussed in this article) is a standalone IDE-level programming tool released by OpenAI, supporting multi-file operations, terminal command execution, code review, and other complex tasks. It's positioned as an "AI-native development environment." Unlike ordinary code completion plugins, it can understand entire project contexts and autonomously plan multi-step development tasks, representing the latest evolution in AI programming tools from "assisted completion" to "autonomous agent."
AI Agent Architecture Background: The new-generation Codex draws on the "AI Agent" architectural paradigm — where the model no longer just answers individual questions, but can decompose complex tasks, invoke tools (such as executing terminal commands and reading/writing files), and iteratively adjust plans based on execution results to complete development workflows spanning multiple files and steps. The core difference from traditional code completion plugins (like early Copilot) is that the latter is "passively responsive" while the former is "actively planning." The industry calls this evolution a leap from the Copilot (co-pilot) paradigm to the Autopilot paradigm, marking AI's transition from an auxiliary role to a semi-autonomous role in software development.
The academic roots of this architecture trace back to the "ReAct (Reasoning + Acting)" framework — where the model alternates between two types of operations: "reasoning" and "acting." Reasoning steps help the model plan the next action, while acting steps interact with the external environment to gather new information, forming a spiraling decision loop. This paradigm was proposed and validated by Google Research around 2022, and was subsequently widely adopted by major LLM providers including OpenAI and Anthropic, becoming the mainstream architectural pattern for building complex AI applications.
At the engineering implementation level, this Agent capability relies on the "Tool Use / Function Calling" mechanism: when generating responses, the model can output structured tool invocation instructions (such as "execute this shell command" or "read that file"), which the outer framework actually executes and feeds results back to the model, allowing the model to continue planning the next step with new information. This "model—tool—environment" closed-loop interaction pattern enables Codex to handle complex development tasks requiring multiple rounds of information gathering and dynamic adjustment, rather than remaining at the single Q&A level.
The Core Pain Points for Users in China
Codex is an OpenAI product, and its default login method is tied to a ChatGPT Plus membership account. This means users in China face a triple barrier: no ChatGPT account, no Plus membership, and an unstable network environment.
If you happen to have a ChatGPT Plus account, the simplest path is: download Codex directly, select "Log in with ChatGPT," enter your credentials, and you're done — no additional configuration needed.
But for most users in China, this path is a dead end. The good news is that with third-party management tools, we can connect Chinese LLMs like DeepSeek and Doubao to Codex, making them serve as Codex's inference backbone. This article focuses on the DeepSeek solution — its V3/V4 models deliver stable performance at extremely low prices.
About DeepSeek: DeepSeek is a large language model series developed by DeepSeek (深度求索), a subsidiary of the Chinese quantitative investment firm High-Flyer (幻方科技). It has repeatedly matched top-tier models like GPT-4o and Claude 3.5 Sonnet in international benchmarks, particularly excelling in code and mathematical reasoning tasks. DeepSeek's most prominent competitive advantage lies in pricing: its API costs are roughly 1/20th to 1/50th of OpenAI's equivalent models, making high-frequency programming tasks extremely economical.
DeepSeek's technical approach is also worth understanding in depth — it uses the MoE (Mixture of Experts) architecture. MoE was systematically proposed by Google in 2017 in the paper "Outrageously Large Neural Networks" and subsequently validated at scale in models like Switch Transformer and GLaM. Its core innovation is decoupling "model capacity" from "computational cost": unlike traditional dense Transformer models that activate all parameters during every inference, MoE splits the model into multiple specialized "expert" sub-networks, with a lightweight router dynamically selecting only a few of the most relevant experts for each inference while the rest remain dormant. Take DeepSeek-V3 as an example — its total parameter count is approximately 671B, but only about 37B parameters are actually activated during a single inference, dramatically compressing computational load. This is the fundamental reason it can provide high-performance API services at such low prices. By deeply integrating this architecture with Chinese language corpus training, DeepSeek achieves extremely competitive API pricing while maintaining top-tier performance.
Step 1: Install the Codex Application
The first step is installing the Codex program itself on your computer — the process is no different from installing any regular software:
- Windows users: Click the Start button, search for "Store" (Microsoft Store), search for "Codex" in the store, and click free download to install.
- Mac users: Similarly, search and install from the App Store.
⚠️ Critical Reminder: After installation, DO NOT open Codex directly! Opening it directly will trigger the ChatGPT account login flow, which is exactly what we need to bypass. Leave it after installation — the next step uses a third-party tool to change the login method.
Step 2: Install the Codex++ Management Tool
Since Codex natively only supports ChatGPT login, the community has developed several third-party tools to solve this problem. This article uses the Codex++ Management Tool.
It's worth noting that these tools do not modify any of Codex's core functionality — they only change the login method to allow Chinese LLMs to connect. There's no need to worry about affecting Codex's capabilities. The core principle leverages the fact that DeepSeek has fully implemented an "OpenAI-compatible interface" — DeepSeek's API format is completely identical to OpenAI's, so simply swapping the request address and Key allows Codex to seamlessly call DeepSeek's models.
OpenAI-Compatible Interface: The Formation of an Industry De Facto Standard: The fundamental reason DeepSeek can "impersonate" an OpenAI service is that the entire LLM industry has established OpenAI's Chat Completions API format as its de facto standard. This standard defines the request body structure (fields like
model,messages,temperature, etc.), the streaming output protocol (Server-Sent Events format), and Function Calling specifications. Currently, mainstream Chinese LLMs including DeepSeek, Zhipu GLM, Tongyi Qianwen, and Moonshot Kimi all provide fully compatible interface layers.The technical highlights of this design are worth exploring in depth: streaming output uses the Server-Sent Events (SSE) protocol, which is lighter than WebSocket and suited for one-way real-time pushing; the Function Calling specification defines tool parameters through JSON Schema, enabling models to express tool invocation intent in a structured way rather than relying on unstructured text parsing. After this design became standardized around 2023, it spawned dozens of mainstream development frameworks including LangChain and LlamaIndex, all of which treat OpenAI interface compatibility as a foundational capability, further reinforcing its ecosystem moat.
The OpenAI API became an industry de facto standard not only because of OpenAI's first-mover advantage, but also because of its design simplicity and universality — the role-differentiated message list (system/user/assistant) naturally expresses the vast majority of conversational scenarios. The "replaceability" brought by this standardization is profoundly changing the AI application ecosystem: developers can freely switch underlying models based on cost, performance, and compliance needs without modifying business code. This means that the thousands of tools and applications built on the OpenAI interface in the ecosystem can theoretically switch seamlessly to any compatible model by modifying just two parameters:
base_urlandapi_key— and this is precisely the technical foundation that enables the Codex++ management tool to integrate DeepSeek.
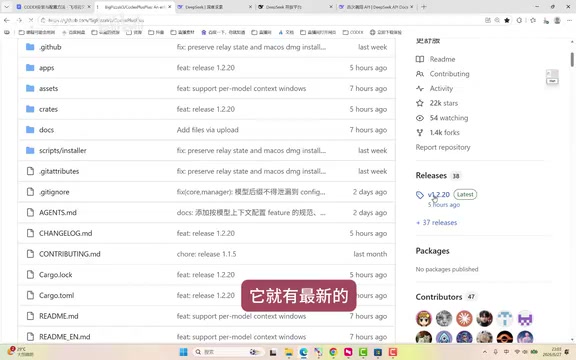
The download channel is GitHub's Release page — find the latest version and download it. If GitHub access is slow, you can use the installation package that the tutorial author has pre-uploaded to a cloud drive, with both Windows and Mac versions available.
After installation, search for "Codex" in the Start menu, and you'll see three programs: Codex, Codex++, and Codex++ Management Tool. Make sure to select "Codex++ Management Tool" — don't pick the wrong one.
Step 3: Configure DeepSeek API as the Inference Backbone
After opening the Codex++ Management Tool, you only need to focus on the "Model Provider" configuration area on the left side. Click "Add Provider" and fill in the key information as follows:
Name and Access Mode
- Name: Enter anything you like, such as "DeepSeek" — this is just a label for your own identification.
- Access Mode: Must select "Pure API". We're connecting to DeepSeek via API interface — this option cannot be selected incorrectly.
What Is an API? API (Application Programming Interface) is a standard protocol for communication between different software systems. In the context of AI large language models, an API allows tools to invoke a remote model's inference capabilities by sending network requests, without needing to run the model locally. Selecting "Pure API" mode means Codex will package your programming questions into specification-compliant network requests (typically HTTP POST requests carrying JSON-formatted conversation content), send them to DeepSeek's servers, where DeepSeek performs the inference computation and returns results to the Codex interface for display. This architecture means ordinary users don't need to configure any local AI environment — all computational resource consumption happens on cloud servers.
How to Fill in Base URL and API Key
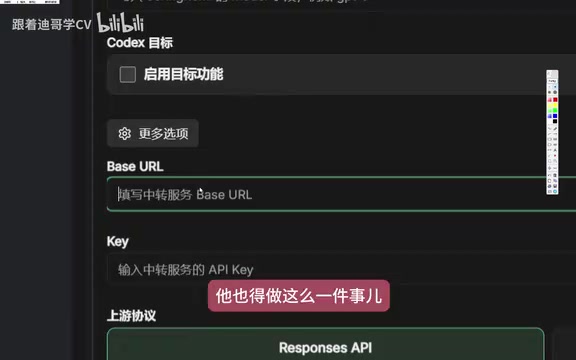
Base URL — enter DeepSeek's API request address: api.deepseek.com. It's recommended to copy and paste directly to avoid manual input errors.
The Base URL is the root address of the API service, and all specific function requests are built by appending sub-paths to this address (for example, the full chat interface address is https://api.deepseek.com/v1/chat/completions, structurally mirroring OpenAI's https://api.openai.com/v1/chat/completions). By allowing custom Base URLs, the Codex++ management tool achieves the effect of making Codex "think" it's communicating with OpenAI while actually calling DeepSeek's servers.
API Key is your DeepSeek account's unique identity credential. Here's how to obtain it:
- Go to the DeepSeek website and click "API Open Platform."
- Find "API Key" on the left side and click "Create."
- The system will display a key string — this key is shown only once! Copy and save it immediately to a local file or notepad. Once you close the window, you won't be able to view it again and will have to create a new one.
Why Should You Safeguard Your API Key? An API Key is essentially an encrypted token (typically a 32-64 character random string) — a unique identity credential issued by the service provider for authentication and usage billing. Each API call carries this Key in the request header (HTTP Header), which the service provider uses to identify the caller and log usage to the corresponding account.
Security best practices include: don't write Keys in plaintext in code and upload them to public repositories like GitHub (numerous cases have shown Keys being scanned by crawlers and misused, resulting in account charges); use different Keys for different purposes to enable independent tracking and permission control; regularly check for abnormal usage. If you discover a Key has been leaked, you should immediately delete it from the platform dashboard and regenerate a new one — since the Key is directly tied to identity credentials, a leaked Key could allow others to consume the balance in your account. Therefore, "revoke immediately upon discovering a leak" is the first response principle for handling such security incidents.
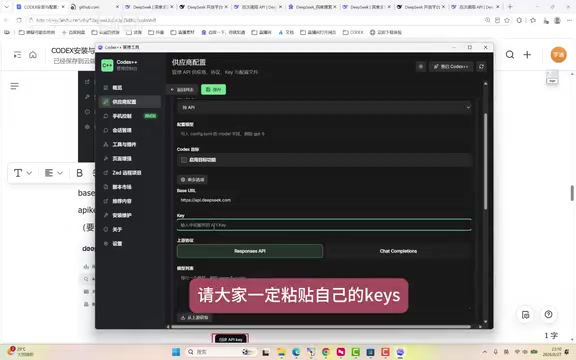
After pasting the API Key into the management tool, keep the protocol options at their defaults, then click "Fetch from Upstream" — this step verifies whether the URL and Key you entered are valid. Upon successful verification, it will pull DeepSeek's currently available model list. It's recommended to select the Pro version for better results.
Finally, click "Save." Your newly created DeepSeek configuration will appear in the provider list. Hover over the right side and click "Use" — when you see the "In Use" status, configuration is complete.
Step 4: Top Up Tokens for Your DeepSeek Account
After configuration, there's one prerequisite: your DeepSeek account must have a balance for API calls to work properly.
Find the top-up entry in the DeepSeek API Open Platform and add 10 RMB (approximately $1.40 USD) to get started. DeepSeek's pricing is extremely low — according to the author, even running various tasks intensively from morning to night, monthly costs are only around 100 RMB (about $14 USD). For casual learners, 10 RMB is more than enough.
Token Billing Mechanism Explained: LLM API calls are billed by "Token" — not by number of calls or time. A Token is the basic unit of measurement for model text processing, originating from tokenization techniques in NLP (Natural Language Processing). Before processing text, the model first uses a Tokenizer to segment it into smaller semantic fragments, then performs vectorized computation. Mainstream Tokenizers typically use BPE (Byte Pair Encoding) or SentencePiece algorithms, building vocabularies by statistically identifying high-frequency character combinations in the training corpus, balancing vocabulary size against sequence length. Token size is not fixed: roughly speaking, Chinese text averages about 1.5 characters per Token, English about 4 characters per Token, and code elements like indentation and brackets each consume their own Tokens.
A complete API interaction consists of "input Tokens" (the code context, problem descriptions, etc. you send) and "output Tokens" (the code the model generates in response), each billed separately with output typically priced higher than input. DeepSeek V3 is priced at approximately 1 RMB per million input Tokens and 2 RMB per million output Tokens. By this estimate, processing a file containing 500 lines of code and receiving detailed modification suggestions typically costs less than 0.01 RMB per call.
Token is also a key concept for understanding a model's "memory" — each model has a fixed "Context Window" limit, the maximum number of Tokens it can process in a single interaction. The physical root of this limitation lies in the fact that the computational complexity of the self-attention mechanism in the Transformer architecture scales quadratically with sequence length (O(n²)), making the computational cost of extending context windows extremely high. In recent years, optimization techniques like Flash Attention and sliding window attention have continuously pushed through this bottleneck, expanding mainstream models' context windows from the original 4K Tokens to hundreds of thousands or even millions of Tokens. DeepSeek-V3's context window is 64K Tokens, meaning Codex can simultaneously bring approximately 80,000 Chinese characters or thousands of lines of code into the model's field of view, ensuring coherent understanding of entire project files. The larger the window, the more complete the understanding, but Token consumption also increases — Codex intelligently balances between the two.

Step 5: Launch Codex Through the Management Tool and Log In
Important: Do not launch Codex by clicking its icon directly — launch it through the Codex++ Management Tool. Only this way will the modified login method take effect.
Find the "Restart Codex++" button in the upper right corner of the management tool and click it — this will automatically launch the Codex program on your computer.
After launch, the login screen will present two options:
- First option: Log in with ChatGPT (skip this)
- Second option: Log in with another method (select this one)
The system will ask for an OpenAI API Key — here, simply paste your DeepSeek API Key and click "Continue." The fundamental reason this step works is precisely that DeepSeek has fully implemented the same API interface standard as OpenAI — from Codex's perspective, the requests it sends to api.deepseek.com are formatted identically to those sent to api.openai.com. Codex technically cannot distinguish which service provider it's actually communicating with. This "duck typing" approach to interface compatibility (i.e., "if it walks like a duck and quacks like a duck, treat it as a duck" — as long as the interface response format meets expectations, the caller doesn't need to care about the underlying implementation) is the core technical premise that makes this entire solution viable. The first login may take a moment.
Once you've successfully logged in and reached the main interface, check the model selector in the lower right corner to confirm you can see "DeepSeek V4 Pro" and switch to the Pro model. At this point, you've successfully powered Codex with the Chinese LLM DeepSeek.
Summary: Five Steps to Connect DeepSeek to Codex
The core idea behind this solution is to use the Codex++ Management Tool as an intermediary, leveraging DeepSeek's compatibility with the OpenAI interface standard to replace Codex's login credentials from ChatGPT to DeepSeek's API Key, thereby making a Chinese LLM serve as Codex's inference backbone. Here's the complete workflow:
- Install the Codex application (don't open it after installation)
- Install the Codex++ Management Tool
- Configure the DeepSeek provider in the management tool (Pure API mode + Base URL
api.deepseek.com+ API Key) - Top up Tokens for your DeepSeek account (starting from 10 RMB, billed by actual usage)
- Restart Codex through the management tool and complete login with your DeepSeek API Key
It's worth noting that OpenAI is reportedly considering native support for third-party LLM integration in the future. If this feature materializes, the configuration process would be greatly simplified and third-party tools may no longer be necessary. But for now, this solution remains one of the most practical paths for users in China to experience Codex — low barrier to entry, costs as little as 10 RMB, and doesn't affect any of Codex's core capabilities.
Key Takeaways
| Step | Key Action | Common Mistakes |
|---|---|---|
| Install Codex | Download from app store | Opening it directly after installation triggers official login |
| Configure Provider | Select "Pure API" mode | Wrong mode selection prevents connection |
| Base URL | Enter api.deepseek.com | Typos from manual input |
| API Key | Save immediately after creation | Key is displayed only once — cannot be retrieved after closing |
| Launch Method | Start via Codex++ Management Tool | Clicking the Codex icon directly bypasses configuration |
Related articles

GitHub Supply Chain Security Upgrade: A Deep Dive into npm and Actions Defense Mechanisms
GitHub upgrades supply chain defenses for npm and Actions with provenance attestation, least privilege enforcement, and anomaly detection to combat attacks.

GitHub Supply Chain Security Upgrade: A Deep Dive into npm and Actions Defense Mechanisms
GitHub upgrades supply chain defenses for npm and Actions with provenance attestation, least privilege principles, and anomaly detection across multiple layers.
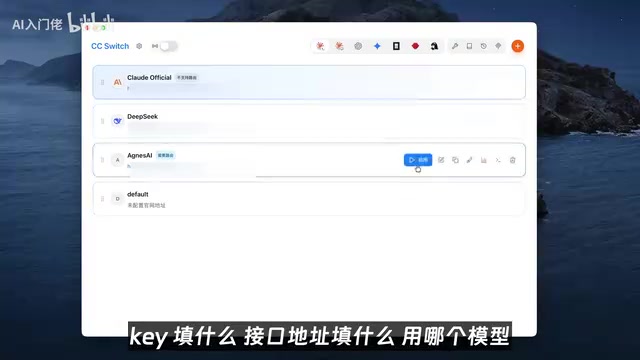
Free Claude Code Tutorial: Complete Configuration Guide for Connecting to Agnes Multi-Modal Models
Learn how to connect Claude Code to Agnes AI's free models via Sense Switch for zero-cost text, image, and video generation, with complete setup steps and real-world results.