Whisper Local Deployment Guide: Step-by-Step Setup for a Free Speech-to-Text Tool

Complete local deployment tutorial for OpenAI Whisper, from environment setup to speech-to-text practice.
This article provides a detailed walkthrough for locally deploying OpenAI's open-source speech recognition tool Whisper, including installing Miniconda for environment management, creating an isolated Python environment, installing core dependencies like PyTorch and FFmpeg, selecting the appropriate speech model (Turbo recommended for balancing speed and accuracy), and performing actual transcription operations with batch scripts for simplified use. The article also covers common troubleshooting and uninstallation methods.
OpenAI Whisper is one of the most powerful open-source speech recognition tools available today, supporting speech-to-text conversion in nearly 100 languages with the ability to automatically translate into English. However, since it relies on a Python environment and operates via command line, many users run into issues during installation. This tutorial will walk you through the entire process from environment setup to practical use, guiding you step by step through Whisper's local deployment.
Why Choose Whisper for Speech-to-Text?
Whistper is an open-source Automatic Speech Recognition (ASR) system from OpenAI, trained on massive multilingual data. The development of ASR technology has evolved from rule-based methods, Hidden Markov Models (HMM), and deep neural networks to today's end-to-end models based on the Transformer architecture. Whisper uses precisely the Transformer encoder-decoder architecture, trained through weak supervision on 680,000 hours of multilingual labeled audio data, giving it extremely strong generalization capabilities. Unlike traditional ASR systems that require separate training for specific languages or accents, Whisper's multi-task training strategy enables it to simultaneously handle speech recognition, language detection, timestamp alignment, and speech translation.
Compared to similar speech recognition tools on the market, it has several notable advantages:
- Supports nearly 100 languages: Including Mandarin, Cantonese, Japanese, Korean, and more
- Extremely high recognition accuracy: Performs excellently across multiple benchmarks, practically word-perfect in real-world testing
- Built-in translation: Can automatically translate other languages into English
- Completely free and open-source: No fees, no API call limits
- Multiple output formats: Automatically generates SRT, VTT, TSV subtitle files and plain text
However, Whisper's installation process isn't beginner-friendly — the official documentation assumes you already have experience configuring Python environments, which is exactly where most people get stuck.
Step 1: Install Conda Environment Manager
Why Do You Need Conda?
Many open-source tools depend on Python environments, but they have different requirements for Python versions and dependency packages. Installing them directly on your system can easily cause conflicts and errors between different software.
Conda is the perfect solution — it creates independent runtime environments for each piece of software, similar to the concept of "virtual machines," allowing different programs to use their own Python versions and dependencies without interfering with each other. Conda is a cross-platform package management and environment management system, originally developed by Anaconda, Inc. for the Python data science ecosystem. Its core mechanism creates isolated directory structures, with each environment having its own Python interpreter, standard library, and third-party packages. Unlike Python's built-in venv virtual environments, Conda can manage not only Python packages but also C/C++ compiled binary dependencies (such as CUDA toolkits, MKL math libraries, etc.), which is especially important for deep learning projects. Switching between environments essentially modifies the system PATH variable, directing command-line calls to Python and pip executables in different directories.
Download and Install Miniconda
Conda comes in two versions: Anaconda (large, includes many scientific computing packages) and Miniconda (lightweight, install only what you need). For deploying Whisper, Miniconda is more than sufficient.
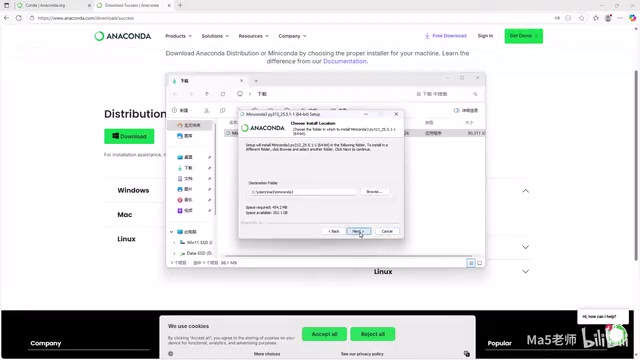
Go to the Miniconda official website to download the Windows installer, then double-click to run it and follow these steps:
- Click "Next" → "I Agree" → "Next"
- It's recommended to use the default installation path (takes about 400MB of disk space)
- Critical step: Check the option to "Add Conda to the system PATH" — this allows you to run Conda from anywhere without path restrictions
- Click "Install" and wait for completion
Step 2: Create a Dedicated Python Environment for Whisper
Whistper and its dependencies require 5-6GB of disk space. It's recommended to reserve at least 10GB, preferably on an SSD to speed up loading.
Create a Working Directory
Create a new folder named Whisper on your target drive, open it, type cmd in the address bar, and press Enter to open a command prompt in the current directory.
Execute Environment Creation Commands
Run the following commands in sequence:
# Add the path to Conda configuration (modify according to your actual path)
conda config --add envs_dirs D:\\Whisper

# Create an environment named whisper-env with Python 3.11
conda create -n whisper-env python=3.11
The system will list the packages to be installed. Type Y to confirm and the download/installation will begin. Once complete, a whisper-env directory will appear inside your Whisper folder — this is your independent Python environment.
Activate the Environment
conda activate whisper-env
Once activated successfully, (whisper-env) will appear at the beginning of your command line, indicating that all subsequent operations will run within this isolated environment.
Step 3: Install Whisper's Core Dependencies
Install PyTorch Deep Learning Framework
PyTorch is an open-source machine learning framework developed by Meta (formerly Facebook) AI Research, and is one of the most mainstream deep learning frameworks in both academia and industry, alongside Google's TensorFlow. Whisper's speech recognition capabilities are built on deep learning models powered by PyTorch.
Whistper's speech recognition model is essentially a neural network containing millions to billions of parameters. During inference, it needs to perform massive matrix multiplications and tensor operations. PyTorch comes in CPU and GPU versions — GPUs (Graphics Processing Units) have thousands of compute cores, making them naturally suited for large-scale parallel computing tasks, typically 10-50x faster than CPUs. The GPU version requires an NVIDIA GTX 6-series or later graphics card (e.g., GTX 650, RTX 3080, etc.). If your GPU isn't supported, you'll have to use the CPU version, which will be considerably slower.
NVIDIA's CUDA (Compute Unified Device Architecture) platform provides a programming interface for general-purpose GPU computing, and PyTorch calls CUDA and cuDNN libraries to achieve GPU acceleration. This is why GPU-version PyTorch requires an NVIDIA graphics card — AMD and Intel GPUs use different computing architectures, and PyTorch support for them is still experimental.
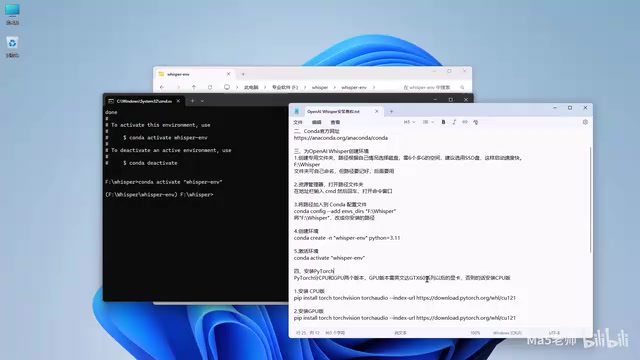
Based on your hardware configuration, get the appropriate installation command from the PyTorch official website and execute it.
Install FFmpeg Multimedia Processing Tool
FFmpeg is an open-source multimedia framework born in 2000 that supports virtually all known audio and video codec formats. It's widely integrated into VLC, Chrome browser, YouTube backend, and many other applications. Whisper depends on FFmpeg because the speech recognition model can only process raw audio waveform data in a specific format (16kHz sample rate, mono-channel PCM float data). When users input compressed audio like MP3, AAC, FLAC, or video files like MP4, MKV, FFmpeg handles decoding, resampling, and converting them into a format the model can accept. This preprocessing is completely transparent to the user, allowing Whisper to directly process virtually any common audio/video file.
Installation command:
conda install ffmpeg
Type Y to confirm the installation.
Install OpenAI Whisper
Users in China are recommended to use the Tsinghua University mirror to improve download speeds:
pip install openai-whisper -i https://pypi.tuna.tsinghua.edu.cn/simple
At this point, all Whisper components are installed.
Step 4: Whisper Model Selection Guide
Whistper offers six language models, and choosing the right one directly affects recognition quality and processing speed. In deep learning, a model's parameter count directly determines its "memory capacity" and expressive power — more parameters mean the model can learn richer speech features and language patterns, with better handling of accents, noise, and specialized terminology, but at the cost of requiring more computational resources and VRAM for inference.
| Model | Parameters | Relative Speed | VRAM Required | Use Case |
|---|---|---|---|---|
| tiny | 39M | ~10x | ~1GB | Quick preview |
| base | 74M | ~7x | ~1GB | Simple tasks |
| small | 244M | ~4x | ~2GB | Daily use |
| medium | 769M | ~2x | ~5GB | High accuracy needs |
| large | 1.55B | 1x | ~10GB | Maximum accuracy |
| turbo | 809M | ~8x | ~6GB | Recommended |
The Turbo model is special: it was optimized by OpenAI from large-v3 using knowledge distillation — retaining the first two layers of the large model's decoder while compressing the remaining layers from 32 to 4, achieving approximately 8x faster inference with virtually no loss in recognition accuracy. It's a textbook example of engineering optimization. However, the Turbo model doesn't support translation. If you only need speech-to-text without translation, Turbo is strongly recommended. For translation functionality, choose the medium or large model.

Note: When selecting a model, make sure its VRAM requirement doesn't exceed your graphics card's VRAM capacity. The first time you use a particular model, Whisper will automatically download the corresponding model file (e.g., the medium model is about 1.42GB), so be patient.
Step 5: Whisper Speech Transcription in Practice
Basic Command Line Usage
Open a command prompt in the folder containing your audio/video file, activate the environment, then execute:
# Basic transcription (auto-detect language)
whisper 11.mp3 --model turbo

# Transcription with Chinese language specified
whisper 11.mp3 --model turbo --language zh

# Translate to English (requires medium or large model)
whisper 11.mp3 --model medium --task translate
Tip: Manually specifying the language (
--languageparameter) usually improves recognition accuracy. This is because when Whisper auto-detects the language, it uses the first 30 seconds of audio for language identification. If that segment happens to contain silence, background music, or mixed languages, it may lead to incorrect language detection, which affects subsequent recognition quality.
After transcription is complete, Whisper automatically generates five files in the audio file's directory:
- SRT: The most commonly used subtitle format, includes timestamps. SRT (SubRip Subtitle) is the world's most universal subtitle file format, consisting of sequence numbers, timecodes, and text. Whisper's ability to generate SRT files stems from the timestamp prediction mechanism built into its model architecture — the model predicts the start and end times of each speech segment while decoding text. This end-to-end time alignment approach is more natural and accurate than the traditional two-step method of first transcribing text then force-aligning. The generated SRT files can be directly imported into video editing software like Premiere Pro, DaVinci Resolve, or CapCut as subtitle tracks, or uploaded to YouTube, Bilibili, and other platforms as external subtitles.
- VTT: A subtitle format commonly used on the web, natively supported by HTML5's
<video>tag - TSV: Tab-separated text format, convenient for importing into Excel or other spreadsheet tools for analysis
- TXT: Plain text content without timing information
- JSON: Structured data format containing detailed confidence scores and other metadata for each segment, suitable for programmatic processing
Simplify Daily Operations with Batch Scripts
Manually activating the environment and typing commands every time is tedious. You can use batch scripts (.bat files) to streamline the process — simply drag and drop audio files into the script window and follow the prompts to select the model and task type.

The script workflow is very intuitive:
- Double-click to run
whisper.bat - Drag your audio/video file into the window and press Enter
- Select the language model (default is Turbo)
- Choose the task type: Transcribe (original language) or Translate (to English)
- Wait for processing to complete — results are automatically saved to the original file's directory
Tip: If a downloaded .bat file shows a "cannot verify publisher" warning when running, you can open the original file in Notepad, copy all the content, create a new text file, paste it in, and save it as a .bat file with ANSI encoding to resolve the issue.
Uninstallation and Common Troubleshooting
If you need to uninstall Whisper, the process is very simple: just delete the installation folder and uninstall the Conda program. No residual files will be left on your system.
Common issues and solutions:
- Installation failure: Check your network connection. Users in China should always use the Tsinghua mirror source. If pip encounters timeout errors during installation, try adding the
--timeout 120parameter to extend the timeout - Insufficient VRAM error (common error message:
CUDA out of memory): Switch to a smaller model, or use the CPU version of PyTorch. You can also try adding--fp16 Falseto the command to use 32-bit floating point precision instead of 16-bit — it'll be slower but can sometimes work around VRAM limitations - Inaccurate recognition: Try a larger model, or manually specify the language with the
--languageparameter. If the audio has significant background noise, consider preprocessing with noise reduction tools like Adobe Podcast or Audacity - Processing too slow: Confirm that GPU-version PyTorch is correctly installed by running
nvidia-smito check GPU status. If the command returns GPU information but Whisper is still using CPU, the PyTorch CUDA version may not match your system drivers — reinstall the corresponding version
As OpenAI's open-source speech recognition tool, Whisper truly represents the ceiling in terms of accuracy and multilingual support. While the installation process is somewhat complex, once configured it can be used indefinitely — no internet connection required, no fees, making it an essential tool for content creators and subtitle makers.
Related articles
 Tutorials
ChatGPT Plus Subscription Guide: Are GPT-5.5, image-2, and Codex Worth the Upgrade?
A detailed look at ChatGPT Plus features — GPT-5.5, image-2, and Codex — with a Plus vs Pro comparison and a complete step-by-step subscription guide for users outside the US.
 Tutorials
Harness AI Engineering in Practice: Using Claude Code to Master Enterprise-Level E-Commerce Development
Deep dive into Harness AI Engineering: master enterprise e-commerce development with Claude Code using the Rules, Skills, Wiki, and Changes framework.
 Tutorials
Cursor + Codex Dual-IDE Collaboration: A Practical Methodology for Open-Source Project Customization
A complete methodology for open-source project customization based on real-world experience, detailing the Cursor+Codex dual-IDE workflow, seven-stage process, MVP validation, and AI source code reading techniques.