WordPress Website Building Tutorial for Online Business: A Complete Guide from Scratch

A complete beginner's guide to building a WordPress online business resource site from scratch.
This article provides a comprehensive walkthrough for building a WordPress online business resource site from zero, covering domain purchase and DNS configuration, Hong Kong cloud server setup with BT Panel installation, WordPress source code upload and database configuration, permalink/pseudo-static settings, and Zibll theme installation and customization — perfect for complete beginners to follow along.
Introduction
Building your own online business resource site is a common need for many internet entrepreneurs. Whether you want to share project resources, build a personal brand, or use it as a platform for traffic generation and monetization, a professional WordPress website can deliver long-term value.
This article covers the entire process of building an online business site — from domain purchase and server configuration to WordPress installation and theme customization. Even if you're a complete beginner, you can follow along step by step.
Domain & Server Setup: The Foundation of Your Website
Domain Purchase and DNS Configuration
A domain is your website's "street address," and it's independent of your server's IP address. The key benefit of using a domain is that even if your server IP changes due to upgrades or provider adjustments, users can still access your site through a fixed domain name without any traffic loss.
To save costs, you can purchase "buy-it-now" domains on platforms like Juming.com, with prices ranging from a few yuan to around ten yuan. Beginners are advised to start with an inexpensive domain (around 8-16 yuan) to run through the entire process first, and invest in a better domain once everything is validated.
After purchasing the domain, go to the management center, find "My Domains," and click "DNS" to enter the DNS resolution settings page. You need to add two A records:
- @ record: Points to your server IP address, representing direct access via the root domain
- www record: Also points to your server IP, allowing users to access the site via www.domain as well
DNS Resolution Explained: DNS (Domain Name System) is the internet's "phone book," responsible for translating human-readable domain names into machine-recognizable IP addresses. An A record (Address Record) is the most fundamental type of DNS record, directly mapping a domain to an IPv4 address. When a user enters a domain in their browser, the request first reaches a DNS server to look up the corresponding IP — the entire resolution process typically completes in milliseconds. The reason for setting both @ and www records is that @ represents the root domain (e.g.,
example.com) while www is a subdomain (e.g.,www.example.com). Technically, they are separate addresses that need to be configured independently to ensure both access methods work properly. DNS records typically take anywhere from a few minutes to several hours to propagate, depending on the cache refresh cycle (TTL value) of DNS servers in different regions.
Server Purchase and BT Panel Installation
For the server, a Hong Kong cloud server is recommended — no ICP filing (备案) is required, and domestic access speeds are acceptable. Keep an eye out for promotional offers; some platforms support stacked discounts, and there are even 1-yuan 1-day trial options that let beginners test things out first.
After purchasing the server, the key step is to reinstall the system. Choose Ubuntu and select an image with BT Panel (宝塔面板) pre-installed from the app marketplace. This way, once the system installation is complete, BT Panel will be automatically deployed, saving you the hassle of manually connecting via SSH to install it.
About BT Panel: BT Panel (宝塔面板) is the most widely used visual Linux server management tool in China. It wraps operations that would normally require command-line work — Nginx/Apache configuration, database management, file operations, SSL certificate requests, etc. — into a graphical interface, dramatically lowering the technical barrier to server administration. BT Panel is developed in Python and supports mainstream Linux distributions including CentOS, Ubuntu, and Debian. Choosing a pre-installed BT Panel image essentially means the cloud provider has already executed the official installation script for you, saving beginners the learning curve of SSH connections. After logging into BT Panel, it's recommended to immediately install the LNMP stack (Linux + Nginx + MySQL + PHP) from the "Software Store" — this is the standard server-side combination for running WordPress.
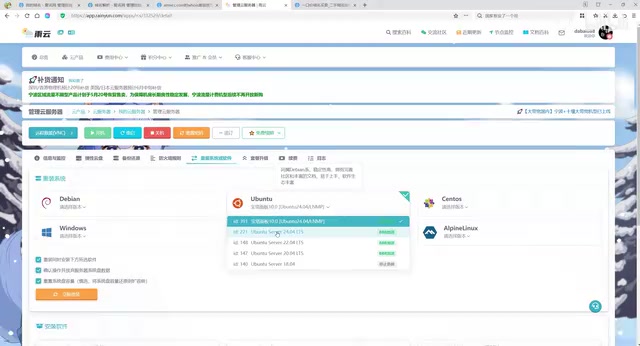
Once installation is complete (about 1 minute), you can obtain the BT Panel access URL, username, and password directly from the server management dashboard. It's recommended to change the default password immediately after your first login for security purposes.
WordPress Installation & Configuration: The Core Setup
Creating a Site and Uploading WordPress Source Files
After logging into BT Panel, click "Add Site" under the "Websites" section, and add the domain you purchased earlier (both the www and non-www versions). Once added, visiting the domain should display a default Nginx welcome page, confirming that DNS resolution and site configuration are working.
Next, you need to upload the WordPress source files. Go to wordpress.org to download the latest WordPress installation package (.zip format), then use BT Panel's file manager to navigate to the website root directory, upload the archive, and extract it.
WordPress Architecture Overview: WordPress is the world's most popular content management system (CMS), powering over 43% of all websites on the internet. It's built with PHP and uses MySQL as its data storage backend, employing a "themes + plugins" extension architecture. WordPress core files handle only the basic framework — all visual styling is controlled by themes, and functionality is extended through plugins. This decoupled design gives it exceptional flexibility. When downloading, it's recommended to choose the latest stable version from the official site to get the newest security patches and feature support.

After extraction, the WordPress files will be in a subdirectory. You need to cut all files and move them to the website root directory, then delete the empty folder and the archive file.
Database Creation and WordPress Initialization
Create a MySQL database in BT Panel and note down the database name, username, and password. Then visit your domain in a browser, and WordPress will automatically guide you through the installation:
- Select Simplified Chinese (or your preferred language)
- Enter the database information (database name, username, password; keep host as localhost)
- Set the site title, admin username, and password
- Click install to complete initialization
Database Security Tips: The MySQL database is the core where WordPress stores all content (posts, users, settings). When creating the database, it's recommended to create a dedicated user with limited permissions specifically for WordPress rather than using the root account — this is a basic security practice. WordPress uses
wp_as the default table prefix; it's advisable to change it to a custom prefix (e.g.,wc_) during installation to effectively defend against SQL injection attacks targeting default table names.
Permalink Settings (Don't Skip This!)
This step is easily overlooked but critically important: In BT Panel's site settings, find the "Pseudo-static" (伪静态) option, select the WordPress rewrite rule, and save.
URL Rewrite Technical Explanation: Pseudo-static (URL Rewrite) is a URL rewriting technology on web servers. Its core function is to rewrite dynamic URLs (like
/?p=123) into static-looking URLs (like/article/my-post/) at the server level, while the actual request processing is still handled by the PHP dynamic program. WordPress relies on the rewrite module of Nginx or Apache to implement its permalink functionality. In Nginx, the rewrite rule that BT Panel writes is essentially the directivetry_files $uri $uri/ /index.php?$args;, which tells the server: if the requested file doesn't exist, forward the request to WordPress'sindex.phpentry file for processing. Without this rule configured, Nginx can't find the corresponding physical file and directly returns a 404 error. Clean URLs are not only more user-friendly but also an important foundation for SEO — search engines prefer to index semantic URLs containing keywords.
Without pseudo-static settings, your site's permalinks, page routing, and other functions won't work properly — accessing article pages will result in 404 errors. This is the first pitfall many beginners encounter after setting up their site, so make sure to configure it in advance.
Theme Installation & Customization: Building a Professional Site
Installing the Zibll Theme
The default WordPress theme is quite basic — you'll need to install a professional theme to enhance visual appeal and functionality. Popular themes for online business resource sites include RiPro (日主题) and Zibll (子比主题). This tutorial uses Zibll as an example.
The recommended installation method is to upload directly via BT Panel's file manager: Navigate to the site directory → wp-content → themes, upload the Zibll theme archive, and extract it. Then go to "Appearance → Themes" in the WordPress dashboard to activate it.
Related articles
 Tutorials
ChatGPT Plus Subscription Guide: Are GPT-5.5, image-2, and Codex Worth the Upgrade?
A detailed look at ChatGPT Plus features — GPT-5.5, image-2, and Codex — with a Plus vs Pro comparison and a complete step-by-step subscription guide for users outside the US.
 Tutorials
Harness AI Engineering in Practice: Using Claude Code to Master Enterprise-Level E-Commerce Development
Deep dive into Harness AI Engineering: master enterprise e-commerce development with Claude Code using the Rules, Skills, Wiki, and Changes framework.
 Tutorials
Cursor + Codex Dual-IDE Collaboration: A Practical Methodology for Open-Source Project Customization
A complete methodology for open-source project customization based on real-world experience, detailing the Cursor+Codex dual-IDE workflow, seven-stage process, MVP validation, and AI source code reading techniques.