WorkBuddy Installation & Configuration Guide: 4 Steps to the Optimal Setup
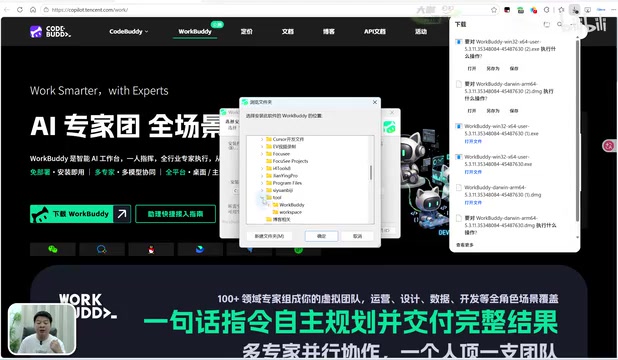
Four essential post-install configurations to optimize your WorkBuddy AI agent development experience.
This guide walks through WorkBuddy's installation process and four critical post-install configurations: changing the default storage path off the C drive, disabling the Experience Improvement Program, tuning the AI's tone and style with custom instructions, and enabling conversation memory. These steps help beginners avoid common issues like storage bloat and verbose AI responses, setting a solid foundation for long-term use.
Why Configuration Matters More Than Installation
As a domestic AI agent development tool, WorkBuddy has virtually zero installation barriers — just follow the official website instructions and click through a few screens. But what truly determines your user experience isn't the installation itself — it's the series of routine configurations that follow.
The term "AI Agent" mentioned here refers to one of the most talked-about paradigms in the AI application space today. Unlike traditional "question-and-answer" chatbots, agents possess the ability to autonomously plan, invoke tools, perceive their environment, and execute tasks. A typical AI agent architecture consists of four core modules: the perception layer (receiving user instructions and environmental information), the planning layer (breaking complex tasks into executable steps), the tool layer (calling external tools like search, code execution, and file operations), and the memory layer (storing interaction history and learned preferences). As an agent development tool, configuring WorkBuddy is essentially setting initial parameters for these modules — the storage path relates to the tool layer's file management, custom instructions affect the planning layer's behavioral strategy, and conversation memory directly corresponds to the memory layer's capabilities.
According to Bilibili content creator Pan Ge's explanation in the WorkBuddy Agent Development Bootcamp, many users overlook several critical settings during their first use, which leads to problems like a full C drive, system lag, and overly verbose AI responses. This article systematically walks through WorkBuddy's installation process and four core configurations to help complete beginners get the tool dialed in from the start.
Installing WorkBuddy: Avoid the C Drive Trap
Downloading WorkBuddy is straightforward: go to the official website and hover over the "Download WorkBuddy" button to see all currently supported versions. It covers Windows, Mac, HarmonyOS desktop, as well as mobile versions for Android and iOS — simply choose the one that matches your operating system.
During installation, there's one easily overlooked but critically important detail: WorkBuddy's default installation directory is on the C drive, and it takes up a significant amount of space. In Windows, the C drive is commonly known as the "system drive" — it's the default location for OS core files, the registry, system cache, and temporary files. Since Windows' page file (virtual memory), system restore points, Windows Update cache, and more all occupy C drive space, there's often not much room left for user software. When free space on the C drive drops below 10%-15% of its total capacity, you'll notice a clear drop in system performance, including slower startup, sluggish file indexing, and even blue screen crashes. If both the software itself and all the files it generates pile up on the C drive, the system will get progressively slower as your workload grows.
Therefore, during installation, make sure to click "Browse" and switch the installation directory to the D drive, F drive, or another partition. It's a good idea to create a dedicated folder in advance (e.g., named WorkBuddy or Tool) and install the software there.
After installation, a login window will appear when you first open the app — just follow the prompts to log in. Your account will be displayed in the lower-left corner after logging in, and first-time users can click to claim bonus credits. WorkBuddy currently includes the built-in member model HY3, which is available for free trial — beginners are encouraged to dive right in.
Configuration #1: Change the Default Workspace Storage Path
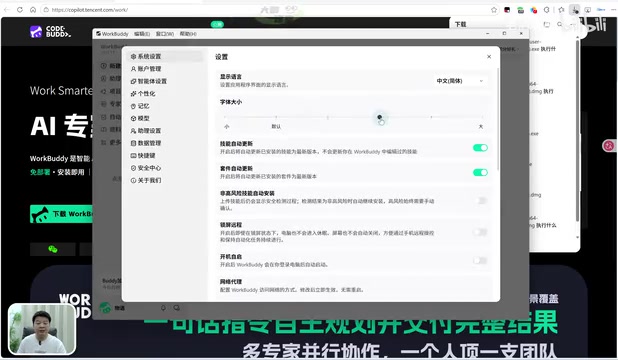
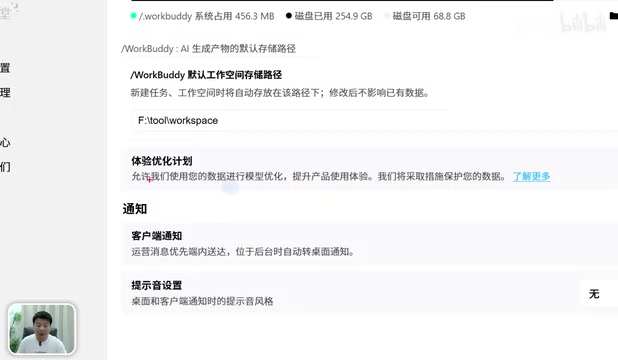
After logging in, go to Settings. The first thing you should do also involves the "drive letter." Scroll down in System Settings to find "WorkBuddy Default Workspace Storage Path."
Here's why this path matters: when you have WorkBuddy execute tasks, all output — whether documents, images, or videos — is automatically saved to this directory. By default, it usually points to the C drive, which means the more tasks you complete, the faster the C drive fills up with output files, eventually dragging down system performance.
The correct approach is to click "Change" and point the workspace to a dedicated directory on a non-system drive (e.g., F:\Tool\WorkBase). The logic here is the same as relocating the installation directory: move both software and data off the system drive to ensure smooth long-term use.
If you find the interface font too small, you can enlarge it in Settings by dragging a slider or clicking the adjustment controls. That said, there's no need to make it too large — just big enough to read comfortably.
Configuration #2: Disable the Experience Improvement Program
In Settings, you'll also find an "Experience Improvement Program" option, which is typically enabled by default after installation. It's recommended to turn it off.
The Experience Improvement Program essentially uploads some of your usage data to the vendor to help improve the product. For users who value privacy or want to minimize unnecessary background activity, disabling it is the safer choice. This setting doesn't affect any core functionality, so feel free to turn it off.
Configuration #3: Tune the AI's Tone and Style
This setting is found in the "Personalization" section and is a key step for improving your actual user experience.
Why You Should Adjust the AI's Tone
Large language models have a natural tendency to be "people-pleasers": no matter what you ask, they'll say "That's a great question" and pad their responses with excessive pleasantries. This tendency isn't accidental — it's a direct product of how they're trained. After pre-training, mainstream LLMs go through an alignment stage called RLHF (Reinforcement Learning from Human Feedback). During this stage, human annotators rank and score multiple model responses, and the model learns to generate answers that are more "likable." This training mechanism causes models to favor polite, affirming, and verbose expressions, since such responses tend to receive higher scores from annotators.
Understanding this mechanism makes it clear why active intervention is necessary. More importantly, every piece of content the AI generates consumes tokens — a token is the basic unit of measurement for how LLMs process text. In Chinese, a single character is typically split into 1-3 tokens (depending on the model's tokenizer, such as BPE or SentencePiece). When generating responses, every token produced requires computational resources, and commercial models typically charge based on the number of input and output tokens. This means every "That's an excellent question" and "I hope the above answer is helpful" is genuinely eating into your token quota or credits. Redundant pleasantries don't just waste resources — they also reduce information retrieval efficiency.
Recommended Style Choices
Under "Basic Style and Tone," the system offers several presets. The default option, which is the most verbose, is not recommended. Consider choosing from these two styles:
- Efficient and Pragmatic: Conveys maximum information with minimum words
- Straightforward and Blunt: Reduces the people-pleasing tendency, addresses issues directly
Other similar options like "Concise and to the point, no fluff, cut to the chase" are also worth trying.
Lock in Rules with Custom Instructions
Beyond preset styles, WorkBuddy also supports a "Custom Instructions" feature that allows you to set rules and preferences for the AI to follow long-term. This solves a common pain point: the AI gradually drifting away from your desired behavior over time.
From a technical perspective, custom instructions correspond to the "System Prompt" in LLM architecture. In an LLM's conversation API, messages are typically divided into three roles: system, user, and assistant. The system prompt is injected before each conversation begins, defining the model's role, response style, and behavioral boundaries. It generally takes higher priority than user messages, allowing it to consistently influence the model's behavior throughout the entire session. WorkBuddy's "Custom Instructions" feature essentially persists user-defined rules as a system prompt, eliminating the need to restate your preferences at the start of every conversation. A good set of custom instructions should be clear, specific, and non-contradictory — vague descriptions can lead to execution deviations.
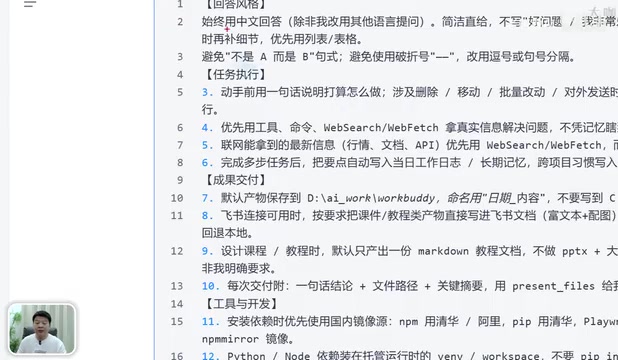
Pan Ge provides a reusable custom instruction template in his tutorial notes, with two core components:
- Response Style: Requires concise answers, removes pleasantries, avoids formulaic expressions like "It's not A, but rather B"
- Task Execution: Sets execution rules for specific use cases
Users can modify this template as needed — once configured, just swap out the instruction content as required.
Configuration #4: Enable Conversation Memory
The final setting is found under "Memory" — make sure the "Generate Conversation Memory" feature is enabled.
By default, AI has no memory capability. This is because large language models are inherently stateless — each request is independent, and the model doesn't automatically remember previous conversations. What we perceive as "context" is achieved by concatenating conversation history into the current request, but this is constrained by the model's context window length limit (typically ranging from 4K to 128K tokens), and historical information is truncated once the window is full.
Conversation memory addresses this problem at the application level: the system extracts and summarizes key information from multi-turn conversations, stores it persistently, and injects it in condensed form into subsequent conversations, making the model behave as if it "remembers" your preferences and history. This mechanism is sometimes called "long-term memory" or "memory augmentation" and is a critical component of modern AI agent architectures, significantly improving personalized experiences and task continuity.
If you want WorkBuddy to increasingly "understand you," enabling conversation memory is essential — it organizes and records context for you, making subsequent interactions progressively smoother. This is a classic "enable once, benefit forever" setting.
Summary: Four Configuration Steps for Long-Term Smooth Use
Looking back at the entire process, beyond installing the software on a non-system drive, the four configurations that truly impact long-term experience are:
- Change the default workspace storage path — Prevent the C drive from being filled with output files
- Disable the Experience Improvement Program — Reduce unnecessary background activity
- Adjust tone and style + custom instructions — Recommended: "Efficient and Pragmatic" or "Straightforward and Blunt" to eliminate AI fluff
- Enable conversation memory — Let the tool gradually learn your preferences over time
These settings may seem trivial, but they're the dividing line between a good and a frustrating WorkBuddy experience. After completing these steps, WorkBuddy will understand you better and better over time, making it increasingly smooth to use. For users preparing to dive deep into WorkBuddy agent development, laying a solid foundation ensures that subsequent workflow building, component invocation, and debugging will be far more efficient.
Related articles

ROS2 Beginner's Guide: Understanding the Core Framework for Robot Development from Scratch
A comprehensive introduction to ROS2 core concepts, version selection, and learning paths. Covers ROS1 vs ROS2 differences, Humble vs Jazzy comparison, and version compatibility tips for beginners.
Open-Source AI Agents for Computer Control: A Comprehensive Guide to Multi-Model Integration
Explore how open-source AI Agent frameworks enable computer control with multi-model support. Compare AutoGPT, LangChain, and Open Interpreter with DeepSeek V3 integration.

LeaseBase: A Landlord Management Tool That Replaces Data Dashboards with AI Compliance Advice
LeaseBase is an AI compliance assistant for California landlords, offering proactive legal guidance, integrated payments, repairs & lease management. A deep analysis of its vertical SaaS strategy.