WSL2 Installation Guide: Complete Tutorial from Setup to Non-System Drive Migration

Complete WSL2 installation and migration tutorial for AI developers setting up Linux on Windows
This article provides a detailed guide to installing WSL2 on Windows, covering three major steps: enabling Windows underlying features, installing the WSL2 kernel with Ubuntu 22.04, and migrating the subsystem from the C drive to the D drive. It explains why WSL2 is essential for AI development—mainstream AI frameworks prioritize Linux support—and covers WSL2's native support for GPU passthrough and Docker integration, making it the best solution for building AI development environments on Windows.
Why AI Development Needs WSL2
WSL (Windows Subsystem for Linux) is a feature provided by Microsoft that allows users to run a Linux environment directly within Windows. The WSL project began in 2016, initially developed through a collaboration between Microsoft and Canonical (Ubuntu's parent company). WSL1 used a compatibility layer to translate Linux system calls into Windows NT kernel calls, similar to a real-time translator. WSL2, released in 2019, completely changed the architecture—it runs a full Linux 5.x kernel on top of the Hyper-V virtualization layer, meaning virtually all Linux programs can run natively, with file system performance improved by over 20x compared to WSL1. This architectural change is also the fundamental reason why Docker Desktop later chose to run on WSL2.
For AI developers, WSL2 is practically an essential tool—most AI frameworks and toolkits were originally developed in Linux environments, and installing them directly on Windows often leads to various compatibility issues, ranging from constant errors to complete installation failures. Specifically, mainstream AI frameworks like PyTorch, TensorFlow, and JAX heavily rely on Linux-specific system calls and toolchains at their core. For example, NVIDIA's CUDA toolkit has more complete driver support on Linux, multi-process data loading (DataLoader) depends on Linux's fork() system call, and many pre-compiled packages (wheels) for conda and pip are built for Linux first. Additionally, emerging AI tools like Hugging Face, vLLM, and DeepSpeed are almost entirely developed with Linux as the primary platform, with Windows versions often lagging by months or missing entirely.
Taking AI tools like OpenCloud as an example, official documentation typically strongly recommends deployment in a Linux environment. Rather than struggling with dual-boot setups or virtual machines, it's much more efficient to install a lightweight Linux subsystem directly within Windows.
What's the difference between WSL1 and WSL2? The core difference lies in the underlying architecture. WSL1 uses a translation layer to convert Linux system calls into Windows system calls—while it boots quickly, its compatibility is limited and it cannot run tools like Docker that require a complete kernel. WSL2 uses a real Linux kernel running in a lightweight virtual machine, with compatibility far exceeding WSL1, suitable for over 95% of use cases. Therefore, this tutorial directly uses WSL2 for installation.
Pre-Installation Preparation
System Requirements
- Windows 10 (version 2004 or later) or Windows 11
- Ensure the system is updated to the latest version
- Sufficient disk space (recommend reserving 10GB+ on a non-system drive)
Installation Process Overview
The entire WSL2 installation process can be divided into three major steps:
- Enable Windows underlying support: Activate the Linux subsystem feature and virtual machine platform
- Install the WSL2 kernel and deploy Ubuntu: Download the kernel update package and install a Linux distribution
- Migrate to a non-system drive: Move the subsystem from the C drive to the D drive to free up system disk space
Step 1: Enable Windows Underlying Features
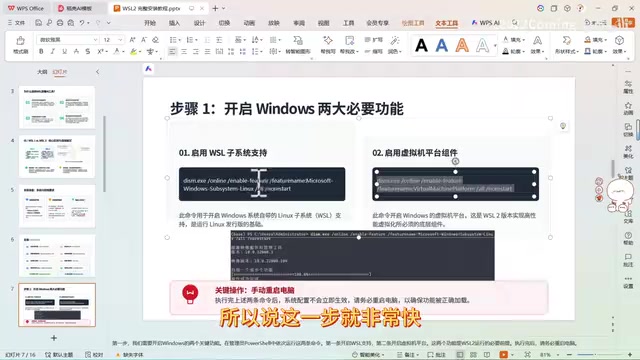
First, search for PowerShell, right-click and select "Run as administrator"—this step is crucial, as normal permissions cannot execute the subsequent commands.
In PowerShell, execute the following two commands in sequence to enable Linux subsystem support and virtual machine platform features:
dism.exe /online /enable-feature /featurename:Microsoft-Windows-Subsystem-Linux /all /norestart
dism.exe /online /enable-feature /featurename:VirtualMachinePlatform /all /norestart
The DISM (Deployment Image Servicing and Management) tool used here is a Windows built-in system image management utility, commonly used to enable or disable Windows optional features. The two features enabled by these commands serve different purposes: Microsoft-Windows-Subsystem-Linux provides the basic WSL framework and user-mode support, while VirtualMachinePlatform enables Windows' lightweight virtualization capability (a subset of Hyper-V), which is required for WSL2 to run a real Linux kernel. It's worth noting that enabling the virtual machine platform is not the same as installing full Hyper-V—it won't affect the normal operation of third-party virtualization software like VMware or VirtualBox (newer versions have achieved compatibility).
These two commands simply enable built-in features on your Windows computer and execute very quickly. After completion, it's recommended to restart your computer for the settings to take effect.
Step 2: Install WSL2 Kernel and Ubuntu System
Update the WSL2 Kernel
Since Windows doesn't include Linux underlying support packages by default, we need to manually install the WSL2 kernel update. Execute in PowerShell:
wsl --update
This step requires downloading the kernel package from the network and may be slow, taking approximately 10-20 minutes. While you can also manually download and install from Microsoft's official website, the command-line approach involves the fewest steps.
After installation, set the default WSL version to 2:
wsl --set-default-version 2
Choose and Install an Ubuntu Version
First, check the available Linux distribution list:
wsl --list --online
You'll see multiple versions including Ubuntu 26.04, 24.04, 22.04, and others. Here, Ubuntu 22.04 is recommended for the following reasons:
- 26.04 is too new: Some underlying dependency packages may have compatibility issues
- 24.04 is acceptable: Has a long maintenance period, but its ecosystem is less mature than 22.04
- 22.04 is the most stable: Verified over several years, still has over a year of official maintenance, and has the most mature AI development ecosystem
Ubuntu uses a year-based naming convention (e.g., 22.04 means released in April 2022), with even-year .04 versions being LTS (Long Term Support) releases that receive 5 years of official maintenance. Ubuntu 22.04's maintenance period extends until April 2027, during which it continuously receives security patches. In AI development, version selection is particularly important: official deb installation packages for CUDA 11.x/12.x, pre-compiled libraries from conda-forge, and CI/CD test matrices for various AI projects all use Ubuntu 22.04 as their baseline environment. Choosing a version that's too new may cause subtle issues like glibc version mismatches or Python default version conflicts, which are very time-consuming to troubleshoot.
Execute the installation command:
wsl --install -d Ubuntu-22.04

After the download and installation complete, the system will automatically prompt you to set a username and password. Enter your custom username and password to enter the Linux environment. Type exit to exit the subsystem.
Step 3: Migrate to a Non-System Drive (Critical Step)
By default, WSL2 installs the Linux subsystem on the C drive, and the space usage will rapidly grow as you build your development environment. Each WSL2 Linux distribution is actually stored as an ext4-formatted virtual hard disk file (.vhdx) in the Windows file system, with the default path located in the %LOCALAPPDATA%\Packages directory on the C drive. As you install Python environments, download pre-trained model files, store datasets, and perform other operations, this virtual disk can expand to tens or even hundreds of gigabytes. Therefore, migrating WSL2 to a non-system drive like D is a very necessary operation.
Export the Current System Image
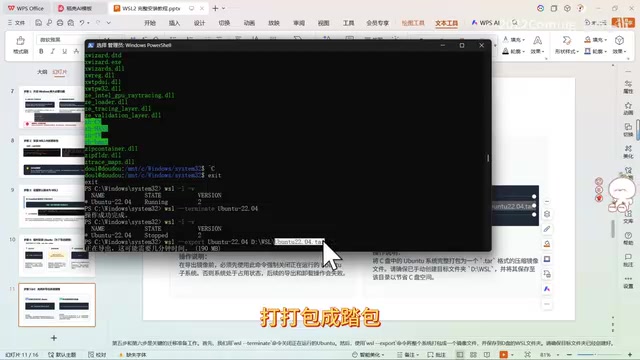
First, shut down the WSL service:
wsl --shutdown
Then export the current system as a tar archive:
wsl --export Ubuntu-22.04 D:\\WSL\\ubuntu-22.04.tar
You need to create the WSL folder on the D drive beforehand. The export process essentially packages the entire Linux file system into a standard Unix archive format (tar), with all installed software, configuration files, and user data completely preserved. The export takes a few minutes, with a file size of approximately 1GB.
Unregister the C Drive Version and Re-import to D Drive
Unregister the Ubuntu installation on the C drive:
wsl --unregister Ubuntu-22.04
Re-import from the tar archive on the D drive, specifying the installation path on the D drive:
wsl --import Ubuntu-22.04 D:\\WSL\\Ubuntu-22.04 D:\\WSL\\ubuntu-22.04.tar
During import, the system will unpack the tar archive into a new .vhdx virtual disk file, stored in the specified D drive directory. After import completes, the Linux system is entirely located on the D drive.
Configure the Default Login User
After migration, re-entering WSL will default to logging in as root. We need to create and configure a regular user:
# Create a new user
adduser your_username

# Grant administrator privileges
usermod -aG sudo your_username
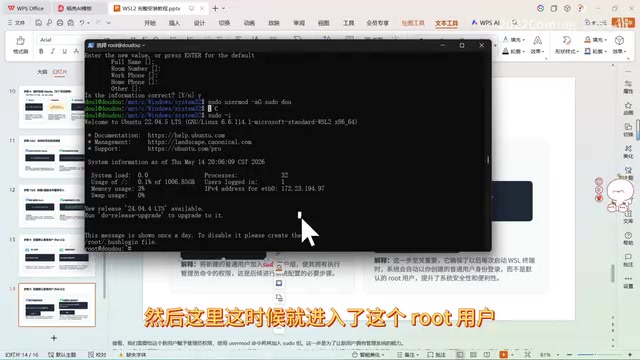
Then set the default login user. Edit the /etc/wsl.conf file and add the following content:
[user]
default=your_username
wsl.conf is WSL's instance-level configuration file. Besides setting the default user, it can also configure automatic Windows disk mounting behavior, network mode, memory limits, and other parameters. After saving, you need to completely shut down the WSL service and re-enter for changes to take effect:
wsl --shutdown
wsl
Now when you enter the system, it will display the regular user you created.
Daily Usage
After installation and configuration, using WSL2 daily is very convenient with multiple launch methods:
- Method 1: Click the Start menu, find the Ubuntu icon and launch directly
- Method 2: Open CMD or PowerShell, type
wsland press Enter - Method 3: Select the Ubuntu tab directly in Windows Terminal
All three methods enter the same Linux environment—just choose whichever you prefer.
WSL2 with GPU Acceleration and Docker Integration
One important advantage of WSL2 is its native support for GPU passthrough. Starting with Windows 11 and newer versions of Windows 10, NVIDIA GPU drivers can pass through directly into WSL2 without needing to install GPU drivers separately in the Linux subsystem—you only need to install the latest NVIDIA driver on the Windows side. This means you can directly run CUDA programs and train deep learning models in WSL2, with performance close to a native Linux environment.
Additionally, Docker Desktop's WSL2 backend allows containers to run directly on the Linux kernel, avoiding the performance overhead of the traditional Hyper-V backend. This makes container-based AI development workflows (such as deploying inference services using NVIDIA NGC containers) extremely smooth. After installing Docker Desktop, simply check "Use the WSL 2 based engine" in settings to seamlessly use Docker commands within the WSL2 environment.
Summary
This tutorial comprehensively covers the entire process from installing WSL2 from scratch to migrating it to a non-system drive. Let's recap the key steps: Enable Windows underlying features → Install WSL2 kernel and Ubuntu 22.04 → Export and migrate to D drive → Configure default user.
Compared to traditional dual-boot or virtual machine solutions, WSL2 offers advantages such as fast startup (typically within 2 seconds), low resource usage, and seamless integration with Windows (you can access the Linux file system directly in Windows Explorer at the path \\wsl$). It's the best choice for AI developers to set up a Linux environment on the Windows platform. After installation, you can freely install PyTorch, TensorFlow, CUDA, and other AI development toolchains in this Linux environment, enjoying a native Linux development experience.
Related articles
 Tutorials
ChatGPT Plus Subscription Guide: Are GPT-5.5, image-2, and Codex Worth the Upgrade?
A detailed look at ChatGPT Plus features — GPT-5.5, image-2, and Codex — with a Plus vs Pro comparison and a complete step-by-step subscription guide for users outside the US.
 Tutorials
Harness AI Engineering in Practice: Using Claude Code to Master Enterprise-Level E-Commerce Development
Deep dive into Harness AI Engineering: master enterprise e-commerce development with Claude Code using the Rules, Skills, Wiki, and Changes framework.
 Tutorials
Cursor + Codex Dual-IDE Collaboration: A Practical Methodology for Open-Source Project Customization
A complete methodology for open-source project customization based on real-world experience, detailing the Cursor+Codex dual-IDE workflow, seven-stage process, MVP validation, and AI source code reading techniques.