3D Motion to 2D Skeletal Animation: Hands-On with an Open-Source Tool That Makes One Animation Work for Every Character

A Bilibili creator's open-source tool converts 3D skeletal animations to 2D with built-in AI character generation, previewable in Cocos.
A Bilibili creator has open-sourced a tool that automatically converts 3D skeletal animations into 2D skeletal animations, with a built-in AI character generation pipeline based on GP Image R, enabling developers without skeletal animation experience to quickly produce usable 2D character animations. Its core idea is to first use Mesh to Motion to generate 3D motion, then map it down into 2D skeletal data so the same motion set can be reused across different characters, reducing production costs. On the character generation side, users just fill in art style and design descriptions and choose a head-to-body ratio to produce images. The workflow has four steps: generate and build the character, organize the PNG and JSON file directories, return to the home page, refresh, and export for Cocos, then preview in Cocos with the DragonBones component. The tool is free and open-source on GitHub, but currently has arm layer misalignment and a rather manual file organization process; the author promises future fixes and simplification.
A Bilibili creator has open-sourced a tool that automatically converts 3D skeletal animations into 2D skeletal animations, with a built-in AI character generation pipeline. It lets developers with no skeletal animation experience quickly produce usable 2D character animations. According to the demo, the generated animations can be imported into the Cocos engine and previewed directly through the DragonBones component, and a single set of motion data can be adapted to different characters.
From 3D to 2D: The "Dimensionality Reduction" Approach to Skeletal Animation
Traditional 2D skeletal animation requires manually rigging bones, painting weights, and tuning keyframes, which is a high barrier for beginners. The core idea behind this tool is: first use Mesh to Motion to generate 3D skeletal animation, then convert it into 2D skeletal data. In the video, the creator admits that he "can't do skeletal animation by hand" (original wording: "me, who can't do skeletal animation to save my life"), and it was precisely with AI that he completed the conversion from 3D motion to 2D skeletons.
The value of this "dimensionality reduction" approach lies in reuse: once 3D motion data is generated, it can be batch-mapped onto different 2D characters, reducing repetitive work. For indie developers or small teams, this amounts to covering multiple characters with a single animation asset, significantly lowering production costs.
Skeletal animation works by driving mesh vertex deformation with a hierarchy of "bones": each bone carries transforms such as rotation and translation, and vertices are bound to one or more bones through "skinning weights." When bones move, vertices follow according to their weighted influence, producing natural deformations such as limb bending. 2D skeletal animation (formats like Spine and DragonBones) organizes bones, slots, and image attachments on a 2D plane, making it suitable for mobile games and web; 3D skeletal animation, by contrast, involves joint hierarchies and volumetric deformation in three-dimensional space. The difference in their data structures is exactly why "3D to 2D" requires coordinate projection, flattening of the bone hierarchy, and keyframe resampling.
Mesh to Motion is an approach that estimates or generates skeletal motion from mesh deformation: first obtain the character mesh's deformation across frames, then work backward to infer the bone transforms and weights driving those deformations. Compared with pure manual keyframing, it can automatically derive skeletal animation from video or existing motion data, making it well suited as a "motion source" that is then converted into a 2D skeletal system.
AI Character Generation: Built-In Prompts, Free-Form Art Style
The tool's other major module is AI character generation. The creator integrated GP Image R (the AI image model mentioned in the video) and built in character template prompts, so users only need to fill in the character's art style and design description to generate the corresponding character. The generation interface supports selecting head-to-body ratios—for example, "2x" corresponds to chibi-style characters—making it easy to keep styles consistent.
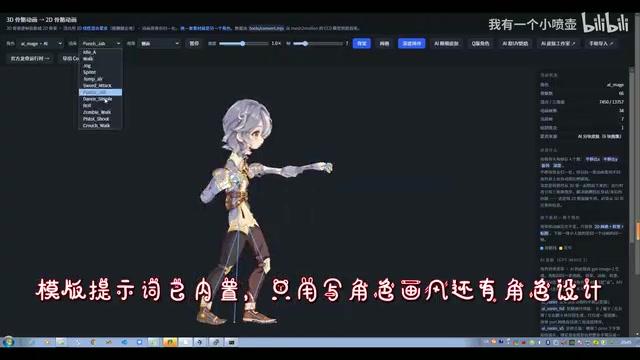
In practice, users need to enter the GP Image R API address and key. The creator mentions using a relay API, which also works fine, offering an alternative for users without official API access.
GP Image R is a text-to-image/image-to-image diffusion model service that users call via an API address and key. The "relay API" mentioned here refers to a third-party proxy forwarding service: it forwards requests to the official endpoint and returns the results, usually with pay-as-you-go pricing and a lower barrier to entry, though stability and compliance depend on the relay provider. For users who can't get official quotas, this is a common alternative.
Head-to-body ratio is a fundamental character design parameter, referring to the ratio of head height to full-body height. Realistic styles typically fall between 1:6 and 1:8, while chibi styles can go as far as 1:2 to 1:3. The tool turns the ratio into selectable presets (e.g., "2x" for chibi) so that batch-generated characters maintain a consistent scale, avoiding mismatches during subsequent 2D skeletal rigging and motion mapping.
Prompts operate on two levels here: the built-in "character template prompts" lock in engineering requirements such as composition, pose, and transparent background to ensure the output can be used directly for skeletal slicing; users only need to add art style and character design descriptions, lowering the barrier to entry.
Four Steps to Get Started: From Generation to Cocos Import
The whole workflow can be broken down into four steps, which the creator demonstrates in full in the video.
Step 1: Generate a Character and Build
After filling in the prompts in the AI Studio, generate the character, adjust the head-to-body ratio, and click "Build." According to the demo, once generation is complete, click "Build," enter the character name, then click "Preview" to confirm the result.
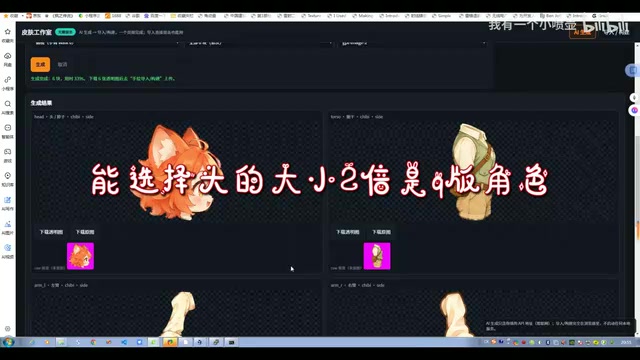
Step 2: Organize the File Directories
After building and downloading, you get two files. The creator explains: put the PNG image into the "AI" folder under the "Outside" folder (you need to create an "AI" folder under the "Side" folder), and put the JSON file into the "Side" folder.
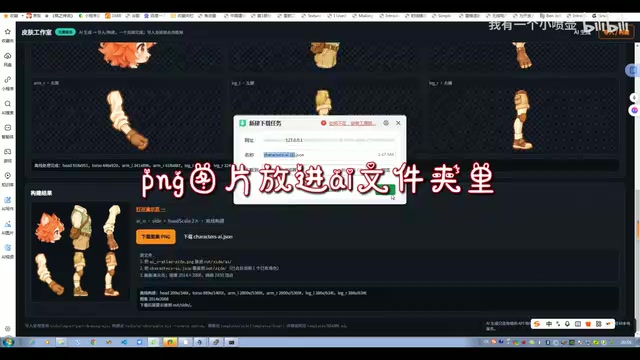
The creator also notes that the current process is "a bit cumbersome" and will be simplified later.
Step 3: Return to the Home Page, Refresh, and Export
After returning to the tool's home page and refreshing, you'll see the AI-generated character appear in the list. Click "Export Cocos," and three files will be downloaded.
Step 4: Import into Cocos and Preview
In Cocos, create an empty Node, add the DragonBones component, drop the imported files into the DragonBones component, and select an animation to preview it.
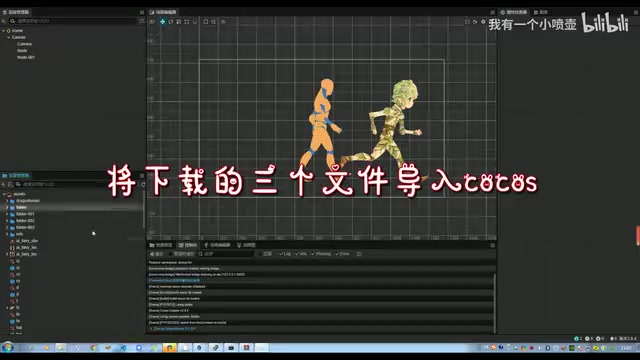
The creator points out that after export, the arm layer currently has a misalignment issue, but says it will be fixed later.
The Cocos DragonBones component is used in Cocos Creator to play DragonBones-format skeletal animations: it reads the skeletal data (JSON) and texture atlas, draws attachments layer by layer in slot order, and plays animations along the timeline. The "arm layer misalignment" mentioned here is a typical layer/slot order (z-order) and anchor offset problem—2D skeletal animation relies on slot draw order to determine occlusion relationships. If, during conversion, the local coordinates or ordering of arm attachments relative to the bones are inconsistent with the original design, the arm may cover the body or appear offset. Such issues can usually be resolved by correcting attachment transforms and slot hierarchy during the data conversion stage.
Open Source and Use Cases
The tool is open-sourced on GitHub and free to use. After downloading, unzip it and double-click the web page to enter the tool interface. The creator put the link in the comments, lowering the barrier to access.
In terms of use cases, this solution suits rapid prototyping, indie small-game development, and lightweight projects that need to batch-generate character animations. However, two caveats: first, the arm layer misalignment issue has not yet been fixed, so projects with high precision requirements should proceed with caution; second, the file directory organization process is currently rather manual, though the creator has promised to simplify it.
Overall, this tool strings 3D motion data, AI character generation, and 2D skeletal animation into a single pipeline. While there is still room for polish in the details, it offers a viable shortcut for developers lacking animation production capabilities.
One-line Summary
A Bilibili creator's open-source tool converts 3D skeletal animations to 2D with built-in AI character generation, importable into Cocos for preview.
Paragraph Summary
A Bilibili creator has open-sourced a tool that automatically converts 3D skeletal animations into 2D skeletal animations, with a built-in AI character generation pipeline based on GP Image R, enabling developers without skeletal animation experience to quickly produce usable 2D character animations. The core idea is to first use Mesh to Motion to generate 3D motion, then "reduce" it into 2D skeletal data, allowing the same set of motions to be reused across different characters and lowering production costs. On the character generation side, users only need to fill in art style and design descriptions and select a head-to-body ratio to produce images. The full workflow has four steps: generate and build the character, organize the PNG and JSON file directories, return to the home page, refresh, and export for Cocos, then preview in Cocos with the DragonBones component. The tool is open-sourced and free on GitHub, but currently has issues with arm layer misalignment and a rather manual file organization process; the author promises future fixes and simplification.
Related articles

Gemini 4 Neon Released: A Balance Between Frontier Intelligence and Efficient Task Execution
Google DeepMind releases Gemini 4 Neon, focused on frontier intelligence and fast end-to-end task execution. This article breaks down its benchmark performance in coding, enterprise analysis, scientific reasoning, and cybersecurity, its four thinking levels, pricing, and safety alignment data.

Is AI the Culprit Behind Global Outages? The Trust Crisis Behind the NSA and FAA Failures
Fourth major failure in five days hits NSA classified network. Microsoft blames a software bug, FAA denies its new AI system, NSA says routine maintenance. Senator Warner suggests AI accelerates vulnerability discovery, leading to rushed fixes — while 39% of Americans already view AI negatively, exposing a deepening trust crisis.

Robot Developer Builds Custom B-rep Kernel with 3,487 Tests
A robot developer builds a custom B-rep geometry kernel with 3,487 tests, exploring why robotics needs dedicated CAD tools and the barriers to building one.