AI Game Development in Practice: Two-Phase Boss State Machines and Death Heatmap Tuning

Implement a two-phase Boss with a state machine, data-driven difficulty acceptance via death heatmaps, and step-by-step AI implementation.
Using a side-scrolling action game's Boss fight as an example, the article explains how to implement a two-phase Boss with a state machine and break fairness into four measurable specs: warnings no shorter than 0.4 seconds with a Max F guarantee, a visual signal for every warning, a 20% speed-up expressed as parameters, and at least one no-damage dodge. Difficulty acceptance doesn't rely on feel but on a death recorder and heatmap to locate difficulty cliffs, with fixes applied lightest-to-heaviest and one change at a time. The author also points out that having AI write the whole Boss in one go leads to changing one thing and breaking three, and that the right approach is to implement in three passes with acceptance and commits after each, ending with common pitfalls and an acceptance checklist.
Boss fights are the design centerpiece of side-scrolling action games, and they're also where AI-assisted development most easily goes off the rails. In the second half of lesson ten of the "AI Game Development in Practice" series, the author gives a complete demonstration of how to implement a two-phase Boss with a state machine, and how to use a death heatmap to do data-driven acceptance testing of level difficulty. The value of this workflow isn't in any particular move, but in the method of translating "design intent" into "measurable parameters."

1. Boss Design: Replacing Text Explanations with Color Signals
The Ruins Guardian is a stone statue sleeping in the guard hall, drawn on a 64×64 canvas, about two and a half times the height of the knight, with 30 HP, entering its second phase when HP drops below 15. A rune core is embedded in its forehead; normally the core is dim and the body is dark blue, indicating invincibility. Only when the core glows bright cyan is it an attackable weak-point window.
This color change is a gameplay signal, not an art detail. Attacking outside the window deals zero damage, but triggers sparks, a clink sound, and a slight knockback, with the log printing blocked at the same time. The author specifically contrasts two kinds of feedback: if nothing happens when you hit it, the playtester's first reaction is "is the game broken?"; with sparks and sound effects added, players immediately understand they need to wait for the core to brighten. The sound effects are left for lesson 11.
The move list uses the V2 version. The heavy punch slam raises the right fist and turns the eyes red, with a shadow warning of 0.8 seconds, shortened to 0.64 seconds in the second phase; the fist deals 2 damage and emits shockwaves on both sides, after which the Boss lowers its head and pants for 2 seconds. The core laser sweep only appears in the second phase, charges for 1 second, with the low laser 4-16 pixels off the ground—a standing jump is enough to clear it—and after firing it overheats for 1.5 seconds, which is another weak-point window. On phase transition it roars with screen shake and 0.5 seconds of invincibility, reminding players to back off.
Every Boss move is a three-part structure: warning, attack, weak-point window. This rhythm gives players a stable learning curve.
2. Fairness Principles: Four Hard Constraints Written into the Spec
The author breaks Boss fairness into four executable specifications. First, any damaging move must have a warning of no less than 0.4 seconds, and even after second-phase acceleration it must not fall below this floor, implemented with a Max F guarantee. Second, every warning must have a visual signal—raised fist and red eyes, ground shadow, core charging—with audio signals to be added later. Third, the 20% speed-up must become measurable parameters: warning times multiplied by 0.8, shockwave speed multiplied by 1.2, weak-point windows multiplied by 0.8, and no new instant moves. Fourth, there must be at least one safe solution that, once understood, lets you dodge without taking damage—for example, a standing jump over the shockwave or the laser.
These four principles solve a common problem with AI-generated content: models very easily write moves that "look cool but are impossible to beat." Writing warning durations, speed multipliers, and hitbox positions as spec items gives the AI clear acceptance criteria during implementation, rather than tuning parameters by feel.
Max F guarantee: The "F" in Max F guarantee stands for frames. Max F is a technique that keeps a parameter from falling below a certain floor even when it gets shortened by multiplication. For example, second-phase warning duration = Max(base warning × 0.8, minimum warning frames). This way, even if speed multipliers stack or configuration goes wrong, the warning won't be shorter than the design floor (such as 0.4 seconds), thereby holding the fairness bottom line. In code it usually takes the form of a max function or a clamp operation, and it's a common means of putting spec constraints into practice.
3. State Machine and Move Selection Rules
The Boss is implemented with a state machine. In the sleeping state, the player crossing column 32 triggers awakening—2 seconds of invincibility, the gate closes—then it enters the idle and move-selection loop. There are two interrupt rules: in any state, when HP first drops below 15, it enters phase transition with 0.5 seconds of invincibility; when HP reaches zero, it dies, collapses, the gate opens, and the finish flag appears. If the player dies, everything resets: the Boss returns to full HP, the first phase, and the sleeping state.
Move selection has clear restrictions: the first phase has only the heavy punch; the second phase has heavy punch at weight two and laser at weight one, and the laser never appears twice in a row. Falling rocks are an independently timed passive that doesn't occupy the state machine. The animation list totals 11 actions, including sleeping, slam, laser, panting, roar, and death, drawn at 64×64 facing right and flipped horizontally to face left. Animation durations must match the warning durations: the first three frames of the slam animation total 0.8 seconds, and setting playback speed to 1.25× in the second phase makes it 0.64 seconds.
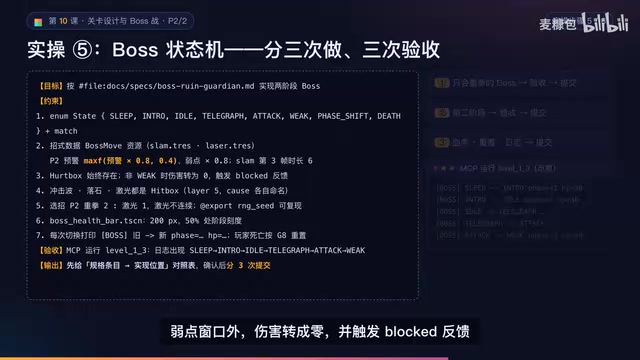
State Machine: A state machine is a classic architecture in game AI for controlling character behavior: it divides a character's behavior under different circumstances into mutually exclusive "states" (such as sleeping, idle, attacking, hurt, dead) and defines the transition conditions between states. Each state only cares about its own logic and exit conditions, avoiding the chaos of deeply nested if-else chains. For Boss fights, a state machine turns "when to use which move, when to enter an invincible window" into an enumerable, testable set of rules, and also makes it easy for AI to implement in modules and modify locally, reducing the risk of breaking three things by changing one.
4. Difficulty Acceptance: Let the Death Heatmap Do the Talking
"I think the difficulty is fine" is not an acceptance criterion. The author designed a recorder: every death records where it happened, what killed the player, and how long they watched, appended to a DEVS file in the user directory; every clear is recorded in a RUNS file with time taken, death count, and coin count. These files can be found in the editor menu under "Project → Open User Data Folder."
Difficulty targets are written into the document: 1-1 averages no more than 1 death, 1-2 is 2 to 4 deaths, 1-3 is 3 to 6 deaths with most of them at the Boss; clear times are 3-5 minutes, 5-7 minutes, and 3-5 minutes respectively; first-clear rates are at least 80% for 1-1, at least half for 1-2, and at least 30% for 1-3; and for single-point concentration, no 3×3 cell area may account for more than a quarter of that level's deaths. A difficulty cliff is defined as: one segment having three times or more the deaths of the previous segment and accounting for over 30% of the level's deaths, or a new mechanic causing more than half of playtesters to die the first time it appears.
In the sample report, the first round of playtesting for 1-2 had 20 deaths total, with columns 60-69 accounting for 16 of them, while the previous segment had 0—far more than 3× and 80% of the whole level. That's exactly where the moving platform crosses a bottomless pit, matching the heatmap.
Death Heatmap: A death heatmap is a data analysis tool that visualizes where players die: it counts deaths per grid cell on the level map and uses color intensity to represent density, with deeper red meaning more concentrated deaths in that area. It turns subjective "difficulty" into objective distribution data, helping developers quickly locate difficulty cliffs and verify the effects of changes. Heatmaps usually need to be used together with a death recorder (recording coordinates, cause of death, and time), and you must watch for consistency in coordinate origin and Y-axis direction, or the points will be shifted as a whole.
5. Fixes: From Lightest to Heaviest, One Change at a Time
After finding a cliff, fixes proceed from lightest to heaviest. For clustered jump-related deaths: first add coins to guide walking, then reduce the pit width by one cell, then add a stepping platform. For clustered enemy-related deaths: first remove one enemy, then lengthen the warning, then add a heal point in front. For a Boss move causing too many deaths: add 0.1 seconds to the warning, change damage from 2 to 1, or add a dodge platform. For respawns taking too long: add a checkpoint. If it's too easy: add an enemy or shorten the safe zone, but don't touch the tutorial segment.

The key is to change only one variable at a time, then regenerate the level and test again. The author demonstrates the second-round heatmap after adding three coins as hints: the red patch in segment F has basically disappeared, average deaths dropped from 6.7 to 4, and median clear time fell from 8.6 minutes to 6.5. At the same time, the author notes that this is illustrative data from very few people, and real projects need more rounds of testing.
6. Crash Scenes and Step-by-Step Implementation
Having the AI write the entire Boss in one go will cause problems. The author describes a typical crash: a big script of several hundred lines that looks like it runs; you say the laser hitbox is too high and should be lowered, and the AI changes the laser but also messes with the shared state-switching code, so after the heavy punch it no longer enters the weak-point window, a null pointer appears, and the second-phase warning becomes 0—change one thing and break three.
The correct approach is to roll back to the last save point and implement it in three passes: first the state machine, heavy punch, and tutorial falling rocks; second the phase transition, laser, and periodic falling rocks; third the HP tuning, reset, and logging. Accept and commit after each pass. The prompt directly references the spec document, the constraints spell out every detail of the eight states, move data is made into resources, second-phase warnings use the Max F guarantee, and damage outside the weak-point window is converted to 0 and triggers blocked feedback.
A review Agent can use MCP to run 1-3, prove from the logs that a complete loop occurs, then personally play through to confirm G1 through G8 all hold and that the Boss can be defeated within three minutes.

MCP (Model Context Protocol): MCP (Model Context Protocol) is an open protocol that lets AI models interact with external tools and data sources; you can think of it as an AI's "plugin interface." In game development, a review Agent can use MCP to call the game runtime environment, read logs, and execute test scripts, thereby automatically verifying whether the Boss exhibits a complete loop and whether state transitions are correct. This is more reliable than simply having the AI read code, because it can make judgments based on actual runtime results, partially automating "acceptance" away from manual playtesting.
7. Common Pitfalls and Acceptance Checklist
Level-transition errors usually come from switching scenes directly inside a physics callback; you need a deferred call. The second phase becoming an instant kill is because the warning got squeezed too short—use the Max F guarantee. Hitting the Boss with no reaction means there's no feedback outside the weak point. The laser being undodgeable no matter how you jump means the hitbox is too tall or too thick—turn on collision-area display and check in slow motion. The Boss continuing at half HP after the player dies means HP reset wasn't implemented. Heatmap points being shifted as a whole means inconsistent coordinate origin or Y-axis direction. There's also an easily overlooked pitfall: testing it all yourself isn't enough—the author is too familiar with the level—so find at least two new players and only observe without explaining.
The acceptance checklist includes three maps and generation stats, switching through the three levels in order, platforms being stable to stand on, the arena gate closing and locking the camera, a complete Boss log loop, no HP loss outside the weak point, second-phase warnings no shorter than 0.4 seconds, reset after death, complete spec and heatmap, and one round of adjustments completed and committed.
Homework comes in three tiers: the basic task is to add a safe zone of at least 6 cells before segment B of 1-2 and explain why a breather is needed; the advanced task is to design a fourth move for the Boss, such as a double-fist sweep, writing the move list first and then handing it to the AI to implement, using the heatmap to verify the kill rate doesn't exceed half; the challenge task is to have the AI write a level-checking script that automatically finds pits that are too wide, steps that are too high, and enemies too close to checkpoints—essentially automated testing for levels.
All three levels and the Boss are now playable, but the game still has no sound, title screen, or pause menu. The next lesson covers generating sound effects and music with AI, and building a complete UI flow from title screen to clear.
One-line Summary
Implement a two-phase Boss with a state machine, use death heatmap data for difficulty acceptance, and have AI implement it in steps.
Paragraph Summary
Using a side-scrolling action game's Boss fight as an example, the article explains how to implement a two-phase Boss with a state machine and break fairness into four measurable specs: warnings no shorter than 0.4 seconds with a Max F guarantee, a visual signal for every warning, a 20% speed-up expressed as parameters, and at least one no-damage dodge. Difficulty acceptance doesn't rely on feel but on a death recorder and heatmap to locate difficulty cliffs, with fixes applied lightest-to-heaviest and one change at a time. The author also points out that having AI write the whole Boss in one go leads to changing one thing and breaking three, and that the right approach is to implement in three passes with acceptance and commits after each, finishing with common pitfalls and an acceptance checklist.
Related articles

WebMCP Security Guide: Three Hints That Make AI Agents Safer
The Chrome team demonstrates three security hints for WebMCP tools: readOnlyHint eliminates invalid confirmation dialogs, consequentialHint forces human confirmation for high-risk operations, and untrustedContentHint defends against indirect prompt injection—improving AI agent security with one or two lines of code.

Why Turbulence Is the Hardest Problem in Fluid Mechanics — and How AI Could Crack It
Why is turbulence the hardest problem in fluid mechanics? This article, based on a Lex Fridman podcast conversation, explores turbulence's multi-scale nature, comparisons with classical thermodynamics, and how AI might simplify turbulence description by discovering coordinate transformations — examining the intersection of vortex formation with mathematics and physics.

R.L. Stine Google Talk: How the Master of Horror Ignites Kids' Passion for Reading
At a Google talk, R.L. Stine shares his accidental pivot from comedy to horror, his principles for children's horror, how phones impact storytelling, and how Goosebumps motivates kids to read.