Building a Local AI Environment on Ubuntu with Hyper-V: The Complete 1Panel + OpenCode + Hermes Workflow

Build a complete local AI agent stack on Ubuntu using Hyper-V, 1Panel, OpenCode, and Hermes.
A hands-on guide to building a local AI agent environment: create an Ubuntu 22.04 VM with Hyper-V, then deploy the 1Panel dashboard, the OpenCode gateway, and the Hermes agent step by step. Covers key VM settings, LLM API aggregators, port reference, and common troubleshooting.
Setting up a complete AI agent runtime environment locally is a core need for many developers and DevOps enthusiasts. Based on a hands-on tutorial, this article walks through how to build an Ubuntu 22.04 server from scratch on a Windows host using Hyper-V virtualization technology, then deploy the 1Panel management dashboard, the persistent OpenCode gateway, and the interactive Hermes agent in sequence—ultimately producing a local AI service stack you can chat with anytime and manage visually.
Environment Preparation and Virtual Machine Setup
Hyper-V is Microsoft's native virtualization platform built on a Type-1 (bare-metal) hypervisor architecture. Unlike Type-2 virtualization solutions such as VMware Workstation or VirtualBox, Hyper-V runs directly on the hardware layer, with the host operating system itself running as a privileged virtual machine (Partition 0). This gives it advantages in performance and resource isolation—which is precisely why it's the preferred choice when building a long-running local service stack on a Windows host.
For the host machine, it's recommended to use the Pro/Enterprise edition of Windows 10 or 11, since the Home edition doesn't include the Hyper-V component by default. For virtual machine resources, allocate at least 4 CPU cores, 6GB of RAM, and a 50GB hard drive; with less than 4GB of RAM, services tend to crash later due to insufficient resources.
Enabling Hyper-V is straightforward: open PowerShell as an administrator, run the Enable-WindowsOptionalFeature command with the -All parameter, and you must restart your computer after execution. After rebooting, you'll find "Hyper-V Manager" in the Start menu.
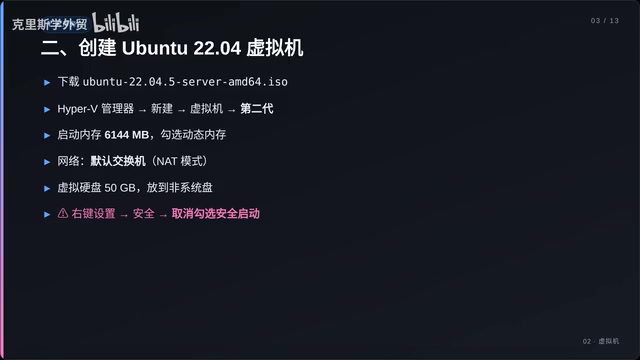
When creating a virtual machine, there are two key points that are easy to overlook:
- The generation must be set to Generation 2
- After creation, right-click to enter Settings, and under the "Security" option, uncheck "Enable Secure Boot"
Generation 2 virtual machines use UEFI firmware instead of the traditional BIOS, supporting larger memory addressing and faster boot speeds. However, its Secure Boot feature causes compatibility conflicts when loading non-Microsoft-signed Linux bootloaders—this is the fundamental reason why the VM won't boot properly if you don't disable it, and it's also the most common pitfall in the entire workflow. For network connectivity, simply select the default switch and use NAT mode.
Installing Ubuntu and Basic Configuration
After downloading the Ubuntu 22.04 Server image, mount it and boot up. During the installation wizard, remember to check Install OpenSSH Server, and keep track of the username and password you set—both will be needed for subsequent SSH remote connections.
After the system installation is complete and the machine reboots, run hostname -I to obtain the VM's IP address, which usually starts with 192.168.137. This IP is critical—all subsequent panel and service access is based on it.
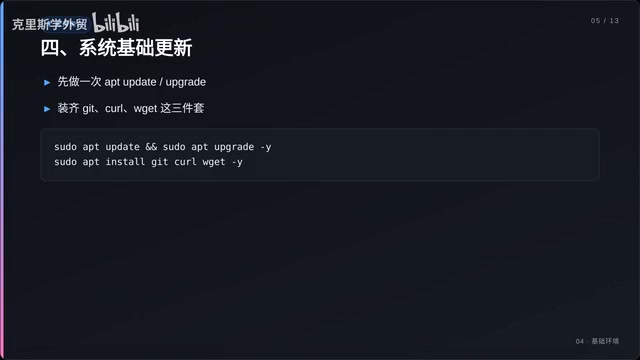
After the system boots, first run a basic update:
apt update && apt upgrade
Then install the three common tools git, curl, and wget together. Nearly all subsequent installation scripts rely on curl to fetch resources, so this step cannot be skipped.
Deploying the 1Panel Management Dashboard
1Panel is a new-generation Linux server management panel open-sourced by the FIT2CLOUD team (with over 20k stars on GitHub). Its underlying architecture is entirely built with Go, using a decoupled frontend-backend design. Compared to the veteran BT Panel (baota), 1Panel places greater emphasis on containerized workflows—deeply integrating Docker and Docker Compose, with all applications deployed as containers to avoid dependency conflicts. It provides visual firewall, process supervision, log, and website management capabilities. Installation requires just a single curl command to fetch the quick_start script and execute it with sudo bash.
After installation, the terminal will directly print out the panel access address, account credentials, and security entry—be sure to record them. If your browser can't open the panel, it's most likely because the firewall is blocking the port—simply use ufw allow inside the VM with the corresponding port to open it.
Note: 1Panel's access port is randomly generated during installation and is not a fixed value. Refer to the terminal output.
Once deployment is complete, you can visually manage firewall rules and view service logs through the graphical interface. Worth particular mention is its built-in "Process Supervision" module—essentially a visual wrapper around Linux Systemd services, allowing users to create, start/stop, and monitor daemon processes through the GUI. This is also the core reason why it's recommended for hosting Hermes later.
Installing and Initializing the OpenCode Gateway
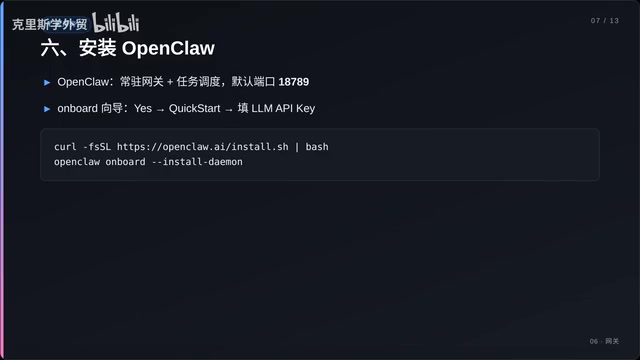
OpenCode is a persistent gateway and task scheduler that uses port 18789 by default. Installation is again a single curl command; once complete, immediately run the initialization command to enter the configuration wizard.
The wizard process has three steps:
- Confirm the risk warning by selecting
Yes - Choose Quick Start mode
- Enter your LLM API Key (supports keys from aggregator providers such as OpenRouter and OpenLayer, allowing flexible connection to different large models)
The core value of LLM API aggregator providers like OpenRouter and OpenLayer (also known as AI Gateways) lies in offering a unified OpenAI-compatible interface that routes behind the scenes to dozens of models such as GPT-4o, Claude 3.5, Gemini, and Llama 3. Developers only need a single API Key and can freely switch between different underlying models by changing the model name parameter, without needing to manage separate accounts and SDKs for multiple providers. When a model's price rises or its service is interrupted, you can migrate seamlessly by simply modifying the model name parameter in the configuration, greatly reducing the risk of vendor lock-in.
After initialization, use daemon start to run the daemon process in the background, and daemon status to check its running status anytime. If you need external access, remember to open port 18789; if you want it to start automatically on boot, run daemon enable.
The Core Component: The Hermes Agent
AI Agents are one of the mainstream paradigms for real-world large model applications today. What fundamentally distinguishes them from ordinary conversational models is their "Tool Use/Function Calling" capability and their "plan-execute" loop. In this article's architecture, Hermes plays the role of the Agent, while the OpenCode gateway acts as the tool execution layer. When a user issues a natural-language instruction like "check the server status," Hermes translates that intent into a structured tool-call request, OpenCode executes the corresponding system command and returns the result to the model, and the model then converts the raw data into a human-readable natural-language response. This decoupled design of "LLM brain + tool execution layer" gives the entire system excellent extensibility.
Hermes is the heart of this setup—a conversational interactive agent that can directly connect to the OpenCode gateway deployed earlier. After running the installation script, execute hermes setup to complete the initial configuration. The config files are located in the .hermes folder in the user's home directory; edit the .env file within it to fill in the target model name and API key.
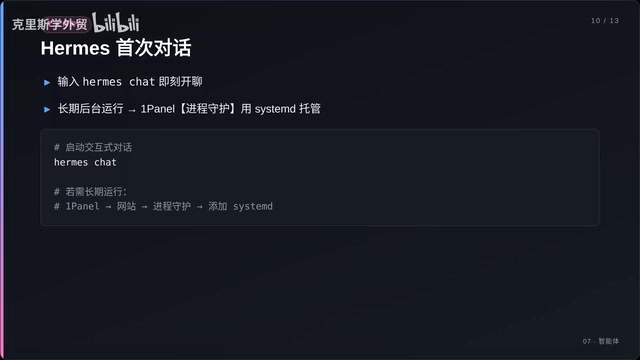
Once configured, simply enter the following command to start an interactive conversation:
hermes chat
You can try asking it to query the server status to verify that connectivity with the OpenCode gateway is working properly. Later, you can continuously expand Hermes's capability boundaries by registering new tools with OpenCode—for example, file management, scheduled task execution, or external API calls.
Configuring Hermes to Start on Boot
If you want Hermes to run stably in the background over the long term, it's recommended to add a Systemd service to host it in 1Panel's Process Supervision panel. This way, even if the system restarts, the service will start automatically without manual maintenance.
Port Quick Reference and Common Troubleshooting
To make it easier to manage firewall rules with 1Panel or ufw, here's a summary of the ports for the three services:
| Service | Port |
|---|---|
| SSH | 22 |
| 1Panel | Randomly generated at install |
| OpenCode Gateway | 18789 |
Frequently Encountered Issues
- Hyper-V VM can't connect to the internet: Usually caused by a malfunctioning default switch—deleting and recreating it will restore connectivity.
- GitHub script download fails: Switch network environments or use a proxy and retry.
- Services crash due to insufficient VM memory: Increase the memory allocation to above 4GB.
- OpenCode won't start on boot: Confirm that you've run the
daemon enablecommand.
Conclusion
By following this workflow, you'll end up with a complete local AI stack:
- An isolated Ubuntu 22.04 virtual machine
- A graphical 1Panel management dashboard
- A persistent background OpenCode gateway
- A Hermes agent you can chat with anytime
The core value of this combination lies in connecting virtualization, DevOps management, and the AI agent—Hyper-V provides a secure sandbox isolated from the host, 1Panel ensures continuous service availability through Systemd encapsulation, OpenCode as the tool execution layer gives Hermes the ability to truly operate the system environment, and the introduction of LLM API aggregator providers keeps model selection flexible. This architecture guarantees both environment isolation and manageability while putting local large model services within easy reach—making it ideal for developers who want to explore Agent applications hands-on in their own environments.
Related articles

Uber Deploys ChatGPT Work Company-Wide: AI in the Workplace Enters the Scaled Implementation Phase
Uber deploys ChatGPT Work to 30,000+ employees, extending it from engineering to all roles. We analyze its expert-engineer pairing, end-to-end automation, and questions of AI control and power concentration—insights for scaling AI in the workplace.

Shift at Midnight Hands-On: When "ID Verification" Becomes Alien Hunting
Shift at Midnight blends ID verification with horror survival in a four-player co-op game. We break down its inspection mechanics and chaotic humor.

Zelensky Recounts the Outbreak of War: I Need Ammunition, Not a Ride
Zelensky recalls the first day of war in a YouTube interview: farewell to family, rejecting Biden's evacuation offer with "I need ammunition, not a ride," and how Bucha shaped his stance on compromise and peace talks.