Codex Beginner's Guide: How to Use DeepSeek Instead of ChatGPT to Log In

A step-by-step guide for China-based users to connect DeepSeek to Codex instead of ChatGPT.
This guide helps users in China who lack a ChatGPT Plus account use OpenAI's Codex coding assistant by connecting DeepSeek via the third-party Codex++ Management Tool. Key steps include installing Codex without opening it, setting up Codex++ with DeepSeek's Base URL and API Key in Pure API mode, topping up a DeepSeek account (as little as ¥10), and launching Codex through the management tool to log in via "other method." The article also notes that OpenAI may soon natively support third-party models, potentially eliminating the need for workarounds.
Codex Beginner's Guide: How to Use Domestic LLMs Instead of ChatGPT to Log In
Codex, OpenAI's AI coding assistant, is quickly becoming an essential tool for developers. But for users in China, there's one unavoidable obstacle — the default login method requires a ChatGPT Plus account, and many people get stuck right there due to network and account limitations.
This guide is based on a detailed tutorial from a Bilibili creator. It focuses on how to bypass the ChatGPT login requirement and use domestic large language models like DeepSeekAd as the backend for Codex — so users without overseas accounts can still get started.
Two Ways to Use Codex: ChatGPT Login vs. Domestic LLMs
There are two paths to using Codex, and which one you take depends on the resources you have available.
The first path is the simplest: If you already have a ChatGPT Plus account, just download the official Codex installer, log in with your ChatGPT account, and you're done — no extra configuration needed. This works well for overseas users or anyone who already has a Plus subscription.
The second path is for most users in China: If you don't have a ChatGPT account, no Plus membership, or even a stable connection, you can use a third-party management tool to connect DeepSeek, Doubao, or other domestic models to Codex as its backend. This path is slightly more involved, but entirely doable — and it's the main focus of this article.
One thing to be clear about: Codex itself is just a shell. The actual work is done by the underlying large language model. Whichever model you use, you'll need to top up tokens with that provider.
Step 1: Install Codex — But Don't Open It Yet
First, install the Codex application on your computer. Windows users can open the Start menu, search for the Microsoft Store, and search for "Codex" to find the app. Mac users can do the same in the App Store. Once found, click to download and install for free — the process is the same as any other app.
One critical note: After Codex finishes installing, do NOT open it right away. By default, launching it will immediately prompt you to log in with a ChatGPT account — which is exactly where users in China get stuck. You need to finish configuring the third-party tool first, so you can switch to a domestic model login method.
Step 2: Install the Codex++ Management Tool
The second tool you need is the Codex++ management tool. It's a third-party application that doesn't modify any of Codex's core functionality — it simply changes how Codex authenticates, allowing you to connect via a domestic large language model.
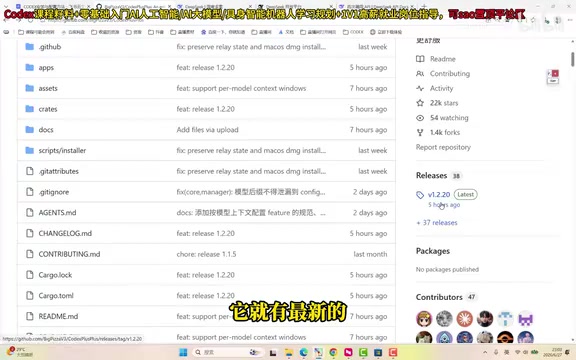
You can download the latest version from the GitHub releases page. If GitHub is inaccessible on your network, try refreshing a few times, or use the pre-uploaded installer shared by the tutorial author (separate versions are available for Windows and Mac). Installation is straightforward — just click through the defaults.
After installation, you'll see three programs: Codex, Codex++, and the Codex++ Management Tool. Make sure to open the "Codex++ Management Tool" — don't mix it up with the others.
Step 3: Configure DeepSeek as the Backend
Once the Codex++ Management Tool is open, you'll see a lot of options — but we only need one: the model provider configuration.
Click "Provider Configuration" on the left. By default, only one entry is listed. Click "Add Provider" and fill in DeepSeek's details:
Key Parameters to Fill In
- Name: Anything you like — something recognizable, like "DeepSeek"
- Connection Mode: Must be set to Pure API — this connects to the model via its API interface
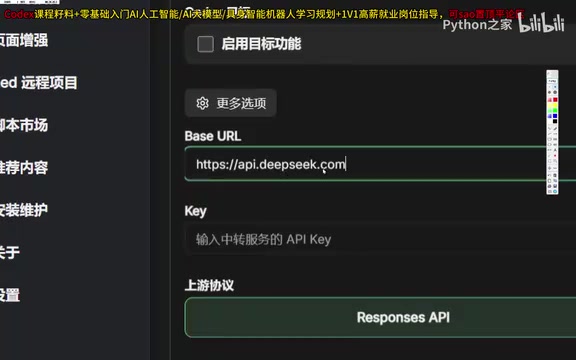
- Base URL: Enter
api.deepseek.com— copy and paste this rather than typing it manually to avoid errors - API Key: Enter your own DeepSeek secret key
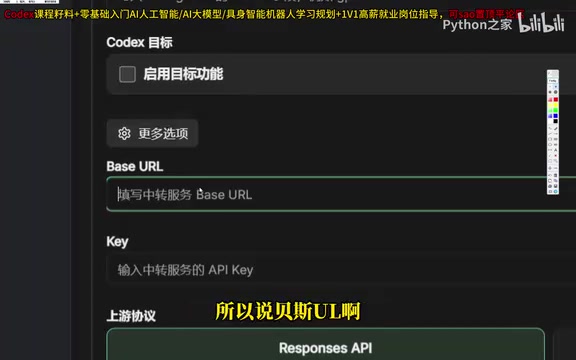
The Base URL is the endpoint address for the model service. Every major LLM provider has its own: DeepSeek uses api.deepseek.com, Doubao (ByteDance) uses ark.cn-beijing.volces.com, and Alibaba Cloud Bailian uses dashscope.aliyuncs.com. The Codex++ Management Tool uses this address to know which server to route your requests to. If you ever want to switch to a different domestic model, just update the Base URL and API Key in the provider configuration — the rest of the process is identical.
Getting Your DeepSeek API Key
An API Key is your account's unique identifier. Codex needs it to verify that requests are coming from your account when calling DeepSeek. Here's how to get one:
Go to the DeepSeek website, navigate to the "API Open Platform," find the "API Key" section in the left sidebar, and click "Create" to generate a new key.
This is extremely important: The key is only shown once. As soon as it's created, copy it immediately and save it somewhere — a local file, a chat window, or a file transfer tool. Once you close that window, you can never view the key again. You'd have to create a new one.
Once all the fields are filled in, leave the protocol option on its default (right side), then click "Fetch from Upstream" to test the connection. If you can successfully retrieve a list of available models (such as DeepSeek Pro), the configuration is working. Click "Save," and your newly added DeepSeek entry will appear in the provider list. Hover over it and click "Use" to switch it to "Active" status.
An API Key is essentially a random string of characters — think of it as your account's access pass to the outside world. Every time Codex calls DeepSeek, it attaches this key to the request header. DeepSeek's servers verify the key before responding and billing your account. Because the key is directly tied to your account, anyone who obtains it can consume your quota. Never upload it to a public GitHub repository or share it with anyone you don't trust. If you suspect your key has been compromised, delete it immediately in the DeepSeek API platform and generate a new one.
Step 4: Top Up Your DeepSeek Account
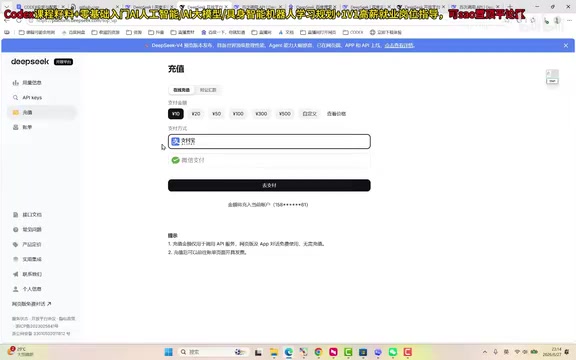
Once the configuration is done, there's one more prerequisite — your DeepSeek account needs to have a balance for the model to actually run.
Go to the recharge page in the DeepSeek API platform. Adding around ¥10 is more than enough to get started with learning. According to the tutorial author, DeepSeek's pricing is very affordable — even with heavy usage all day long (including running multiple background tasks after shutting down the screen), the monthly cost came out to about ¥100. For most learners, ¥10 will cover the majority of use cases.
Step 5: Launch Codex Through the Management Tool and Log In
With everything set up, find the "Restart Codex++" option in the top-right corner of the management tool interface. The key point here: do not launch Codex directly — launch it through the management tool. This is what enables the modified login flow.
Click it, and the management tool will automatically start the Codex app installed on your computer. When the login screen appears:
- Do not select the first option: "Sign in with ChatGPT"
- Select the second option: "Sign in with another method"
- When prompted for an OpenAI API Key, paste in your DeepSeek API Key from earlier
- Click "Continue" — the first login may take a moment
Once you're in, check the model selector in the bottom-right corner and confirm you can select the DeepSeek model you configured (e.g., DeepSeek V4 Pro). Switch to the Pro version for better results. At this point, Codex is successfully running with DeepSeek as its backend.
Official Native Support for Third-Party Models May Be Coming
The tutorial author also shared a noteworthy update: the official Codex team has reportedly announced plans to natively support third-party large language models in a future release. If that feature ships, users will be able to configure DeepSeek, Doubao, and other models directly within Codex — no third-party management tools required.
Until that happens, connecting via the Codex++ Management Tool remains the most practical solution for users in China. The setup process has a fair number of steps, but the logic behind each one is clear. Once you understand the method, connecting any other model in the future follows the exact same approach.
Related articles

Felix Rieseberg Personal Homepage
Felix Rieseberg's personal homepage sparks attention on Hacker News. This article covers the Slack engineer's technical background, the rise and fall of nativefier, and the value of a developer homepage as a tech calling card.

@ai-sdk/vue 3.0.306 Patch Release Syncs with [email protected] Update
@ai-sdk/vue 3.0.306 released, synced with [email protected]. A routine patch release for the Vercel AI SDK ecosystem with no public API changes; the Vue adapter layer stays version-aligned with the core package.

Gemini 4 Argon API Launches: The Era of Million-Token Output Begins
Google launches Gemini 4 Argon with sparse MoE architecture, up to 1M output tokens, and a 68.90% Vals Index score, available across API, AI Studio, and the Gemini app.