Complete Guide to Connecting External Models in Codex: Two Methods to Unlock Full Capabilities

Two practical methods to connect external models (GPT, DeepSeek, etc.) to OpenAI Codex via relay services or the CC Tool.
This guide covers two main approaches to connecting external models to Codex: manually editing auth and config files with a relay service API key, or using the CC Tool to automatically generate those files and bridge models like GPT and DeepSeek. Includes configuration details, model-specific integration differences, and data security considerations.
Introduction: Why Connect External Models to Codex?
OpenAI's Codex is a solid AI programming tool out of the box. Built on the GPT architecture and fine-tuned specifically for code generation, it was trained on hundreds of millions of lines of open-source code (primarily from GitHub), enabling it to translate natural language descriptions into runnable code across dozens of languages including Python, JavaScript, and Go. According to OpenAI's 2021 technical report, Codex achieved a 28.8% pass@1 rate on the HumanEval benchmark at launch, later surpassing 72% — a leap that marked AI code generation's transition from "toy" to "production-ready." Its training data comprised 54% public GitHub code and 46% natural language text, giving the model both syntactic understanding and natural language reasoning. It's also worth noting the relationship between Codex and GitHub Copilot: Copilot is the IDE plugin built through Microsoft and OpenAI's partnership, while Codex is the underlying model powering it — also exposed directly via API for developers building their own coding assistants. For developers who want to flexibly switch between models or reduce costs through third-party relay services, learning how to connect external models and manage custom API keys in Codex is a highly practical advanced topic.
This guide is based on hands-on tutorials and systematically covers the two main methods for unlocking Codex's full capabilities and connecting external models. Please ensure you comply with relevant terms of service when using these approaches.
Prerequisites: Three Core Tools
To unlock Codex's capabilities and connect external models, you'll need three components:
- Codex: The main programming tool, downloaded through official channels.
- Codex Management Tool (Codex++): The control center for configuration management and key switching — recommended as your starting point.
- CC Tool: Dedicated to external model integration and protocol bridging, supporting multiple model formats.
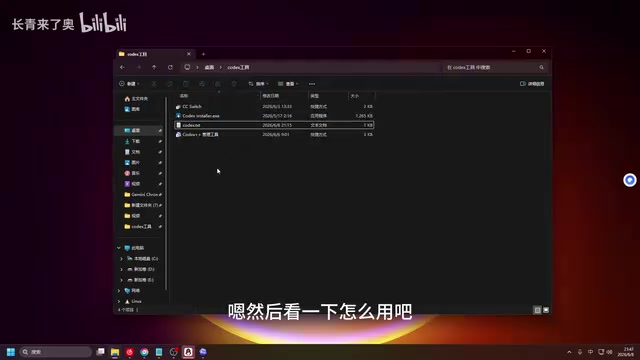
The recommended workflow is to open Codex++ first as the starting point for the entire configuration process. Download links for these tools are typically included in tutorial documentation — install them in order.
Method 1: Manually Configure Keys via a Relay Service
Create a Key and Navigate to the Installation Directory
The first approach uses a relay service. An API relay (or proxy) is essentially a reverse proxy — it receives API requests from clients, forwards them to upstream model providers (like OpenAI), and returns responses back to the client. Unlike a forward proxy that acts on behalf of the client, a reverse proxy acts on behalf of the server. Nginx and Caddy are the most common open-source reverse proxy implementations. API relay services typically add key pool management, rate limiting, and billing aggregation on top of this, merging quotas from multiple upstream API keys into a single access point — useful for distributing rate limits under high concurrency. The core value is a unified access layer: developers maintain one endpoint to call multiple model services. From a networking perspective, reverse proxies also provide load balancing, request caching, and access control. Create a key in the relay service (any name works), click "Use Key," then navigate to Codex's local installation directory.
One thing to note: free relay services often face bot abuse — registered user counts may look large, but real active users are far fewer. These services are completely free, so abuse only results in account bans with no benefit to anyone. Use them responsibly.
Modify Two Key Configuration Files
The integration hinges on two configuration files:
- auth file: Stores authentication credentials, typically as a Bearer Token or API Key in plaintext or encrypted form. Bearer Token is the standard authentication method under the OAuth 2.0 spec — its name reflects the "whoever holds it gets access" design philosophy, which means keeping this file secure is critical.
- config file (starts with "c"): Stores runtime parameters such as the service URL, model parameters, and plugin configurations.
This "credentials + config" dual-file separation is a common pattern in modern CLI tools, allowing identity and business configuration to be managed independently across environments. Deleting either file will cause the tool to stop working. This design aligns with the "config separated from code" principle from The Twelve-Factor App — a best practice in cloud-native application development.
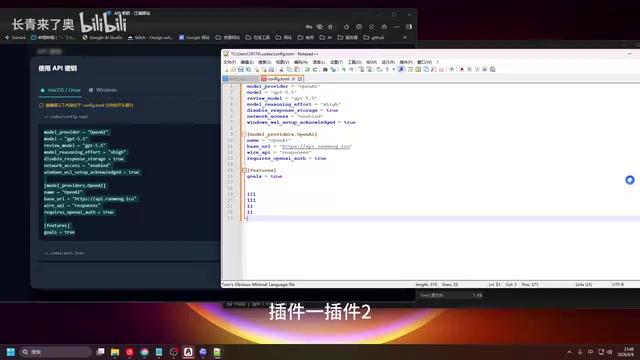
If you can't find the files, search by filename within the directory. There are two scenarios to handle differently:
- First-time Codex user: You can select all, copy the complete configuration, and paste it in directly.
- Existing Codex user: Your config may contain personalized settings like "Plugin 1, Plugin 2, Skill 1, Skill 2" — in this case, only replace the API key and service URL, and do not overwrite existing custom settings.
After saving, test by typing something in Codex (e.g., "Hello"). First-time use requires creating a sandbox environment — a sandbox is an isolated execution environment that uses OS-level mechanisms like process isolation, filesystem namespaces, and cgroups to contain the side effects of code execution within an independent container. Linux Namespaces provide isolated views of PID, network, and filesystem resources; cgroups limit maximum usage of CPU, memory, and disk I/O; seccomp further filters system call whitelists to prevent malicious code from escaping. Google's gVisor and Amazon's Firecracker offer even stronger microVM-level isolation, commonly used by cloud providers for multi-tenant code execution. In AI coding tools, sandboxes serve another role: providing a repeatable, deterministic execution context for the model, allowing it to run generated code snippets and observe output — enabling the "generate → verify → correct" loop that distinguishes Codex from pure text generation models. Once configured correctly, you can create tasks and receive responses normally.
Method 2: Auto-Bridge External Models via the CC Tool
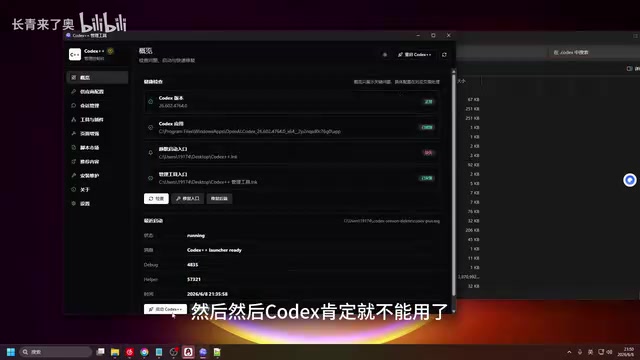
How the CC Tool Bridges Models
The second method is better suited for scenarios where you need to connect a wider range of external models. To demonstrate, start by deleting the auth and config files created in Method 1 — Codex immediately stops working without its keys, which confirms just how central these two files are.
Then use the CC Tool to re-establish the connection. The CC Tool uses the OpenAI API format as its standard interface. This REST API spec became the de facto industry standard for large model interfaces for deep historical reasons: when OpenAI released the GPT-3 API in 2020, its interface design drew on RESTful best practices, modeling conversation history as a message array with three roles (system/user/assistant) — a design that greatly simplified multi-turn conversation state management. After GPT-4's launch in 2023, this format became familiar to millions of developers through Copilot, ChatGPT, and related products, creating strong path dependency. The core endpoint /v1/chat/completions uses a JSON structure with a messages array for conversation history — semantically clear and easy to implement. DeepSeek, Mistral, Qwen, and many others have chosen to support this format, essentially leveraging network effects: OpenAI compatibility means you can reuse the existing client ecosystem without any code changes on the developer's end. Anthropic's Claude and Google's Gemini each have native API formats but both provide OpenAI compatibility layers, further cementing this standard. This is what enables the CC Tool to manage heterogeneous models through a single "select format type" workflow. Using GPT-series models as an example:
- Select the model type in the CC Tool (e.g., OpenAI format)
- Enter the corresponding API key
- Enter the request URL, making sure to append
/v1at the end (this is the explicit identifier for the OpenAI API standard, telling the server to use the v1 interface spec) - Click "Test" to verify connectivity
- Save and enable the configuration
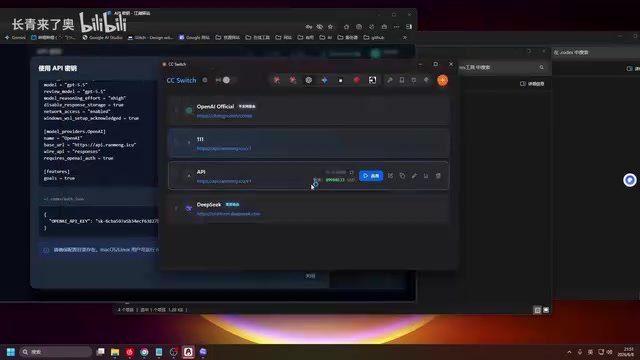
CC Tool's Key Advantage: Auto-Generating Config Files
The most noteworthy feature of the CC Tool is that once you configure and click "Use," it automatically generates both the auth and config files — no manual copy-pasting required.
At its core, Method 2 is an automated upgrade of Method 1 — the manual approach requires users to understand the configuration structure and operate it themselves, while the CC Tool encapsulates that process and significantly lowers the barrier to entry. This encapsulation approach mirrors the Infrastructure as Code philosophy: transforming a process that previously relied on manual operations into a repeatable, automated workflow that reduces human error and improves environment consistency.
After configuration, restart Codex and start a new conversation to invoke the external model.
Integration Differences Between Models
Different large models have slightly different integration processes:
- GPT series / relay models: Simply fill in the OpenAI-format key and request URL — the most straightforward approach.
- DeepSeek official model: Requires starting a local routing service first, then connecting through it. A local routing service (like Ollama or a custom conversion script) acts as a protocol adapter — it listens on a local port, re-packages incoming OpenAI-format requests into DeepSeek's required format, and performs the reverse conversion on responses. In software engineering, this is called the Adapter Pattern — one of the GoF structural design patterns, classically defined as "converting the interface of a class into another interface that clients expect." In the LLM space, the LiteLLM project maintains an adapter matrix covering 100+ models, with each adapter mapping OpenAI-format request parameters (like
max_tokens,temperature) to the target model's native parameters and reversing the response — adding a new model only requires adding one adapter module without touching any upstream business code, perfectly embodying the Open/Closed Principle. The core value is decoupling: client code doesn't need to know the specific interface differences of downstream models, with all adaptation logic centralized in the middleware layer.
Understanding this difference helps you quickly diagnose issues when switching between models.
Summary: Which Method Should You Choose?
Combining the Codex++ management tool with the CC Tool makes model integration in Codex highly flexible. Both methods revolve around the auth and config files — the difference is in how you approach them:
- Manual configuration: Direct and transparent, ideal for users who want to understand the underlying logic and control configuration details.
- CC Tool automation: Streamlined process, ideal for users focused on efficiency and rapid model switching.
From a broader perspective, the need for "unified multi-model access" continues to grow among developers. As the large model space becomes increasingly competitive, platforms like LiteLLM and OpenRouter specifically address model routing. OpenRouter aggregates APIs from dozens of model providers through a single endpoint with dynamic routing based on real-time pricing, latency, and availability; LiteLLM is more geared toward self-hosted developer scenarios, supporting 100+ models unified under the OpenAI format with enterprise features like budget controls and log tracing. These platforms deliver value across three dimensions: automatically selecting the most cost-effective model for a given task (which involves careful Token cost management — output Tokens typically cost 2–4x more than input Tokens, and flagship vs. lightweight model pricing can differ by 10–50x), providing failover when primary models are unavailable, and unified billing monitoring across models. The rise of this model routing layer signals that LLM application architecture is evolving from "single-point calls" to a "model service mesh" — similar to the rise of service discovery and load balancing infrastructure in early microservices architectures.
One final important note: when using third-party relay services, your code passes through intermediate nodes, creating potential risks of data logging or leakage. On the transport security side, TLS 1.3 (standardized by IETF in 2018) reduced handshake round trips from 2-RTT to 1-RTT compared to TLS 1.2, and mandates Forward Secrecy key exchange — meaning even if a long-term private key is compromised, historical session content cannot be decrypted. Relay services without TLS protection expose your code in plaintext on the network. On the compliance side, many industries (finance, healthcare, government) have strict rules on data transfer and third-party data processing. GDPR requires data processors to clearly disclose data usage; CCPA grants users data deletion rights. Enterprises should also pay attention to the Data Security Law's requirements on classified data protection — core code typically falls under "important data" with additional restrictions on cross-border transfer. Always check whether the service provider offers a data-not-retained commitment and whether all transmission is TLS-encrypted. For sensitive code or commercial projects, private model deployment or official enterprise-grade APIs (with data processing agreements clearly defining data ownership) are always the more reliable choice.
Key Takeaways
- Codex configuration centers on two files — auth (credentials) and config (runtime parameters) — both are essential.
- Relay services are reverse proxies enabling unified multi-model access; the OpenAI API format (
/v1/chat/completions) has become the de facto industry standard for LLM interfaces, driven by GPT-3's clean initial design and subsequent path dependency. - Manual configuration suits users who want deep control over details; the CC Tool automates config file generation, significantly lowering the barrier to entry.
- Different models have different integration requirements: non-natively compatible models like DeepSeek require a local routing service for protocol adaptation — an implementation of the Adapter Pattern in software engineering, embodying the Open/Closed Principle and decoupled design.
- Cross-model usage requires attention to Token pricing differences: output Tokens typically cost 2–4x more than input Tokens, flagship vs. lightweight model pricing can differ by 10–50x, and model routing tools enable cost-based intelligent scheduling.
- When using third-party relay services, always assess data security risks: verify TLS 1.3 encryption and data-not-retained commitments; enterprise scenarios must also comply with GDPR, Data Security Law, and similar regulations — private deployment or official enterprise APIs should be the preferred option.
Related articles

Transformer²: Achieving Co-Design of Robot Morphology and Control with a Unified Architecture
Deep dive into how Transformer² uses a unified Transformer architecture to integrate robot morphology design and motion control into one model, enabling task-driven end-to-end co-design for embodied AI.

Tutorial: Installing Tailscale on a Jailbroken Kindle to Create a Private Network Node
Learn how to deploy Tailscale on a jailbroken Kindle, turning an idle e-reader into a private network node. Covers cross-compilation, power optimization, and risk considerations.
Tutorial: Installing Tailscale on a Jailbroken Kindle to Create a Private Network Node
Learn how to deploy Tailscale on a jailbroken Kindle to turn an idle e-reader into a private network node. Covers cross-compilation, power optimization, and risk considerations.