Complete Guide to Dify Local Deployment: Build a Private AI Workflow Platform from Scratch

A complete guide to deploying Dify locally with Docker for a private, self-hosted AI workflow platform.
This guide walks through every step of deploying Dify — an open-source LLMOps platform — on your local machine using Docker and Docker Compose. It covers hardware requirements, Docker installation across Windows, macOS, and Linux, configuring the .env file, launching containers, and completing the initial setup. It also explains how to pair Dify with Ollama for a fully private local AI development environment.
Why Choose Dify for LLM Application Development
In the wave of large model application development, Dify has become one of the most widely adopted tools among enterprises and developers. Dify is an open-source LLMOps (Large Language Model Operations) platform that emerged in 2023. LLMOps is an extension of MLOps (Machine Learning Operations) into the era of large models — MLOps originated around 2019 with the goal of bringing DevOps engineering practices into the machine learning lifecycle, solving the "last mile" problem of moving models from the lab to production. LLMOps adapts this foundation to address the unique challenges of large language models: while traditional MLOps focuses on supervised learning pipelines over structured data, LLMOps must handle unstructured text, ultra-long context windows, and prompt engineering. Its evaluation dimensions have also evolved from quantifiable metrics like accuracy and AUC to newer methodologies like LLM-as-a-Judge that better approximate human judgment. LLMOps focuses on the full lifecycle management of large language models — from development and testing to production deployment — covering prompt version control, model evaluation, dataset management, and monitoring and alerting.
Dify's core architecture is built on a RAG (Retrieval-Augmented Generation) pipeline and an Agent orchestration engine. RAG was formally introduced by Meta AI in a 2020 paper and is now one of the most mainstream technical approaches for enterprise LLM deployment. Its engineering implementation is typically divided into two phases — offline indexing and online retrieval: in the offline phase, documents are split into fixed-size chunks (usually 512–1024 tokens), and each chunk is converted into a vector via an embedding model and stored in a vector database; in the online phase, user queries are similarly vectorized, the top-K semantically similar chunks are retrieved from the database, and these are concatenated into a prompt sent to the model. This mechanism retrieves relevant document fragments from an external knowledge base before the model generates a response, injecting them as context into the prompt — effectively compensating for the model's knowledge cutoff and significantly reducing the risk of hallucinations. RAG performance is influenced by multiple factors including chunking strategy, embedding model quality, retrieval recall rate, and reranking algorithms. This is precisely the core value of Dify's visual orchestration interface — allowing developers to tune these parameters without writing complex retrieval pipeline code.
Dify supports integration with dozens of model providers including OpenAI, Anthropic, and local Ollama instances, and provides a visual prompt orchestration interface. It belongs to the same category of low-code/no-code AI application development platforms as Coze, but holds a unique advantage in enterprise scenarios thanks to its open-source nature and local deployment capability.
Dify's most fundamental value proposition is: building AI applications rapidly, without writing code. With it, you can set up chatbots, create intelligent agents, integrate with business systems, or orchestrate complex workflows. For teams looking to quickly validate AI ideas or roll out large model applications internally, Dify dramatically lowers the technical barrier.
Three Ways to Use Dify: Why Local Deployment Is Recommended
Dify offers multiple usage options. The most direct is visiting the official website and clicking "Get Started" to enter the online workspace. However, the online approach has two notable drawbacks:
First, network access speed is limited — especially for users in China, the online interface can be sluggish to load and respond. Second, all models invoked online are cloud-based services, which significantly impacts development and debugging efficiency while also raising concerns about data privacy and cost.
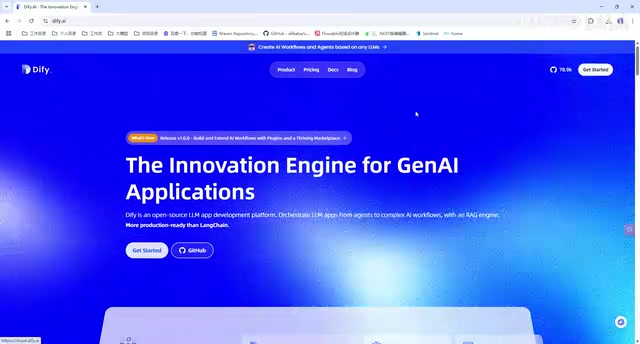
For serious development work, local deployment of Dify is the better choice. Local deployment not only removes network constraints but also enables integration with locally running large models, creating a complete private AI development environment. Below is a detailed walkthrough of the full Dify local deployment process.
Prerequisites for Local Deployment
Dify's local deployment is Docker-based. Docker is not a full virtual machine — it uses Linux kernel features including namespaces (resource isolation) and cgroups (resource limits) to achieve process-level isolation. Namespaces isolate a process's view into independent file systems, network stacks, and PID spaces, while cgroups provide fine-grained quotas for CPU, memory, and disk I/O. This allows containers to start in seconds with memory overhead an order of magnitude lower than VMs. Images use a layered union file system (OverlayFS), enabling multiple containers to share the same base layers and saving significant storage space — truly achieving "build once, run anywhere."
Dify itself depends on multiple components: Nginx (reverse proxy), PostgreSQL (relational database), Redis (cache queue), Weaviate (vector database), and more. Weaviate handles the core responsibility of semantic retrieval — as a database optimized for high-dimensional vector storage and Approximate Nearest Neighbor (ANN) search, it uses the HNSW (Hierarchical Navigable Small World) graph algorithm to build indexes, reducing search complexity from linear O(n) to logarithmic O(log n), enabling millisecond-level approximate retrieval across millions of vectors. Unlike traditional relational databases that match on exact values, it converts text into high-dimensional vectors and measures semantic similarity by computing cosine similarity between vectors (range [-1, 1], closer to 1 means more semantically similar) — making it a critical piece of infrastructure for recalling relevant documents in the RAG pipeline. Docker's containerization is precisely what makes this complex dependency stack straightforward to deploy locally.
Before getting started, the following hardware and software requirements must be met:
Hardware Requirements
- CPU: at least 2 cores
- RAM: at least 4 GB
Software Environment
The core dependencies for local deployment are Docker and Docker Compose. Docker Compose is an orchestration tool for defining and managing multi-container applications — it uses a YAML file to declaratively describe the dependency relationships, networking, and storage mount configurations between services. Dify packages Nginx, PostgreSQL, Redis, Weaviate, and other services as individual containers, which communicate with each other using Docker's internal DNS via service names. The Docker Compose YAML file defines this complete topology, and a single command starts the entire multi-service stack in the correct order. The launch command itself is straightforward — essentially just docker compose up -d — but it requires a complete Docker Compose environment to be in place on the host machine.
Therefore, the first step in deployment is installing Docker, and the second is installing Docker Compose. Both are required.
Installing Docker and Docker Compose on Linux
Whether you're using Ubuntu or CentOS, the installation process is essentially the same.
Installing Docker
On Linux, you can use the official script for a one-command Docker installation, which includes the Docker engine and mirror source configuration. Simply run the install command. If the script downloads slowly due to network conditions, you can download it locally first and then execute it.

Installing Docker Compose
Once Docker is installed, proceed to install Docker Compose. After installation, verify it with:
docker compose version
If a version number is displayed correctly, the installation was successful. If image pulls are slow later on, it's recommended to configure a domestic mirror proxy to speed up downloads.
Windows and macOS Users: Using Docker Desktop
For Windows users, the most convenient option is to install Docker Desktop. Docker Desktop bundles Docker Engine, Docker Compose, and a graphical management interface into a single package, running Linux containers on Windows via WSL 2 (Windows Subsystem for Linux 2).
WSL 2 was released in 2019 with Windows 10 version 2004, and its architecture represents a fundamental shift from WSL 1. WSL 1 achieved compatibility by translating Linux system calls into Windows NT kernel calls — this translation layer introduced noticeable performance bottlenecks for complex file system operations. WSL 2 switched to a Hyper-V hosted virtual machine approach, running Microsoft's customized msft-kernel based on the upstream Linux kernel, achieving 100% system call compatibility. It also uses dynamic memory allocation to automatically release idle memory back to Windows, allowing Docker containers to run at near-native performance, with the entire virtualization process completely transparent to the user. The macOS version achieves the same effect via the Apple Hypervisor.
The steps are simple: visit the Docker Desktop website, download the appropriate installer (.exe), and install it directly. macOS users can follow the same approach. If Docker Compose is already installed on your machine, you can skip this step.

After installation, open Docker Desktop to see its main interface. You may not have noticed that Docker Desktop includes a built-in terminal — you can run commands there or in your system's command-line tool; both are fully equivalent.
Complete Steps to Launch the Dify Service
With the environment ready, you can now officially start Dify. Pay special attention to the following key details.
Step 1: Navigate to the Correct Directory
After pulling the Dify source code from GitHub and extracting it, you must navigate into the docker subdirectory before running the launch command. This directory contains the configuration files (docker-compose.yaml) required by Docker Compose — the command will only work correctly when run from this directory.
Step 2: Handle the Environment Variable File
Inside the docker directory, there is a .env.example file. You need to manually rename it to .env (removing the .example suffix). This design follows the "Twelve-Factor App" methodology — a set of cloud-native application best practices proposed by Heroku engineer Adam Wiggins in 2011. Its third factor, "Config," explicitly requires storing all configuration items that differ between deployment environments in environment variables rather than hardcoding them into source code. The .env.example file acts like an API contract: it declares all configuration items required for the service to run (including PostgreSQL connection strings, Redis passwords, Secret Keys, etc.) without exposing any real credential values. Users create an actual .env file locally and fill in real credentials — this file is typically added to .gitignore to prevent accidental commits to version control, effectively preventing credential leaks. This is a detail that beginners often overlook, and missing this step will cause the startup to fail.
Step 3: Run the Launch Command
With the above preparations complete, run:
docker compose up -d
The -d flag runs the containers in daemon mode (background). A daemon is a process in the operating system that runs continuously in the background without being attached to any terminal session — using this mode means the service continues running even after you close the terminal window, making it suitable for long-running services. Docker will then start the various components that Dify depends on in sequence.
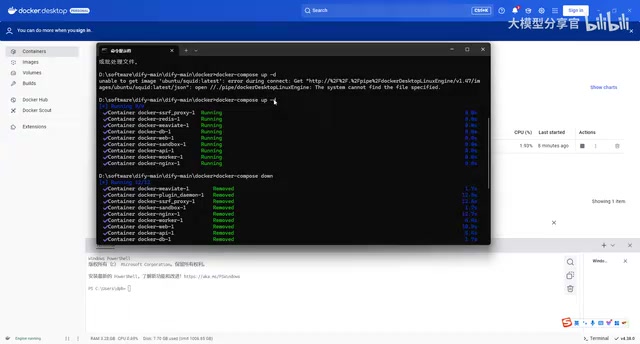
The first run may be slow, as the relevant images need to be pulled from the network — just be patient. If you've configured a domestic mirror proxy, the speed will be noticeably faster.
First Access and Initial Configuration
Dify listens on port 80 by default. Once the service is running, open your browser and go to:
http://localhost/install
Initialization Flow
- Switch language: On first entry, you can switch the interface to your preferred language;
- Set up admin account: The system will guide you to enter an admin email, username, and password;
- Log in: After setup, you'll be taken to the login page — enter the credentials you just created to log in.
Once logged in, you'll have officially entered the Dify workspace, and local deployment is complete.
Next Step: Connecting a Local Large Model
Dify itself is an orchestration framework for AI applications. To actually build usable AI applications, you'll also need to connect an inference model or embedding model to handle real tasks.
Since you've already deployed Dify locally, from a data privacy and development efficiency standpoint, the ideal approach is to also deploy large models locally, forming a complete private, closed-loop AI setup with Dify. Ollama is currently one of the most popular tools for running local large models — its core is a CLI wrapper around the llama.cpp inference backend, with automatic model quantization (GGUF format) and GPU acceleration (CUDA/Metal) support. It supports mainstream open-source models like Llama 3, Qwen2, Mistral, and Gemma, and a simple CLI command is all it takes to download a model and start an inference service.
Worth noting: starting from version v0.1.14, Ollama fully implements a REST interface compatible with the OpenAI Chat Completions API format (running by default at localhost:11434), including streaming output (Server-Sent Events) and Function Calling support. The reason OpenAI's API format has become the industry standard is that its message role abstraction (system/user/assistant) is general enough to accommodate both synchronous and asynchronous, single-turn and multi-turn conversation scenarios. This means any framework compatible with this standard — including Dify — can complete integration simply by replacing the API endpoint with the local address in model provider settings, with no additional adaptation required. This dramatically reduces migration costs for private deployments and mitigates the risk of vendor lock-in. Combining Ollama with Dify is the recommended path for building a complete local AI workflow.
Summary
The overall process of deploying Dify locally is not complicated. The core steps can be summarized as: Prepare Docker environment → Pull source code → Configure the .env file → Start containers → Initialize in browser. Compared to the online version, local deployment offers clear advantages in access speed, data privacy, and development efficiency. Once you've mastered this foundational process, you'll have a fully controlled private AI application development platform — laying a solid foundation for integrating local large models, building agents, and orchestrating complex workflows.
Related articles

FlexBudget: Fair Comparison of KV Cache Eviction Strategies Under a Unified Compute Budget
AMD engineer proposes FlexBudget at PyTorch Conference: a training-free fair comparison method for KV cache eviction rules using fixed kernels and memory budgets, all in core PyTorch.

Anthropic's $2 Trillion Valuation Deconstructed: Why the AI IPO Wave Keeps Faltering

Anthropic IPO Countdown: The Compute Cost Ledger Behind a $2 Trillion Valuation
Anthropic's IPO targets up to $2 trillion — double its Series H valuation. We break down the timeline, compute cost logic, and the key question investor day must answer.