Complete Tutorial: Publishing a Web App with Google AI Studio

Publish any AI Studio app as a shareable web link in just a few clicks — no server setup required.
This article explains how to publish a finished AI app as a Web App directly from Google AI Studio — no server configuration or deployment tools needed. Just open the three-dot menu, go to Settings, find the Publish option, customize your URL, and click Publish App. The resulting link is instantly shareable, data persists across sessions, and anyone can use the app without installing anything. Note: this covers Web App publishing only; Android packaging is a separate process.
Publish a Web App with Google AI Studio in One Click
Google AI Studio isn't just for rapidly prototyping applications — it also lets you publish those apps directly as web-accessible versions. This means you can turn anything you've built in AI Studio into a shareable web link without configuring a server, registering a domain, or setting up a deployment pipeline.
This article walks through the complete process of taking a finished app and publishing it as a Web App. Note that this tutorial specifically covers publishing a Web App — not packaging it as an Android app, which is a different process entirely.

Google AI Studio is Google's generative AI development platform for developers, built on the Gemini family of large language models. It offers a visual prompt editing interface, multimodal input support (text, images, audio, video, and more), plus code generation and debugging capabilities — allowing developers to quickly prototype AI-powered applications without deep ML expertise. The platform provides a free tier of API usage, lowering the barrier for individual developers and small teams to experiment. Compared to traditional cloud function or container-based deployment approaches, AI Studio's built-in publishing feature abstracts away backend hosting, HTTPS certificates, access control, and other infrastructure concerns entirely, letting you focus purely on your application logic.
Accessing the Publish Settings
Once your app is ready in Google AI Studio, the publishing process is surprisingly straightforward. Look for the three-dot menu icon in the top-right corner of the app interface, click it, and navigate to Settings.
Inside the settings menu, you'll find a Publish option. Clicking into it reveals the current app's details, including its default URL. This entry point is the beginning of the entire publishing flow — and also the step most easily overlooked. Many people assume they need separate deployment tooling, when in fact the publish feature is built right into the app's settings.
Customizing Your App URL
Once you're on the publish page, an important personalization step is customizing your app's URL. The system assigns a default address automatically, but you can change it to something shorter and more memorable.
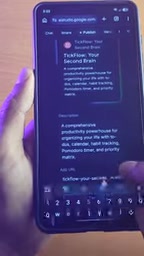
In the example shown, the author sets the URL to a short, easy-to-remember name — making it convenient both for personal use and for sharing with others. Keep in mind that you're only customizing one segment of the URL; the platform's domain suffix (such as a .studio-related ending) is fixed and cannot be removed. Choosing a clean, easy-to-type URL will meaningfully improve the experience of sharing and accessing the app later.
Clicking Publish to Go Live
Once you've confirmed your URL, click the Publish App button to kick off the publishing process. You'll need to wait a moment while the system builds and deploys your app in the background.
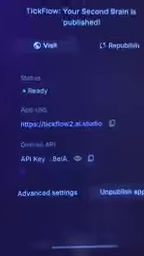
When publishing is complete, you'll receive a Direct URL — the custom address you just set. A Visit option will appear on the page; click it to open your app directly. At that point, your app will be accessible as a web page, fully functional in any browser.
Using and Sharing Your Web App
After publishing, the app opens as a web version that looks and behaves exactly as it did inside AI Studio.

The Web App is fully functional — data you save within it is persisted and won't be lost when you refresh or close the page. To share it with friends or anyone else, simply copy the direct URL from the publish page and send it. Recipients don't need to install anything; they can open and use the app just by clicking the link.
The "persistent data" here relies on the platform's session state management, not a database you control. Specifically, Web Apps hosted by AI Studio maintain conversation context and application state on the server side, so a returning user who visits the same link will still see their history. However, this storage is tied to individual users or devices — different visitors opening the same link each get their own independent session, with no data shared between them. If your use case requires cross-user data sharing or syncing to an external system, you'll need additional integrations such as Google Sheets, Firebase, or another backend service. The platform's built-in publish feature alone cannot support those scenarios.
Summary
Google AI Studio's publish feature compresses the distance between "building" and "going live" down to just a few clicks. The entire workflow can be summarized as:
- Once your app is built, click the three-dot menu in the top-right and go to Settings
- Under the Publish option, customize your app's URL
- Click Publish App and wait for the process to complete
- Access, use, and share your app via the generated direct link
For anyone looking to quickly validate an idea, share a prototype, or create a lightweight web tool, this workflow eliminates the bulk of the complexity involved in traditional deployments — and stands out as one of AI Studio's most practical features as a rapid development platform. If you need an Android app instead, that requires a separate packaging process not covered here.
Related articles

Felix Rieseberg Personal Homepage
Felix Rieseberg's personal homepage sparks attention on Hacker News. This article covers the Slack engineer's technical background, the rise and fall of nativefier, and the value of a developer homepage as a tech calling card.

@ai-sdk/vue 3.0.306 Patch Release Syncs with [email protected] Update
@ai-sdk/vue 3.0.306 released, synced with [email protected]. A routine patch release for the Vercel AI SDK ecosystem with no public API changes; the Vue adapter layer stays version-aligned with the core package.

Gemini 4 Argon API Launches: The Era of Million-Token Output Begins
Google launches Gemini 4 Argon with sparse MoE architecture, up to 1M output tokens, and a 68.90% Vals Index score, available across API, AI Studio, and the Gemini app.