Connecting an Open-Source AI Assistant to OpenClaw: A Complete Local Agent Setup Guide

A complete guide to setting up a local AI execution agent by connecting an open-source assistant to OpenClaw.
This tutorial walks through the full process of integrating an open-source AI assistant with OpenClaw to build a privacy-focused, locally-run AI agent. It covers installing OpenClaw via Robust AI, configuring the gateway address and API Key, and includes a live demo where the agent autonomously checks system resources — showcasing its self-correction capabilities.
Introduction: A New Way to Run Local AI Agents
As AI agent technology continues to evolve, AI assistants capable of "actively executing tasks" are rapidly becoming a hot topic in tech circles. Unlike traditional chatbots, the next generation of execution-oriented agents are no longer limited to conversation — they can actually operate your computer, files, and applications.
AI Agent Technology Background: An AI agent is an AI system that can perceive its environment, make autonomous decisions, and take actions to accomplish goals. Unlike pure question-answering models, agents typically possess three core capabilities: Tool Use, Planning, and Memory. Popular agent frameworks like LangChain, AutoGen, and CrewAI are all built around the "perceive-decide-execute" loop. The rise of execution-oriented agents is largely driven by large language models' (LLMs) native support for Function Calling, which allows models to manipulate external tools and systems much like calling an API.
This article uses the integration of an open-source AI assistant with OpenClaw as a practical example, walking through how to build a local AI agent system with persistent memory and autonomous task execution. The entire workflow is based on open-source tools, making it accessible even for everyday users.
What Is OpenClaw?
OpenClaw uses a lobster as its iconic logo — a deliberate departure from the "barrel" imagery common among traditional chatbots. This visual design hints at its positioning: not passively waiting, but actively taking action.
From "Conversation" to "Execution"
OpenClaw's defining characteristic is that it's an active execution-oriented assistant. Once users grant the appropriate permissions, a simple natural language command is all it takes for OpenClaw to autonomously complete a series of complex cross-application tasks, including:
- File management: Automatically categorize, rename, and move local files
- Email handling: Read and send emails
- Browser control: Simulate web browsing and information scraping
- System info queries: Read memory, disk, and other device statuses
More importantly, OpenClaw supports running on your local device and features persistent memory.
Persistent Memory Mechanism: Traditional LLMs are constrained by a "context window" — once a conversation ends, the memory is wiped and nothing carries over between sessions. Persistent Memory overcomes this limitation by storing key information in external databases (such as vector databases like Chroma or Pinecone, or structured databases like SQLite). When a new conversation begins, the system retrieves relevant historical memory fragments and injects them into the prompt context, enabling a coherent experience where the assistant "remembers who you are and what you discussed last time." This technology is a core competitive advantage of personalized AI assistants over generic chatbots.
This means OpenClaw can both protect private data and remember user preferences and historical context, making every interaction more coherent and natural.
Step 1: Install OpenClaw
This tutorial uses Robust AI for a one-click OpenClaw installation. If you've already installed the OpenClaw component on your device, you can skip this step.
Download and Installation
- Visit the Robust AI official website
- Click "Download for Windows"
- Run the installer after downloading
- Open the Robust AI application
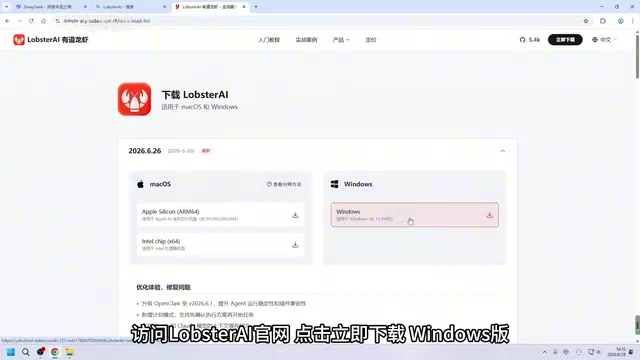
Robust AI comes with the OpenClaw component built in — no separate deployment needed — which significantly lowers the configuration barrier.
Configure the Model
After installation, click "Settings" in the bottom-left corner of the application, then navigate to "Specify Model" in the left sidebar to configure the large model you want to connect to.
The tutorial recommends adding the Claude 4 Code model (accessed via Modao Cloud). Each model reportedly offers around 100 free calls per day, which is generally sufficient for personal learning and light use. Once configured, click "Save" in the bottom-right corner.
Step 2: Connect the Open-Source AI Assistant to OpenClaw
This is the core step of the entire workflow. Before proceeding, confirm that your open-source AI assistant version already supports OpenClaw.
Check Runtime Mode Support
After opening the AI assistant, first check whether the "Runtime Mode" switcher on the left side shows an OpenClaw option. If it doesn't appear, update to the latest version before proceeding.
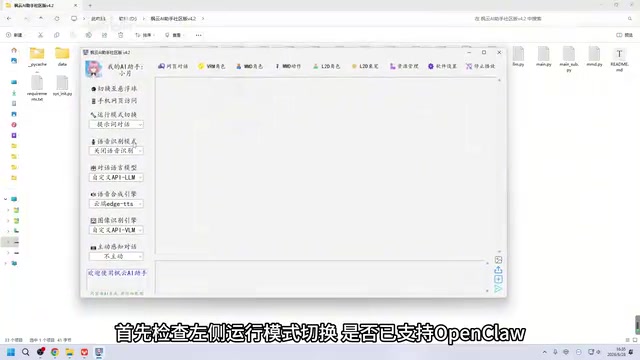
Configure the Gateway Address
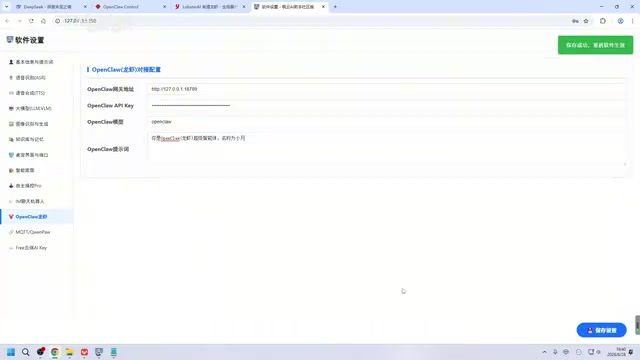
Once support is confirmed, click "Software Settings" in the top-right corner, find "OpenClaw" in the left sidebar, and fill in the following:
- Lobster Gateway Address:
127.0.0.1 - Port:
18789
Local Execution and Privacy Protection: The loopback address 127.0.0.1 (localhost) is a reserved address in the TCP/IP protocol used exclusively for internal communication within the local machine. Data packets never pass through any network interface, physically eliminating the possibility of data leakage. This stands in stark contrast to cloud-based AI services, where every conversation must be uploaded to remote servers for processing. Locally deployed AI agents have a significant advantage in privacy-sensitive domains like healthcare, law, and finance — and this is one of the core drivers behind the rapid popularity of local model runners like Ollama and LM Studio.
The use of the local loopback address (127.0.0.1) reinforces OpenClaw's philosophy of local execution — all data flows remain on the local machine, ensuring better privacy.
Step 3: Obtain and Enter the API Key
After completing the gateway configuration, you'll need to obtain OpenClaw's API Key to complete authentication.
API Keys and Token-Based Authentication: An API Key is a string token used for authentication and access control — essentially a "pass" issued by the server to the client. Even in local service scenarios where the service runs on the same machine, introducing a token mechanism remains important: it prevents other processes on the machine from making unauthorized calls to the local AI service. This is an engineering practice of the Principle of Least Privilege. The Gateway Token is typically generated randomly when the service first starts and written to a local file. Each client request must include this token in the HTTP header, ensuring that only authorized frontend applications can invoke the backend agent capabilities.
Locating the Token File
For OpenClaw installed via Robust AI, the token file is located at:
C:\Users\YourUsername\AppData\Roaming\Robust AI\OpenClaw\State
Navigate to the State folder, open the Gateway Token file with Notepad, and copy the string inside.
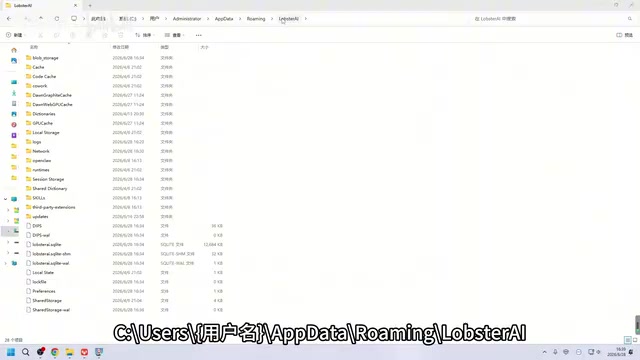
Enter the Token and Save
Paste the copied string into:
- The "Gateway Token" field on the OpenClaw connection screen, then click "Connect"
- The "OpenClaw API Key" field in the software settings
The OpenClaw model can generally be left at its default. If you need to use a different agent, check the supported list under "Agents" in the OpenClaw control panel and modify as needed. The system prompt also supports customization based on your requirements.
After making changes, click "Save Settings" in the bottom-right corner, then restart the AI assistant for the configuration to take effect.
Live Test: Checking Computer Resources with AI
After completing the setup, the tutorial ran a live test. Upon receiving the command, the agent introduced itself as "Xiao Yue, a versatile general-purpose software designer powered by OpenClaw," and accepted the task of checking the computer's memory and disk usage.
From Failure to Self-Correction
The execution process was quite instructive:
- The first attempt failed due to an "encoding issue"
- The agent proactively "tried a different approach" and successfully retrieved disk data
- It encountered another issue when fetching memory info — "variable being consumed by the Shell"
- It ultimately succeeded by switching to a "script file approach"
The Self-Correction Mechanism of Execution Agents: This "fail-correct-retry" process is known in the agent field as the ReAct (Reasoning + Acting) pattern or Reflection Loop. The mechanism works as follows: after the agent executes a tool call, it feeds the result (including error messages) back into the model. The LLM analyzes the cause of failure and generates a corrective strategy, then initiates another action. This mechanism mimics the trial-and-error thinking humans use when solving problems, allowing agents to handle edge cases that couldn't be anticipated in advance. Encoding issues and Shell variable parsing errors are common challenges LLMs face when dealing with low-level OS behaviors, and the strategy switch to "using a script file" demonstrates the practical value of agents in multi-path planning.
This sequence of trial, error, and self-correction highlights the fundamental difference between execution-oriented agents and traditional chatbots — they don't just offer suggestions; they actually get to work, and continuously adjust their strategy based on feedback until the task is complete.
Summary and Takeaways
Through this tutorial, we've walked through the complete workflow: installing OpenClaw, configuring the model, connecting the gateway, and validating with a live test. The entire solution is built on open-source tools, and its local execution design protects privacy while lowering the barrier to entry for everyday users.
For developers and enthusiasts looking to explore local AI agents, OpenClaw provides a relatively friendly entry point. Of course, granting AI direct control over your computer also means you need to carefully manage authorization boundaries — enjoy the automation benefits while keeping permissions within a controllable scope.
As execution-oriented agents continue to mature, we may be witnessing a pivotal moment in AI's transition from "assistant" to "agent."
Key Takeaways
Related articles

Disaster and Glory of the Apollo Program: The History We Must Revisit Before Returning to the Moon
From the fatal Apollo 1 fire to Apollo 8's daring lunar orbit to Apollo 11's successful landing—revisiting the disasters, fears, and compromises of the Apollo program and their lessons for today's return to the Moon.
Netflix Trust Exercise Turns Into Firing Trap: Where Are the Boundaries of Corporate Trust?
A Netflix employee was fired after sharing private info in a trust exercise. We analyze the risks of corporate trust exercises and how employees can protect themselves.

AMD CDNA5 Architecture Deep Dive: Technical Evolution and the AI Computing Competition Landscape
Deep analysis of AMD's CDNA5 architecture covering Chiplet packaging upgrades, HBM memory evolution, and low-precision compute optimization, examining how AMD challenges NVIDIA's AI chip dominance.