Cursor 3.0 Complete Beginner's Guide: Build Your First AI Project from Scratch
A complete beginner's guide to Cursor 3.0's agent-first IDE, from project setup to cloud deployment.
This hands-on tutorial introduces Cursor 3.0 to complete beginners, covering its core concept of an agent-first development environment built on VSCode. Unlike CLI tools such as Claude Code or Codex, Cursor preserves the full engineering toolchain for greater control. Key 3.0 features include dual Agent/IDE views, cloud parallel sub-agents, worktree sandboxing, multi-model cross-review, MCP server integration, and event-driven automation. The guide walks through project startup, model selection, Git habits, Design Mode, the built-in browser, and advanced features like Rules, Skills, and Side Chats.
Cursor has evolved far beyond a code editor with AI bolted on — it's rapidly becoming an agent-first development environment. This tutorial is based on a full hands-on walkthrough, aimed at complete beginners. It systematically covers Cursor 3.0's core features, interface logic, and the end-to-end workflow from project setup to cloud deployment. Even if you've never written a line of code, you can follow along.
What Is Cursor, and How Does It Differ from Claude Code and Codex?
Cursor is essentially a fork of Visual Studio Code, so anyone familiar with VSCode will find the interface immediately familiar. It layers deep AI capabilities on top of the IDE, letting you read, edit, and add tooling to your code while fully leveraging the AI features you'd normally only get in command-line tools.
The biggest difference from command-line tools like Claude Code and Codex comes down to control. With CLI tools, you're often not actually reading files or reviewing code — you're just blindly trusting the model's output. Cursor supports that "vibe coding" style too, but it also preserves the full developer toolchain that serious engineers need when shipping production apps. That's why engineers who care about quality tend to prefer Cursor — it gives you far more control.
Downloading Cursor is completely free. It's available as a desktop app for Windows, Mac, and Linux, and now also supports mobile and web. For most people, start with the desktop app — just register or log in and you're good to go.
Pricing: Free to Start, Pay Per Model Usage
The pricing model is similar to other AI tools — you get a usage quota that varies by model. The key distinction: using Cursor's own models (like Grok and Composer) gives you more quota, while frontier models like Fable or GPT-5.6 burn through it faster.
Beginners should start with the free tier and upgrade to Pro, Pro Plus, Ultra, or a Team/Enterprise plan as needed. If you run out of quota, you can always purchase additional usage on demand.
The Three Waves of Change in Cursor 3.0
From 1.0 to 2.0 to 3.0, Cursor has gone through three distinct rounds of evolution:
Wave 1: Added Skills, sub-agents, a large number of plugins, and introduced specialized modes like Debug Mode and Design Mode, along with a side chat feature.
Wave 2: Shifted to an agent-first interface, fundamentally changing how Cursor looks. The default view is no longer a traditional IDE — instead, it shows a set of agents you can run in parallel. The core idea is running multiple agents concurrently in the cloud.
Wave 3: Introduced the Composer 2.5 model, automated BugBot, cloud-based sub-agents, an iOS app, and the Grok 2.5 model trained in collaboration with SpaceX. According to the presenter, Grok 2.5 performs impressively on benchmarks and costs far less per token than comparable models like Fable or GPT-5.5.
Two Core Views: Agent View and IDE View
When you open Cursor 3.0, it defaults to Agent View — an interface that resembles a ChatGPT prompt window, designed with non-technical users in mind. You just type a prompt, get output, and can view code and multiple running agents side by side. There's an "IDE" button in the top-right corner that switches you to the more traditional IDE View, where code takes center stage and the agent panel moves to the right sidebar.
You can switch between the two views at any time or use both simultaneously. For beginners, the recommended approach is to stay in Agent View to get your project scaffolded, then switch to IDE View for fine-grained edits.
Your First Project: From Creating a Folder to Writing a Good Prompt
The standard flow for starting a new project:
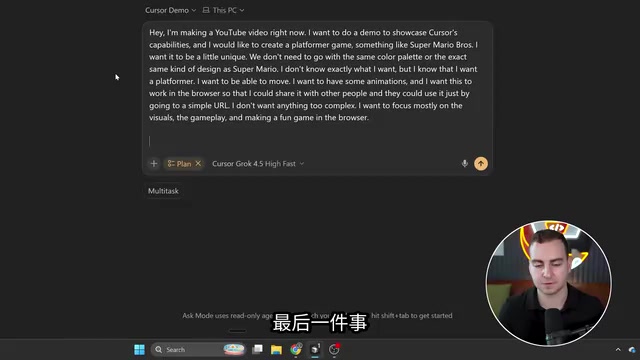
- Scroll to the bottom and click "New Folder," create a working directory on your Desktop (e.g., Cursor Demo), and select it;
- Choose your model — beginners should start with Cursor's own Grok;
- Switch the mode to Plan Mode.
When writing your first prompt, the presenter shared a highly practical methodology: dump everything you're thinking about what you want to build into the prompt, and answer three key questions — what you want to build, why you want to build it, and who your target users are. Answer those clearly and you've already got a solid starting point.
Always end your prompt with: "Please ask me any clarifying questions or design decisions you need answered before proceeding." Cursor 3.0 supports asking questions directly in the interface and can even surface clickable buttons for you to answer — this dramatically reduces back-and-forth rework.
Plan Mode, Parallel Builds, and Multitasking
In Plan Mode, Cursor first generates a detailed plan written in Markdown (now with native icon rendering in Cursor). Once you've reviewed and approved it, click Build. You can choose between local and cloud builds — beginners should start with local.
Parallel Build mode automatically spins up multiple sub-agents to handle the plan concurrently, which is theoretically faster. There's no reason not to enable it. Once launched, the interface enters a multitasking mode — you can even open another project, spin up a new agent, and run multiple tasks simultaneously. Back in the default mode, you can also queue tasks to run sequentially.
Model Selection Strategy
The presenter's real-world recommendations are refreshingly clear:
- Simple web tasks: Use Composer 2.5 — lightweight and quota-efficient;
- Moderately complex tasks: Use Grok 2.5 — slightly more expensive than Composer, but still very affordable compared to Fable or GPT-5.6;
- When you hit a wall: If Composer keeps iterating without fixing a bug, switch to Fable 4 or GPT-5.6 for a "fresh perspective."
There's also Max Mode (expands the context window — only enable for large codebases, as it consumes more quota), Auto Mode (a safe fallback when you're not sure what to use), and adjustable reasoning effort and fast mode settings. For most situations, keeping reasoning at medium and the context window small is perfectly fine.
Debug Mode, Design Mode, and the Built-in Browser
Cursor ships with several specialized modes:
- Debug Mode: Specifically for locating and fixing a particular bug — not for building new features;
- Ask Mode: For asking questions only, without modifying code;
- Design Mode: Lets you select elements directly on screen inside the built-in browser, draw boxes and arrows, then describe the changes you want. For example, you can circle a glowing orb in a game and ask for it to be turned purple — when you submit, a screenshot is automatically attached.
The built-in browser means you never have to leave Cursor to test your app. Cursor can even control the browser itself — clicking buttons and checking the console. In Design Mode, hold Shift and drag to draw a rectangular selection area for inline conversation; press Esc to exit.
Git Version Control Is a Must-Have Habit
To see live diffs in the "Changes" and "Files" panels, you first need to initialize a Git repository. Git is the version control system developers use to track every change — enabling it is strongly recommended. If you don't know Git, just ask the agent: "Can you help me enable Git and create a repository?" It can even install Git for you from the command line.
The tutorial hammers home one best practice: make small, incremental changes, test them, then immediately ask the model to make a Commit. A Commit is a checkpoint for your codebase — if something breaks later, you can roll back. Once changes are applied without a timely commit, undoing them one by one becomes a real headache.

Sub-agents, Worktrees, and Multi-Model Review
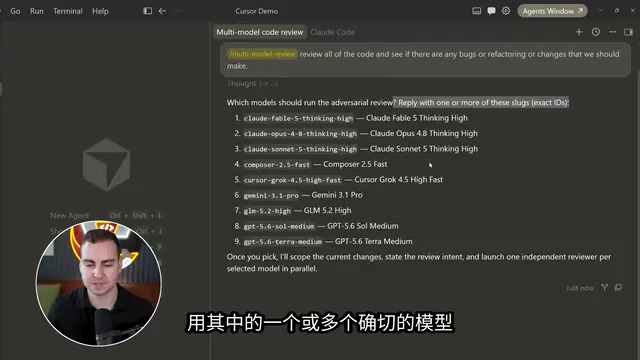
In Agent View, typing / brings up a command and skills menu. Multi-model Review is particularly useful — it calls on multiple different models and agents to cross-review your code, making it ideal to run after a large change.
These agents run inside worktrees — essentially cloned copies of your project. Agents make changes and run commands inside the copy without touching your original code. Only once you're satisfied does the result get merged back into the main codebase. This makes true parallel execution by multiple agents safe, with clean merging at the end.
A word on context management: the small circle in the interface shows how much context is consumed by the system prompt, tool definitions, rules, skills, and conversation history. Once you're approaching 70–90%, it's best to compress the context (auto-summarize) or start a new conversation thread — otherwise model accuracy and performance will degrade.
What is a worktree? A worktree is a native Git feature that allows a single repository to exist as multiple working directories on disk simultaneously, each checked out to a different branch or commit state. Cursor leverages this mechanism so each agent operates on an isolated filesystem copy without interfering with others. Unlike traditional multi-branch development, worktrees don't require switching branches — multiple copies of the code can truly coexist in separate directories and run concurrently. When merging, Cursor presents the agent's changes as a diff for the developer to review; only upon confirmation are they written back to the main codebase. For users unfamiliar with Git, think of a worktree as a "sandbox" — agents can do whatever they want inside the sandbox, and your main code is always safe.
Cloud Execution: From Local to Any Device
By default, all tasks run on your local machine — close your laptop or lose power and the task dies. Cursor's cloud offering solves exactly this problem by pushing tasks to remote compute, and the iOS app lets you trigger and manage them from any device.
The setup involves a few steps:
- Connect your project to a remote Git repository (like GitHub) — the easiest way is to just let the agent do it for you;
- Authorize GitHub / GitLab on the Cursor.com dashboard;
- Link your repository and create a cloud environment;
- After that, use the
/InCloudcommand to push tasks to cloud execution.
Why connect to GitHub? Connecting to a remote Git repository like GitHub is a prerequisite for cloud execution — and a fundamental part of modern collaborative software development. A remote repository acts as a "central store" for your code, accessible by both your local machine and cloud compute nodes. Both can pull the latest code from the same repository and push changes back, keeping everything in sync. For users who have never touched Git or GitHub: think of GitHub as cloud storage for code versions. Each Commit is a save point, Push uploads that save point to the cloud, and a cloud agent starts by pulling the latest save point before beginning work. Cursor lets the agent handle all the command-line operations for initializing the repo and setting up the remote — dramatically lowering the barrier to entry.
Fine-Grained Editing in IDE View
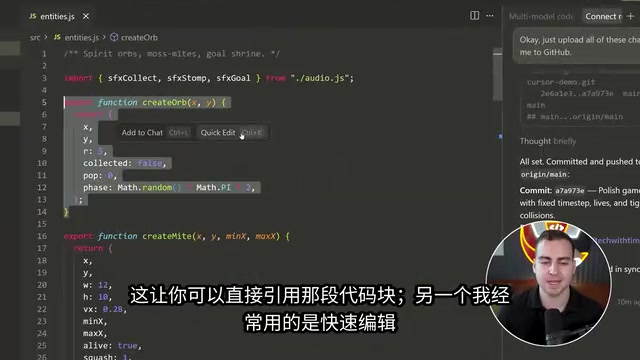
As your project grows and you need more precise, incremental changes, IDE View becomes your best friend. Select a block of code and you can "Add to Chat" to reference it directly, or use Ctrl-K for quick inline editing — just select a snippet and give it a command. Undoing changes is also easier in IDE View — each file has accept/reject options, and you can revert all changes in one click.
You can also use @ to tag files, documentation, history, the browser, and other context — even dictate "@Levels.js" using WhisperFlow voice input. Tab autocomplete is still available, but as the presenter noted, very few people actually hand-type code anymore.
Rules, Skills, Plugins, and MCP
- Rules: Text constraints automatically injected every time an agent starts in that project — for example, "only use JavaScript, not TypeScript" or "no file should exceed 300 lines." The easiest way is to ask the agent to create them; it'll generate Markdown rule files inside the
.cursorfolder. - Skills: Reusable workflow specifications. Cursor ships with built-in skills like
automate,banner design, andcreate rule, and you can define custom ones and invoke them repeatedly via slash commands. - Plugins and MCP Servers: The plugin marketplace lets you connect to Slack, Figma, and more. Adding the GitHub MCP server is highly recommended — it lets Cursor execute commands directly on GitHub.
What is MCP? MCP (Model Context Protocol) is an open standard proposed by Anthropic in late 2024. Its goal is to let AI models connect to external tools and data sources in a unified way — think of it like the USB standard for hardware. Before MCP, every AI tool that wanted to integrate with GitHub, Slack, or a database had to build its own proprietary integration, which was expensive to maintain and incompatible across tools. MCP defines a communication format between "MCP servers" and "MCP clients," so any MCP-compatible AI client (like Cursor or Claude Desktop) can directly call any existing MCP server. The GitHub MCP server mentioned in this article is a classic example: once configured, Cursor's agent can directly create PRs, read Issues, and push code — without the user ever having to switch to a browser or terminal.
Side Chats and Automation
Side Chats are a clever new feature: while a main agent is running, you can select part of its output, add it to a side chat, and ask follow-up questions or request clarifications — all without interrupting the main agent.
Automation lets agents run automatically on a schedule (daily/hourly) or triggered by events (Slack messages, GitHub events, Sentry issues, etc.). It's ideal for handling frequently repeated tasks in real codebases.
Wrapping Up
The core shift in Cursor 3.0 is the move from "an editor with AI" to "an agent-centric development environment." For beginners, mastering this main thread is enough to get started: Create folder → Choose model → Plan Mode → Write a detailed prompt and let it ask questions → Review the plan → Build locally with parallel agents → Commit frequently with Git → Switch to IDE View for fine-grained edits. As you advance, gradually explore multi-model review, cloud execution, rules and skills, and automation. Cursor is fully capable of serving as a serious, production-grade engineering platform.
Related articles

How Big Can Stars Really Get? The Physical Limits of the Largest Stars
Red supergiants are the largest stars by volume, with radii up to 2,000 times the Sun, engulfing the inner solar system. But there is no precise upper limit on stellar size—models predict up to 15,000 solar radii. The most massive blue stars are far smaller than red supergiants—biggest and heaviest are two different things.

Apple HomeView Smart Display Full Feature Breakdown: Wall-Mount or Desktop, $299
Apple launches HomeView, a $299 smart display with wall-mount and desktop options, 12MP camera for facial recognition, smart home control, music playback, and recipe step-by-step cooking. Full breakdown of watch faces, apps, privacy, and cooking integration.

Where Did the Promised New Studio Go? Craft Computing Answers After Five Years
Craft Computing's host responds to viewer questions: the new studio promised five years ago was shelved as construction costs soared from $30,000 to $75,000, and was replaced by a 168-square-foot garage conversion.