DeepSeek Harness Installation Guide: Complete Step-by-Step Setup for Beginners

A beginner-friendly guide to installing and configuring DeepSeek's official Agent framework in three simple steps.
This guide walks complete beginners through installing DeepSeek Harness, the official Agent framework that gives DeepSeek models the ability to execute tasks autonomously. It covers using an AI coding assistant for one-click installation, configuring API Keys, choosing between multiple work modes, and creating a launch file for quick daily access — all without requiring any development experience.
DeepSeek Finally Gets Its "Hands and Feet"
DeepSeekAd has long been renowned for its powerful reasoning and language capabilities, but in the past it was more like a "brain" — able to think and answer, but unable to actually complete tasks on your behalf. With the release of DeepSeek Harness, that has completely changed. It's DeepSeek's official Agent framework, enabling the model to go beyond mere conversation and actually invoke tools, execute tasks, and get work done for you.
Agents are one of the most important development directions in AI today. Unlike traditional chatbots that can only passively answer questions, Agents possess autonomous planning, tool invocation, and environment awareness capabilities. They can break down a complex task into multiple sub-steps, sequentially calling search engines, code executors, file systems, and other external tools to accomplish objectives. OpenAI, Anthropic, Google, and other companies have all been intensively deploying Agent products throughout 2024-2025, marking a paradigm shift for large models from "answering questions" to "completing tasks." DeepSeek Harness is DeepSeek's important move in this wave.
In simple terms, DeepSeek Harness equips the model with "hands and feet." For developers and everyday users alike, this means you can hand off repetitive, multi-step operations to it for automatic completion. This article outlines the most beginner-friendly installation and usage workflow for DeepSeek Harness — even if you have zero development background, you can get started with ease.
It's worth noting that DeepSeek Harness is currently still in a developer preview stage, and both the interface and features may see significant updates going forward. Getting started now is the perfect time to familiarize yourself with the tool and gain an early advantage.
"Using an Agent to Install an Agent": The Smartest Installation Approach
Traditional software installation often requires users to visit official websites, open command lines, and configure environments — extremely unfriendly for beginners. The cleverest aspect of this tutorial is its "use an Agent to install an Agent" approach.
Here's how it works: first, open your everyday AI coding assistant, such as Warp or Codex, then send it a ready-made installation prompt. This AI assistant will automatically check your system configuration and prepare the runtime environment — no manual command-line tinkering required on your part.
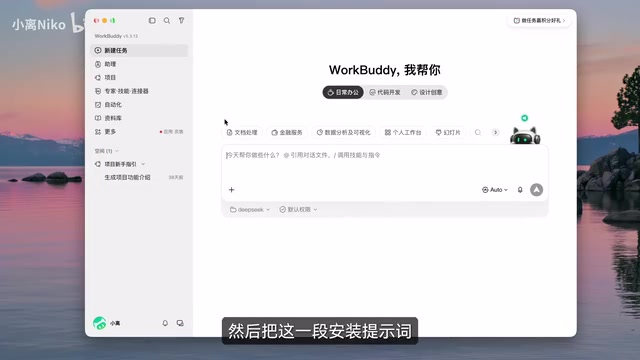
During this process, the only thing you need to do is confirm a few key options with the AI assistant: use npm for one-click execution, and install the program to the default folder. npm (Node Package Manager) is the most mainstream package management tool in the JavaScript ecosystem and one of the world's largest software registries, hosting over 2 million open-source packages. Through the npx command (npm's built-in package executor), users don't need to manually download and install software — a single command can directly run remote packages. This distribution method is very common among developer tools and greatly simplifies software installation and version management. After confirmation, the AI assistant will automatically complete all download and installation work. This approach "translates" complex command-line operations into natural language conversation, significantly lowering the installation barrier.
Why This Installation Method Is Better Suited for Beginners
For users without a development background, the biggest obstacle often isn't understanding concepts — it's feeling helpless when facing a terminal with white text on a black background. Using an existing AI assistant to complete the DeepSeek Harness installation essentially transforms the "technical barrier" into a "communication barrier" — as long as you can clearly express your needs, the AI handles the rest.
First-Time DeepSeek Harness Configuration: Entering Your API Key
After installation is complete, the AI assistant will return a local web address. Open it in your browser, and you'll officially enter the DeepSeek Harness interface.
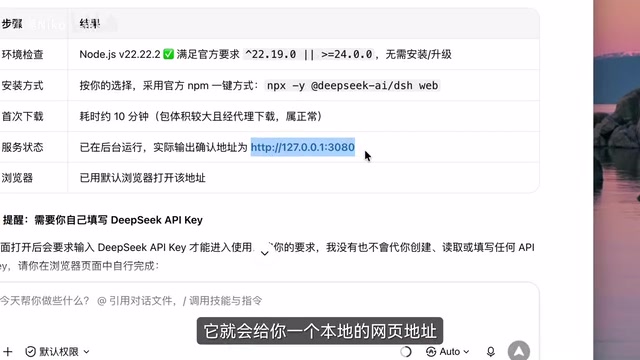
On your first visit, the system will ask you to enter a DeepSeek API Key. This is the credential that Harness uses to invoke DeepSeek's model capabilities. An API Key is an authentication mechanism widely used in cloud services and open platforms. When an application needs to call a remote model's inference capabilities, it attaches this key to the header of each request, allowing the server to identify the caller, track usage, and handle billing. DeepSeek's API uses a per-token billing model, charging based on the length of input and output text (a token roughly corresponds to one Chinese character or half an English word).
Getting one is simple: go to the DeepSeek Open Platform, register an account, and create an API Key in the dashboard. Once you fill it in and save, the configuration phase is complete.
An API Key is essentially a "key" — it determines both your access permissions and billing. If your key is leaked, others could impersonate you to make API calls, generating unexpected charges. Keep it safe, don't share it with others, and never write it into public code repositories.
Creating a New Project and Choosing Work Modes
Once configuration is complete, you can start truly using DeepSeek Harness. Create a new project in the interface, then hand your requirements to Harness and let it complete the work for you.
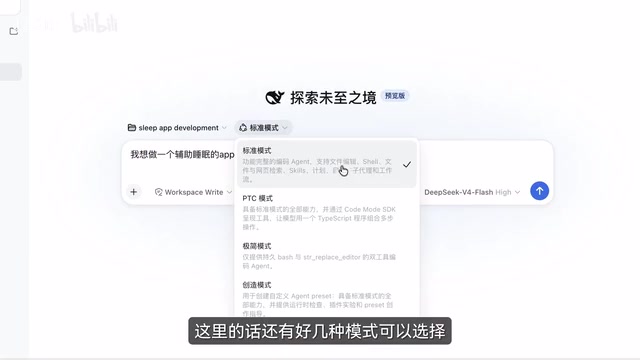
Notably, DeepSeek Harness offers multiple work modes to choose from. Different modes correspond to different task styles and execution strategies — some lean toward autonomous planning, while others favor step-by-step confirmation. Agent work modes typically form a spectrum between "autonomy" and "controllability." In fully autonomous mode, the Agent independently plans and executes all steps, suitable for highly standardized repetitive tasks. Step-by-step confirmation mode pauses at each critical decision point to await user approval, suitable for higher-risk scenarios or those requiring human judgment. This design draws from the Human-in-the-Loop philosophy, allowing users to flexibly choose their level of involvement based on their tolerance for errors in task outcomes.
For beginners, it's recommended to try each mode one by one and observe which best fits your actual work content.
This multi-mode design reflects an important trend in Agent tools: rather than pursuing a "one-size-fits-all" logic, it lets users flexibly switch execution methods based on the nature of tasks, striking a balance between automation and controllability.
Creating a One-Click Launch File: No More Repeated Configuration
Here's a common pitfall for beginners: after restarting your computer, you can't directly access DeepSeek Harness through the previous local address. That's because the local web service stops when you shut down, and needs to be restarted.
The technical reason behind this is: when DeepSeek Harness starts, it launches a lightweight web server on your machine (typically listening on a localhost port), and users access the graphical interface through their browser at that address. The advantage of this architecture is that data processing happens locally for better privacy, while leveraging the browser as the UI layer eliminates the need to install a separate desktop client. The downside is that the service process terminates when the system shuts down, requiring manual or scripted restart each time.
The solution is equally clever — once again, have your AI assistant generate a one-click launch file for you.
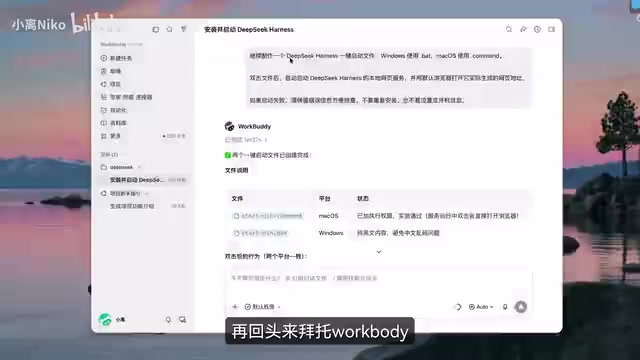
With this launch file (typically a .bat batch file on Windows, or a .command or .sh script on macOS), all you need to do after each boot is double-click once, and DeepSeek Harness's local service will automatically start up — eliminating the hassle of reconfiguring and manually launching every time. If you want to take it a step further, you can even add this launch file to your system's startup items for completely seamless startup. This little trick may seem simple, but it dramatically improves daily convenience and is the key step to truly integrating the tool into your workflow.
Summary: Three Steps to Complete DeepSeek Harness Installation
The launch of DeepSeek Harness marks an important leap for DeepSeek from a "conversational model" to an "action-capable agent." Through the workflow outlined in this article, even complete beginners can leverage existing AI assistants to complete installation, configuration, and begin using it within minutes.
The core installation approach can be summarized in three steps:
- Use an Agent to install an Agent: Leverage an AI coding assistant for one-click environment deployment
- Fill in your API Key: Obtain and configure it from the DeepSeek Open Platform
- Create a one-click launch file: Ensure quick access every time you boot up
Master these three steps, and you've essentially cleared all obstacles for getting started with DeepSeek Harness. Since Harness is still in developer preview, its future interface and features are worth keeping an eye on. While the ecosystem is still in its early stages, getting familiar with the tool's operational logic now will put you one step ahead when future updates arrive.
Related articles

Chain of Thought Isn't Just for AI: How Humans Can Use CoT to Improve Thinking Quality
Chain of Thought isn't just a prompt trick for large models. Starting from a Hacker News discussion, this article analyzes why CoT works for human thinking too, breaks down actionable ways to transfer it, and highlights the key differences between human CoT and machine CoT.
Cloudflare Teams Up with OpenAI: Closi…
Cloudflare Teams Up with OpenAI: Closing the Loop from Vulnerability Discovery to Defense with AI
Cloudflare uses OpenAI Daybreak to investigate security vulnerabilities and generate reviewable remediation plans, while developers use Codex to boost coding efficiency and quality.

Orca Multi-Agent Orchestration in Practice: A Guide to Parallel Collaboration with Claude and Codex
Orca is Stable AI's free open-source agent workbench supporting 34 agents like Claude Code and Codex in parallel. Learn its Git worktree isolation, multi-model orchestration, and mobile management.